

So you want to learn how to start a blog in 2026? That’s awesome! If you’re looking to a step-by-step guide guide for beginners on how to start a blog, you’re in the right place.
If you’re brand new to blogging, I know it can feel overwhelming fast. What platform do you use? How do you get traffic? And wait… what’s hosting again?
I’ve been there. I launched my first blog in 2016 with zero clue what I was doing — but over time, that little side project turned into a full-time business for me to make money online.
In this guide, I’m going to show you how you can do the same. You will learn how to start a blog in 6 easy steps. If you’re a complete beginner, don’t worry — I’ll break everything down for you step-by-step.
If you start now, your blog website will be online in about 30 minutes.
Click here to jump to the first step to start your blog now ↴
To make this guide to starting a blog today easy to follow, I’ve divided it into six parts you can walk through one by one:
How to start a blog (to make money) in 6 easy steps
In this guide, you will learn how to start a blog and make money online following these steps:
- Choose your blog topic and a name
- Get your blog online (web hosting and WordPress)
- Design your blog with a WordPress theme
- Write your first blog post
- Grow your blog traffic
- Make money online
All you need is a few moments of your time. And maybe a cup of coffee for a little extra boost.
Disclosure: Please note that this guide contains affiliate links to products I use and recommend. At no extra cost to you, I may receive a small commission for referring you. This helps me offer this guide free of charge for you and keep this blog up and running.
Save this post for later!
General FAQ: How to start a profitable blog in 2026 (without any experience)
While this guide is the first step to getting your blog started right now, my free 7-day email course breaks the entire process of starting a blog down into simple, actionable steps. It will help you go from zero to setting up your blog and learning how to write blog posts to growing your blog in just 1 week. I can’t recommend it enough.
If you want me to guide you through the simple 7-day process, let me know where to send your first lesson right away:
Step 1: Choose your topic and pick a name
So… what should you blog about?
This is the question that stops more beginner bloggers in their tracks than anything else. And I get it — choosing your blog topic feels like a big commitment. What if you pick the wrong one?
Let me reassure you:
You don’t need to find the “perfect” niche — there’s no such thing!
Instead, you want to find a topic you’re excited to explore for at least the next 12 to 24 months.
I didn’t pick the “perfect” niche right away, either. I started blogging just to share my journey learning web development, with zero clue where it would lead. But taking that first step was so worth it! I learned more in a few short weeks than I could have ever learned by taking blogging courses or watching tutorial videos.
Hence, the only way to become a successful blogger is to get as much hands-on experience with blogging as you can. The sooner you start, the faster you’ll learn how to build a stellar blog from scratch.
When you’re choosing your blog topic, remember these two things:
- You must be genuinely interested in your topic and show commitment. You will be spending a lot of time blogging, so make sure it’s something you enjoy.
- Your topic must help your readers and provide value to them. Your blog is not about you. It’s about your readers and your visitors who find your posts helpful, useful, and valuable. If you want to start a profitable blog, the only way to make money from your blog is to help others by sharing what you know.

Not quite sure what to blog about yet? No problem! There are a couple of easy and quick ways to find a good blog topic. Let’s have a look:
3 quick questions to find the right blog niche for you
If you’re feeling overwhelmed, use these questions to gain clarity:
- What do people already ask you for advice about?
Think about what friends or coworkers turn to you for help with. - What’s something you could talk about all day and never get bored?
That’s your zone of interest — super important when you’re writing every week. - What topic do you enjoy learning about and improving at, even if you’re not an expert (yet)?
You don’t need to be the #1 expert — just a helpful guide on the journey.
You don’t have to lock in a “forever niche” right now. Just pick something that feels like a good fit for this season of your life.
Still unsure? Here’s a shortcut: Explore my full list of profitable blog niche ideas
(I created that post specifically for beginners who feel stuck.)
Make it profitable + personal
If your goal is to earn income from blogging (and I’m guessing it is), your blog niche should ideally sit at the intersection of:
- Something you like talking about
- Something other people search for online
- Something people spend money on
That’s the sweet spot where creativity and opportunity meet.

My tip for choosing your blog topic
Try not to overanalyze things when choosing your topic.
Beginner bloggers often get stuck in analysis paralysis. They overthink to the point where they feel so insecure about the whole thing that they just give up and forget about blogging altogether.
Don’t be one of them!
Pick a topic you enjoy talking about, get your blog online, and start creating content by putting your heart into every blog post you create.
Ok, so you got your topic sorted? Great! Next, it’s time to choose a name for your blog.
How to choose a name for your blog?
Once you’ve found the perfect blog topic, it’s time to choose a name for your blog.
It’s the first thing your readers see when they visit your blog, right? Therefore, think about the name from your readers’ perspective. Can they tell what your blog is about just by reading the name?
For example, I chose to name my blog “Blogging Explorer”. Clearly, this blog is about blogging. And it’s about discovering practical ways to start a successful blog from scratch.
That being said, your blog name should be:
- Unique and clear:
Choose a name that you can relate to and that your readers can understand. If you blog about food, for example, try to include a food-related word into your blog name. - Descriptive:
Your blog name should tell your readers what your blog is about the first time they see it. - Easy to spell:
Choose a name that is easy to write and spell. My rule of thumb is: you should be able to tell it to someone at the coffee shop without them having to ask how it’s spelled. Chances are that they will look for it on Google, so they need to be able to type the name of your blog correctly.
Brainstorm 3–5 name ideas right now.
Next, you need to choose a domain name extension. The most preferred domain extension is “.com”. Also, “.org” and “.net” are popular.
If you want to write for readers in a specific country, consider choosing a country or language specific domain extension like “.fr” for a French blog or “.de” for a blog in German.
Now that you have some name ideas and a domain extension chosen, it’s time to get your blog online.
This might seem a bit scary or technical, which is why the step-by-step guide below will walk you through every step to make things easy for you. It’s easier than you think.
Step 2: Get your blog online (Blog hosting + WordPress setup)
The second step in starting a blog is getting your blog online. That’s what a web hosting company will do for you.
In this step, you’ll select the web hosting plan and the blogging platform you’ll use to get your blog online.
Don’t worry if you’ve never set up a website before. I’ll walk you through the exact steps (with screenshots) so you’ll be online and ready to go in the next 15–20 minutes.
The combination of web hosting and the WordPress blogging platform I use (and that most other bloggers use) is a WordPress blog hosted by Bluehost. This combination is what we’ll be using to start your blog.
WordPress is a free publishing platform that’s been around since 2003 and now powers more than 60% of all blogs worldwide.
Bluehost is one of the most established, reliable companies available for blog hosting. Since 2005, WordPress recommends Bluehost because of their customer service and expertise, too.
I’ve used Bluehost myself since 2016 and still recommend them to this day. They’re beginner-friendly, affordable, and their WordPress setup is 100% automatic. Plus, you’ll get a free domain name, which saves you money right from the start.
Click here to get to Bluehost and hit the ‘Get Started Now’ button:

👉 Start your blog with Bluehost (get a free domain + discount)
Choose your blog hosting plan
Next, you’ll select your hosting plan. I recommend starting with the most affordable option. You can upgrade to a higher-tier plan in the future if you need to.
When you’re just starting out, the Basic plan is perfect. It includes everything you need. Click the blue “Choose Plan” button to select your hosting plan:

Choose your blog’s domain name
Next, you’ll be prompted to choose your blog’s domain name or choose your domain later:

Simply type in the domain name that you’d like your blog to have (mine is bloggingexplorer.com).
Choose a name that’s short, clear, and easy to remember. You can use your name, a descriptive phrase, or something creative — just make sure it aligns with your blog topic.
If your domain name of choice isn’t available, Bluehost will automatically suggest similar domain names for you to consider:
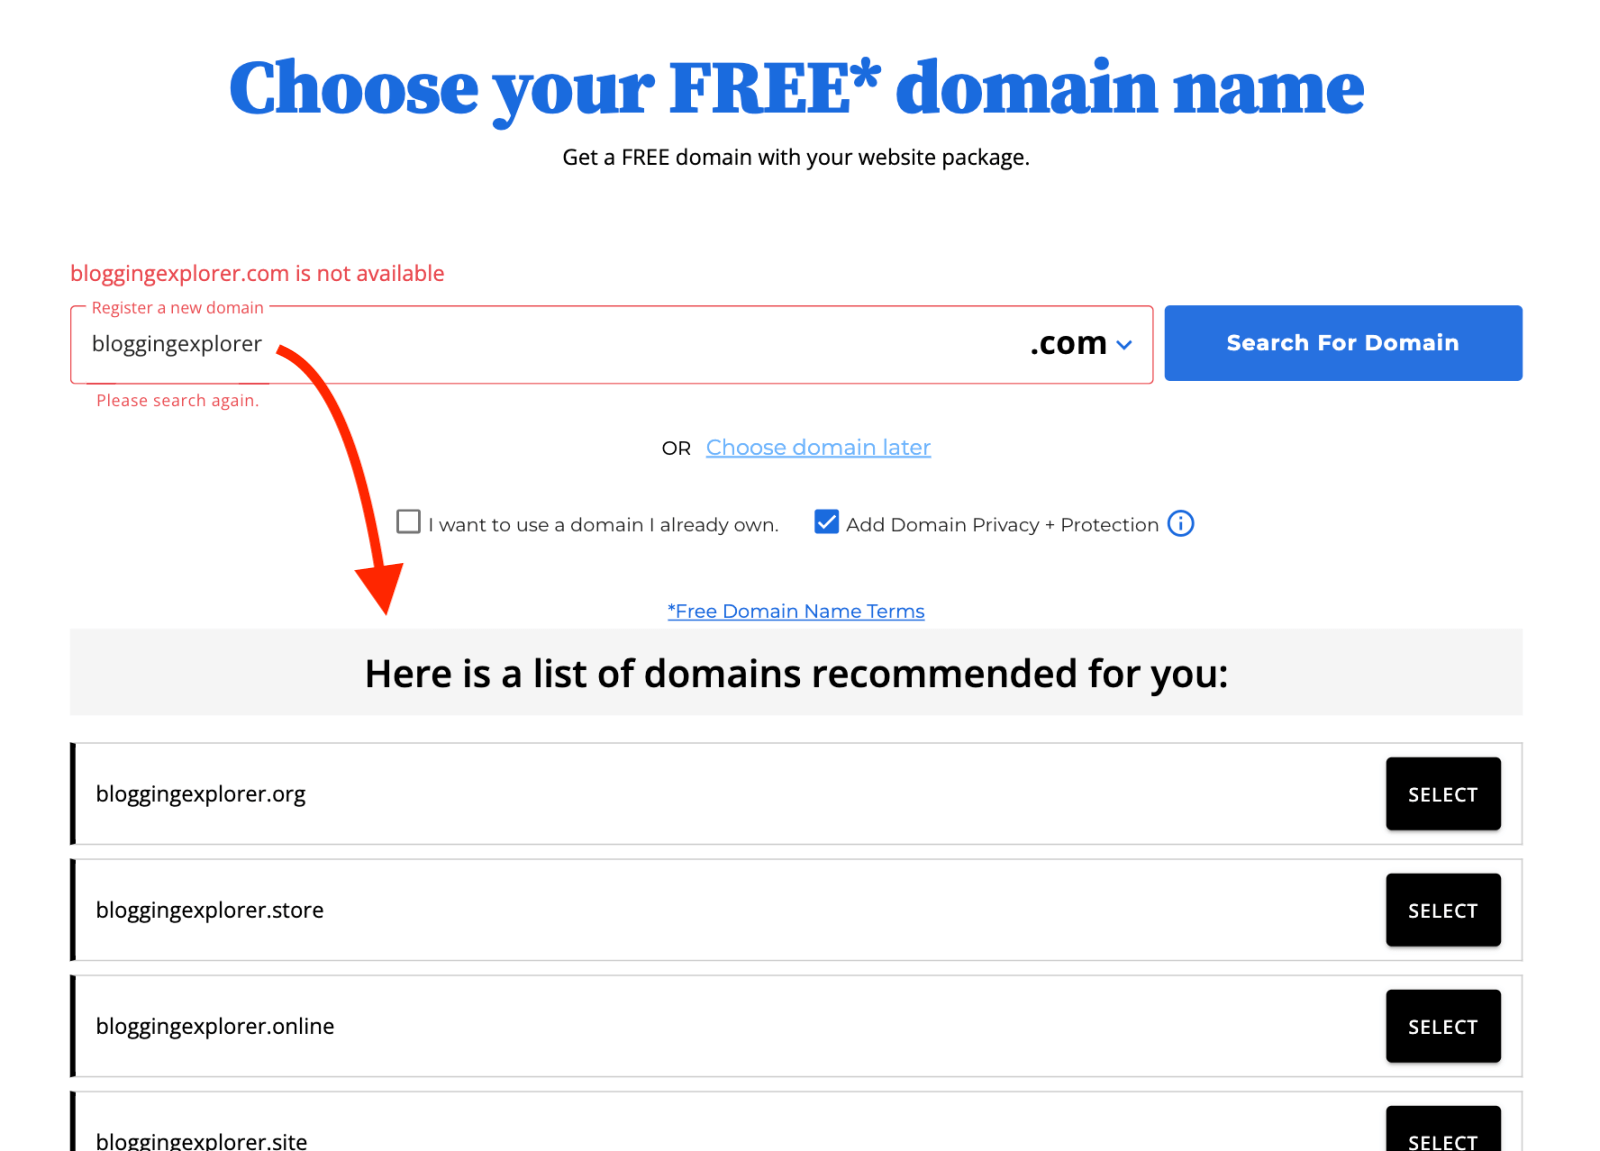
If you’re still not sure which domain name to choose, select the option to choose your domain name later. You’ll find the link for this right below the domain name field. Once you’ve set up your Bluehost account, you can take some time to brainstorm name ideas.
Check your cart
Next, double-check the items in your cart and click “Continue to Checkout”:

Remember to choose your plan duration based on which price you want to secure and how far in advance you want to pay (either 12 or 36 months in advance).
I recommend picking one of the longer plans if you want to lock in the lowest price for your blog hosting. I started with the 36-month option. It gives you the blog hosting at the lowest possible rate for the next 3 years.
Keep in mind that the low pricing only applies to new customers and the first payment you make. If you choose a shorter plan, your pricing may go up after the first year.
Choose a plan that suits your budget. If you’re ready to commit to starting a blog to make money, it’s a good idea to opt for a long-term package.
Please note: Bluehost will automatically add “Domain Privacy + Protection” to your cart. This will protect your personal information (your full name, email address, phone number and home address) from being published anywhere online. I like this extra, but you can remove it from your cart if it’s not important to you. No need to select any other extra services for now — keep it simple and budget-friendly.
Fill in your account details
On the checkout page, start by filling in your Contact Information like name, email address (use your primary email address, because that is where your login details will be sent), and address:

Choose your Bluehost password
Further below, choose your password for your Bluehost account (you will use this password to log into your Bluehost dashboard):

Choose your payment method + Submit payment
After selecting your password, choose your desired payment method, enter your payment details, read through the terms, and click “Submit Payment”:

The total price you see is the amount you’ll pay now. But keep in mind: you won’t have to pay again for 1 to 3 years, depending on the plan duration you chose earlier. Also, remember that Bluehost offers a full 30-day money-back-guarantee in case things don’t work out as you planned for your blog.
Congratulations! Once your payment is processed, you’re officially a happy member of the Bluehost community with your very own web hosting plan.
Take a deep breath, pat yourself on the back, and grab a coffee. This is a BIG step.
Please note: You will receive an email from Bluehost with your receipt and your account details like your username and password for logging in to your Bluehost dashboard. Make sure to save that email.
Access your Bluehost account dashboard
After checkout, you will be taken to your Bluehost account dashboard. Here you can manage your hosting plan, domain names, billing details, and more:

Now is a good time to bookmark your Bluehost dashboard page in your browser so you can find it quickly any time.
Log into your WordPress dashboard
Once Bluehost installs WordPress for you (which happens automatically), you’ll be able to log into your blog right away.
Here’s how:
- Go to your Bluehost My Account area
- Enter your credentials to log in (you chose your password during the sign-up)
- Click “Websites” in the menu
- Find your blog, then click “Edit Site”

This will take you directly into your WordPress dashboard that looks like this:

You will use your WordPress dashboard for managing your blog’s pages, posts, design, and much more. Bookmark this page!
The dashboard has a lot going on, so take a few moments to get your bearings.
The left-hand side menu is your main navigation. You will use it to manage the most important parts of your blog:
- Posts
- Media
- Pages
- Comments
- Appearance
- Plugins
- Settings
Familiarize yourself with the admin area of your WordPress blog step-by-step. You’ll spend a lot of time here and gradually build a deeper understanding of how WordPress works. You will also quickly learn how to change the appearance of your blog and add new features like contact forms or social media sharing buttons.
Access your WordPress dashboard via your domain name
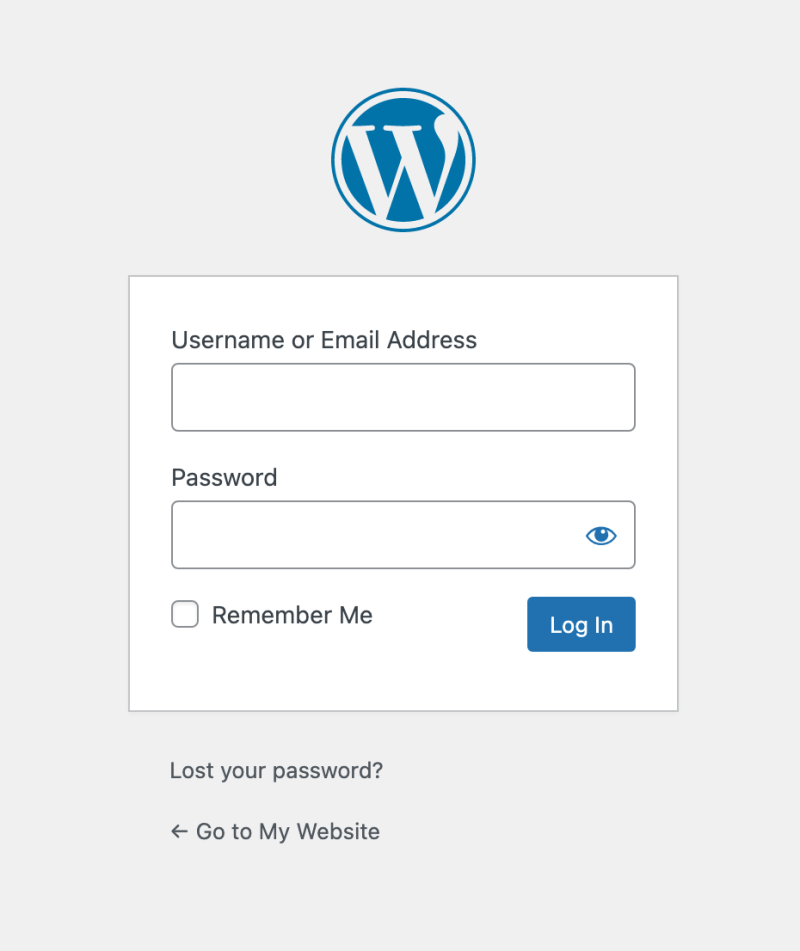
As we saw above, you can access your WordPress dashboard via your Bluehost account. But you can also log into your WordPress blog website directly by using your domain name.
The default login URL is your domain name with “/wp-admin” added to the end of it.
For example, if your domain name is myblog.com, your login URL is “myblog.com/wp-admin”.
To log in, enter your WordPress username and password, and click Log In:
Next, we’ll customize your blog and make it look amazing (no coding needed).
The best 2 blog hosting alternatives for you
I personally recommend Bluehost for starting a blog. It’s the hosting provider I started my first blog with, and it’s still my go-to for most new blogs. It’s affordable, beginner-friendly, and comes with a free domain name + 1-click WordPress install.
But depending on your budget or goals, here are two other hosting options to consider:
- Hostinger — Best for Bloggers on a Budget: Hostinger is one of the most affordable hosting providers out there. They even let you pay monthly, which is rare — and ideal if you’re not ready to commit to a 12-month hosting plan just yet.
- Kinsta — Best for Page Speed and Performance: If you’re serious about performance, SEO, and top-tier support, Kinsta is hands-down one of the best managed WordPress hosts available. It’s a bit more premium in price, but their page speed and infrastructure are absolutely top-notch.
Step 3: Customize your WordPress blog
You’ve finished the technical part of starting a blog, congrats! Now it’s time to have some fun and customize your WordPress blog to look amazing.
In WordPress, the templates that determine how your blog will look like are called “Themes”. Your WordPress theme controls the entire design and layout of your blog.
When you are new to blogging, I recommend sticking to free WordPress themes in the beginning. Learning how to use a premium theme may feel overwhelming at this point, and you don’t want any distractions right now.
Once your traffic grows and you’ve published a handful of blog posts, you can consider investing in a paid premium theme.
So right now, your top priority is to write awesome blog posts to bring visitors to your blog.
How to choose a WordPress theme for your blog
When you start a blog following the steps above, your WordPress website comes with a few pre-installed default themes. Hence, your site already looks great, so you can simply leave it as it is. You can always come back and switch to another theme later.
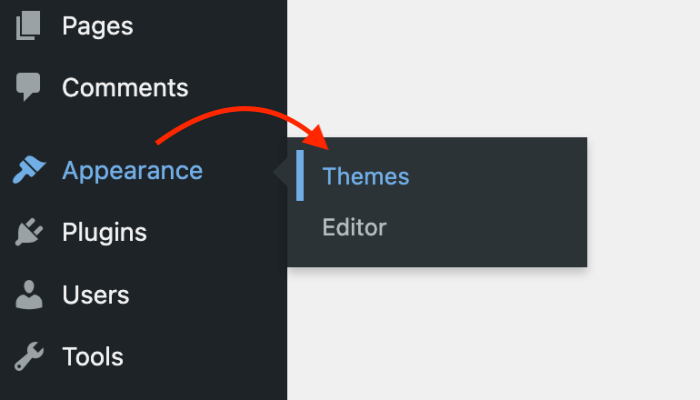
To pick a free theme, head over to Appearance > Themes > Add New > Popular:
You want a WordPress theme that’s beginner-friendly, clean and clear, and easy to set up. Right now, you want to avoid advanced-level themes with too many bells and whistles.
I recommend Astra with the powerful Elementor page builder. They are easy to use, load super fast, and your blog will look stunning without any customization. With both tools you have the option to upgrade to an premium version in the future.
I use Astra and Elementor for this website — just in case you want a similar, easy setup for your blog.
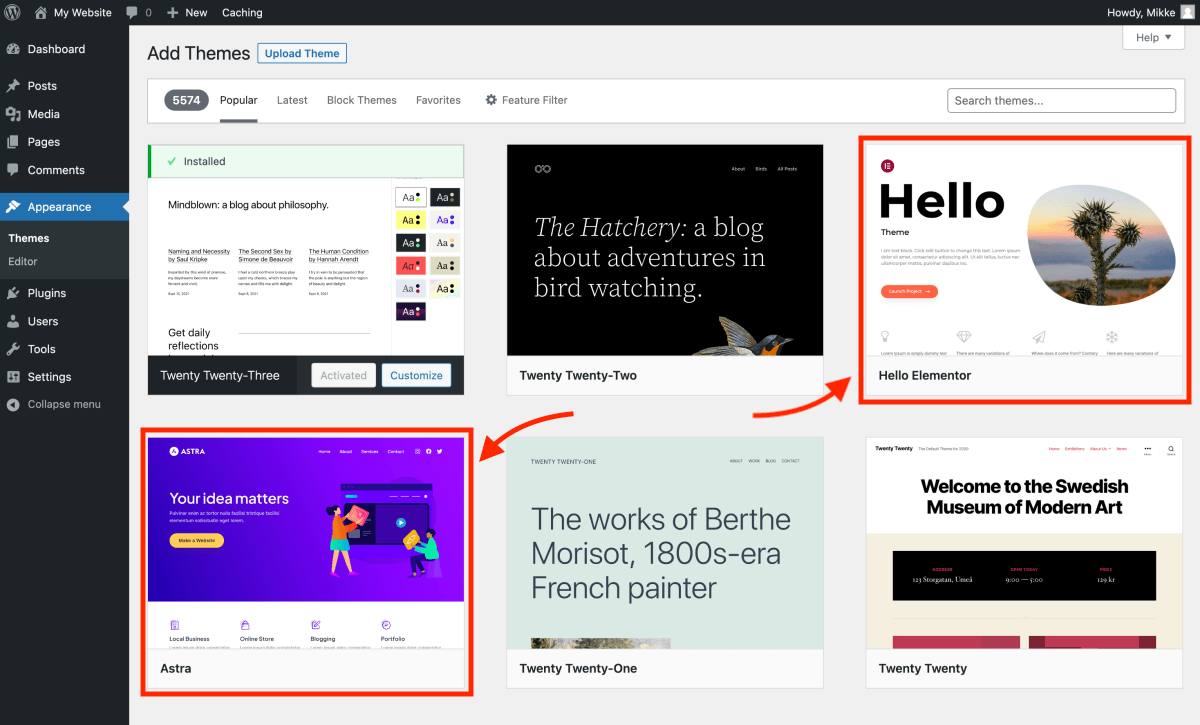
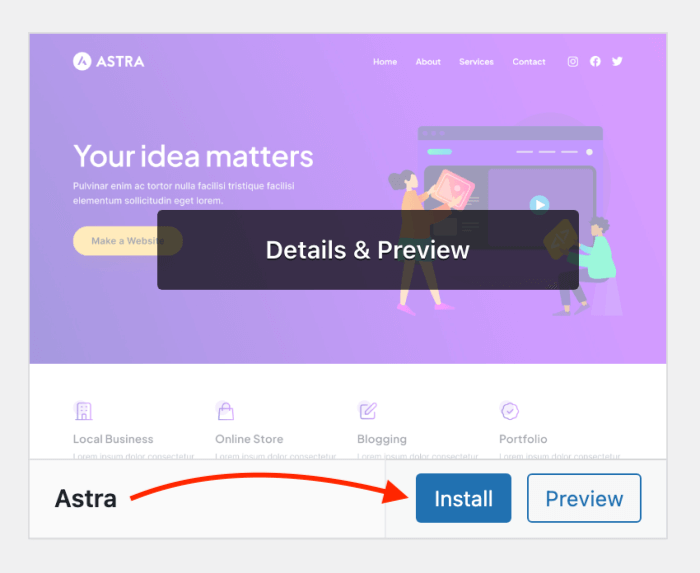
Hover over a theme you like and click Install:
Once the installation is complete, click Activate:
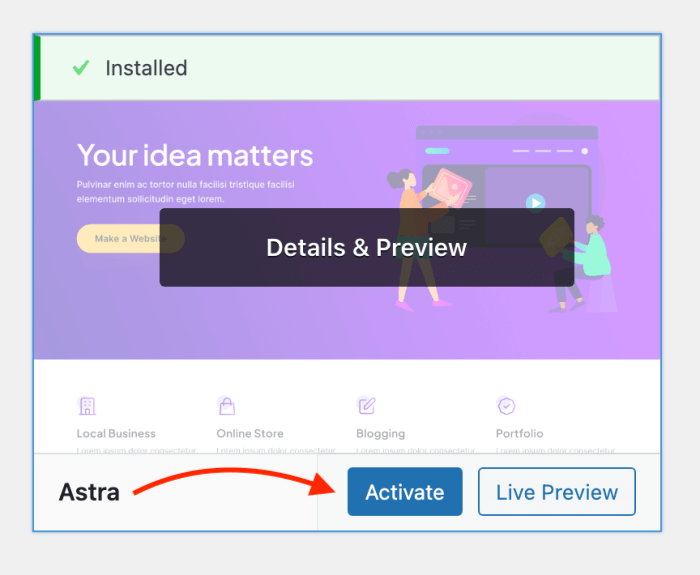
And that, my friend, is how you install a WordPress theme for your new blog!
Now you can admire the new look of your WordPress blog. Hover your mouse over the name of your blog in the upper left corner of the screen and click on Visit site to see the newly-designed start page of your blog:
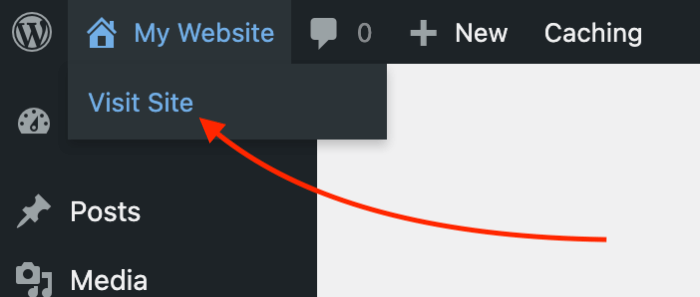
Congratulations! You just changed the design of your WordPress blog like a pro!
Once you’ve selected and installed a theme, it’s time to look at customizing your WordPress blog even further with WordPress plugins. Whereas themes allow you to change the design of your blog, plugins add new features and functionalities to it.
7 must-have WordPress plugins for your blog (install them right away)
WordPress plugins are a crucial part of starting a blog and adding important features. Plugins make your life easier, help your readers enjoy your blog even more, and improve your search engine rankings.
But a word of warning: Installing WordPress plugins blindly can cause all sorts of problems for your blog. Only use plugins that are 100% necessary. “Nice-to-have” plugins are usually a bad idea.
To help you find the right plugins and avoid problems, here are the most crucial WordPress plugins to install when you start a blog:
- Yoast SEO: The more visitors you get, the better chances you have at building a successful blog that makes money. The Yoast SEO plugin helps you optimize your content so that search engines can find your blog and display your content to your target audience in their search results.
- UpdraftPlus: Sometimes things can go wrong and you may need to restore a backup of your blog to fix things. UpdraftPlus is the best free WordPress backup plugin that allows you to save your work and restore a past version of your blog when needed. I know most bloggers don’t even think about backing up their work, but you’ll be glad you installed this plugin.
- Elementor: Elementor is a powerful page builder tool that allows you to customize your blog design and build beautiful page templates for your blog posts. I use Elementor for most of my website projects these days and I can’t recommend it enough. It’s one of the most popular WordPress plugins worldwide – for a good reason.
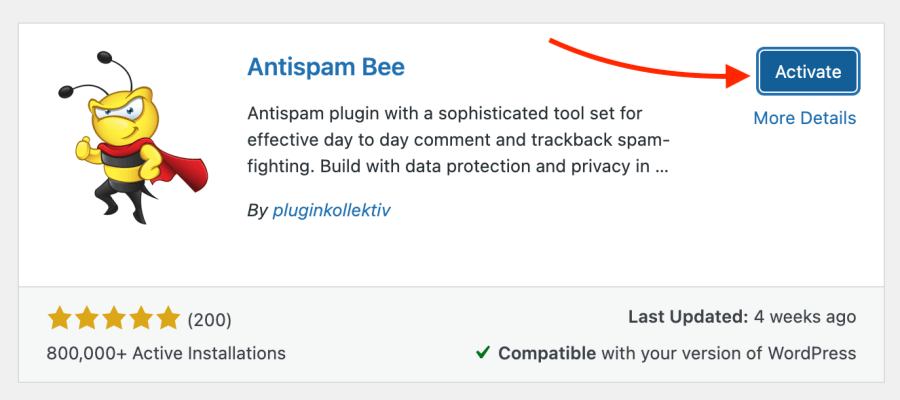
- Antispam Bee: Antispam Bee is the best free anti-spam plugin for WordPress. It filters out and blocks all spam comments for you. This plugin saves you heaps of time and helps you keep your blog clean.
- Insert Headers and Footers: Sometimes you need to add custom code snippets to your blog. For example, if you want to track your visitors, you need to embed a snippet from a tracking tool like Google Analytics. Insert Headers and Footers allows you to do just that – within seconds.
- WP Rocket: Fast-loading websites rank higher on Google and generate more free traffic. WP Rocket is a plugin that speeds up your website by caching your blog pages, reducing your file sizes, and much more.
- Email Address Encoder: Chances are you want to publish your email address on your Contact page to help your readers get in touch with you. Unfortunately, spammers will soon find that address and your inbox will be flooded with spam emails. The Email Address Encoder plugin encodes your email address so that bots can’t find, harvest, and use it for spamming.
How to install a WordPress plugin: Step-by-step guide
The easiest way to install a WordPress plugin is through your WordPress dashboard. To get started, make sure you’re logged into your WordPress blog and follow these steps:
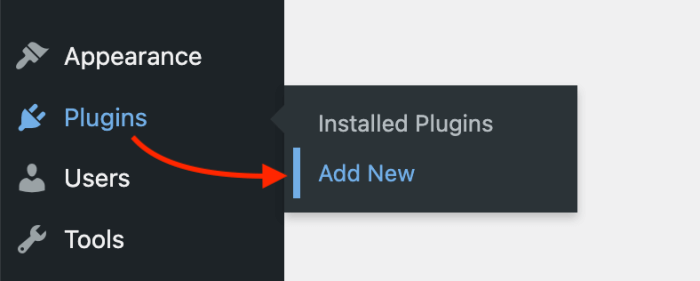
Step 1: Head over to Plugins > Add New
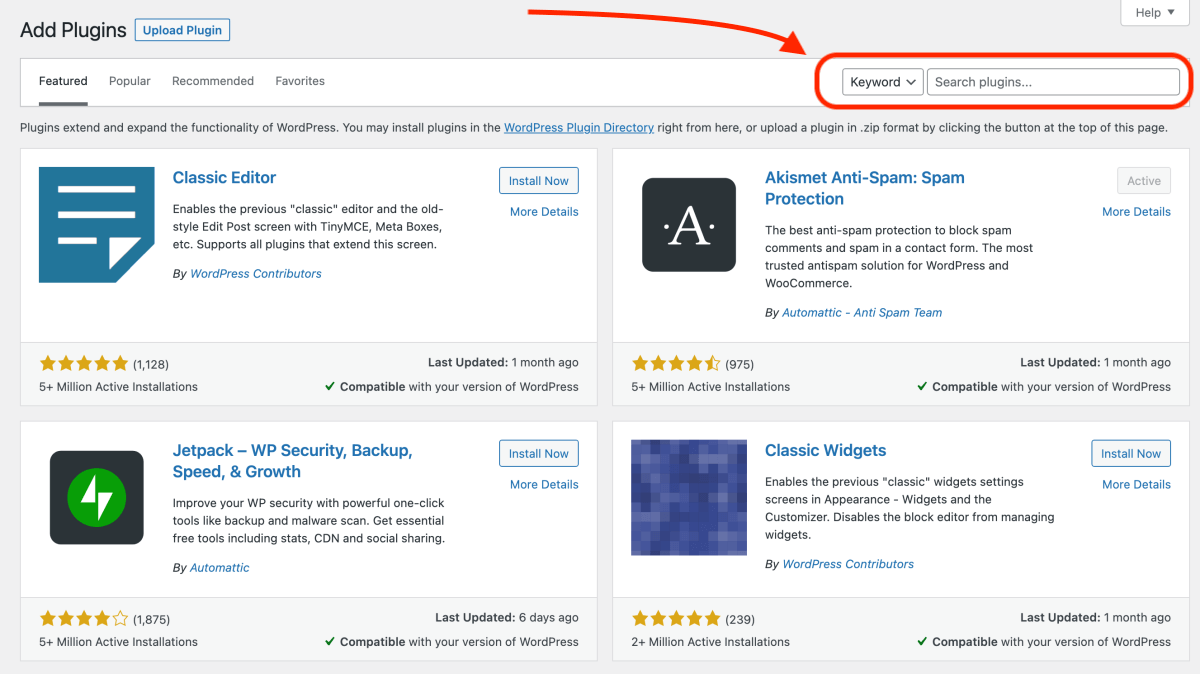
Step 2: Search for the WordPress plugin you need
In your WordPress plugin directory, use the search field at the top right to find the plugin you want to install:
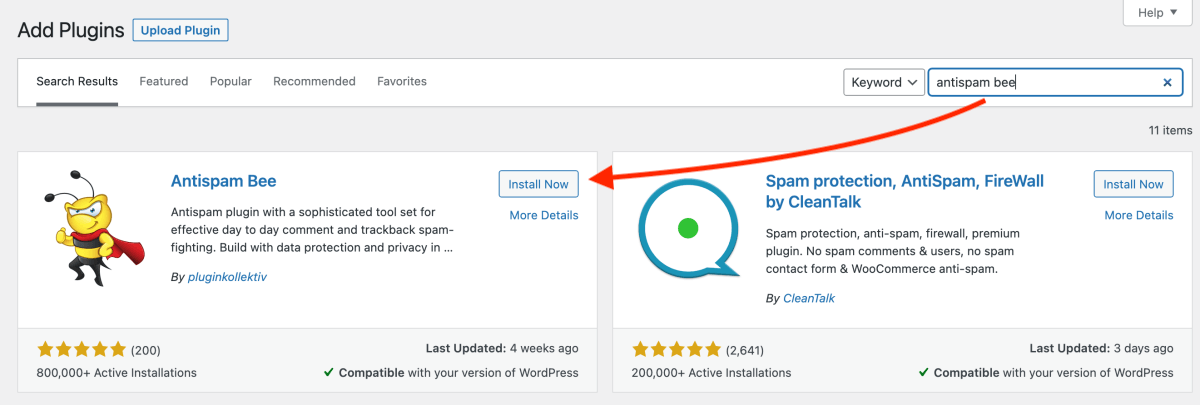
Step 3: Click Install Now
When you’ve found the WordPress plugin you want to install, click the Install Now button:
Step 4: Click Activate
Once the installation is complete, activate the WordPress plugin by clicking Activate:
Once the plugin has been installed and activated, you can start using it right away.
How to create an About page for your blog
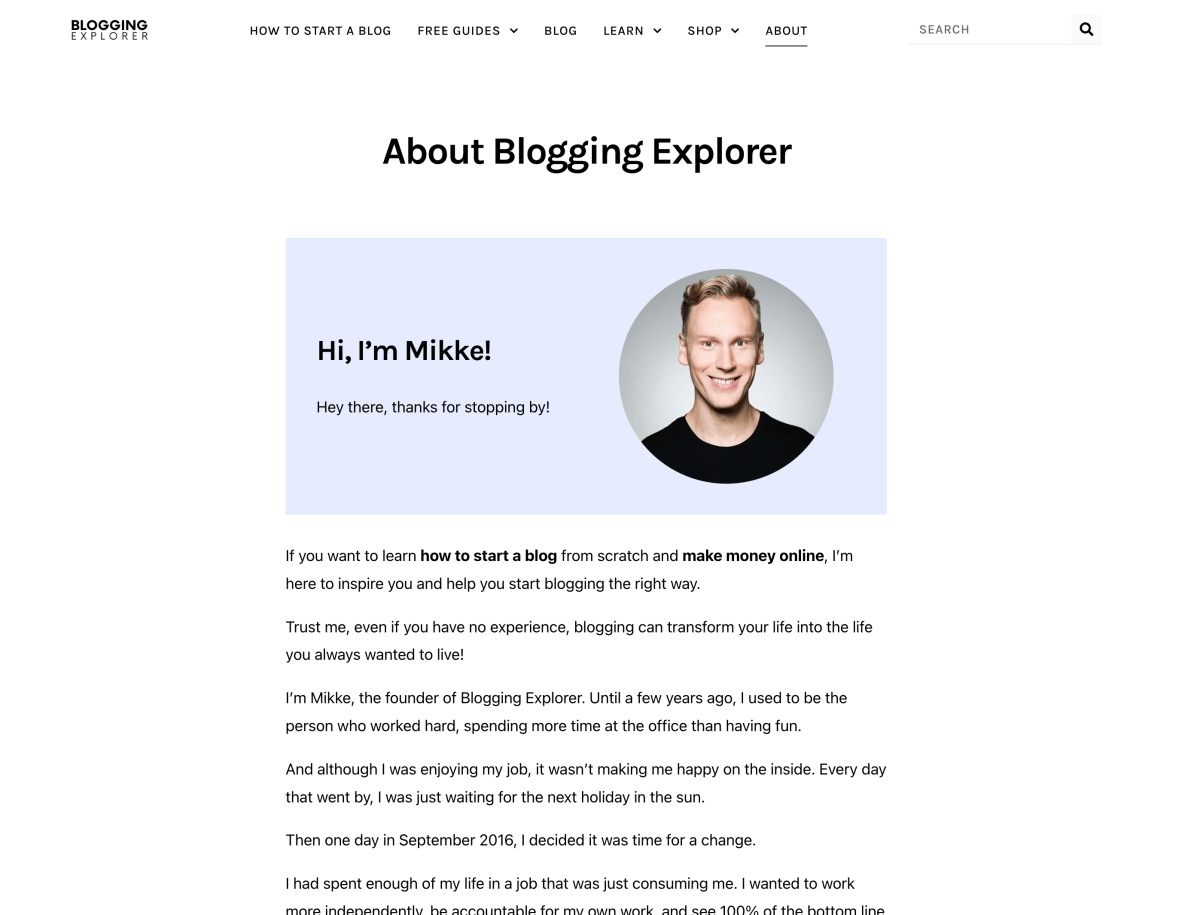
As soon as you start a blog, you want to create an About page for your blog where you showcase some basic information about yourself. This includes who you are, why people should listen to you, and how they can reach you for queries or collaborations.
Your About page is like your blog’s introduction. It’s where you introduce yourself to your readers and showcase your expertise, personality, and purpose for creating your blog.
When you are new to blogging, writing a great About page can feel difficult and daunting. To help you get started, here’s a step-by-step guide on how you can create an About page that achieves these objectives for your blog.
- Introduce yourself: Start by introducing yourself and give a brief background of who you are. Your name, where you’re from, and what inspired you to start a blog.
- Share your mission statement: Let your readers know the purpose of your blog. What topics will you cover? Who is your target audience? What do you hope to achieve with your blog?
- Highlight your expertise: Share your credentials and qualifications that make you an authority in your niche. If you don’t have any formal qualifications, explain why you’re passionate about your topic and how you’ve gained knowledge through personal experience.
- Share personal details: Make your blog personal by sharing a little about your personal life. Talk about your family, hobbies, or anything else that gives readers a glimpse into your life.
- Showcase your personality: Let your readers get to know your personality. Are you funny? Sarcastic? Compassionate? Showcase your personality through your writing style.
- Include a photo: Use high-quality photo of yourself to make your about page more visually appealing. This also helps readers put a face to the name. You don’t need a professional headshot for this. Use your phone, make sure the lighting is good, and ask a friend to take your photo.
- Provide contact information: Make it easy for your readers to get in touch with you. Add your email address on your about page or create a simpel contact form with Elementor or the Contact Form 7 plugin, for example.
- End with a call-to-action: Finally, encourage your readers to take action. Share links to your best content or ask them to follow you on social media, or getting in touch with you.
Remember, your About page is your chance to make a great first impression and connect with your readers. Keep it engaging, informative, and personal to set the tone for your blog. Don’t overthink it – just follow the steps above and you’re all set!
Want to write a stellar About page right now? I created a complete guide on how to write an about me page for your blog step-by-step — I know you’ll find it helpful.
Step 4: Write your first blog post
Why do you read a blog?
You don’t read a blog because it looks nice.
You read a blog because you care about what it says. You are interested in the content.
Creating high-quality content is what will bring you readers, allowing you eventually to earn money blogging.
Now, I know you may be thinking:
“But wait… I’m not sure what my blog should be about yet.”
If that’s you, take a deep breath. You’re not alone — this is super common.
And I get it. Choosing your blog topic and niche can feel like this giant, life-defining decision. Like you’re tattooing your future blog topic onto your forehead.
But here’s the truth I wish someone told me earlier:
👉 You don’t have to get it perfect from day one.
Most successful bloggers evolve their niche over time. And that’s totally okay. You’re not locking yourself into a lifelong commitment here — you’re just picking a starting point.
And I’m going to help you find one that works for you.
Before you start planning your content calendar and writing your first blog post, you need to answer one simple question: Why?
- Why did you choose your blog topic?
- Why do you care for it?
- Why should other people read your articles?
- Why is this a blogging topic you can add value to?
Take time to answer these questions. Remember what made you want to start a blog in the first place. Again: Why?
I always emphasize the importance of picking a clear niche. It helps you focus, keeps you motivated, and makes it easier to monetize your content. For some quick inspiration, check out my full list of profitable niches to blog about.
What should you write about?
To help you find a topic you are interested in, here are a few helpful questions:
- What is your favorite topic to talk about with your friends or family?
- What do you enjoy doing the most in life?
- When you have the feeling that time is just flying by, what are you doing?
- What do you do in your free time? What are your hobbies?
- What topics do you know a lot about?
- What do you enjoy learning about the most?
And finally, my favorite question:
- What’s the one thing you just can’t shut up about?
Don’t get too hung up on finding the perfect topic right away. Take some time to brainstorm ideas – the more ideas you find, the better.
Remember: You must solve a real problem for readers
If you want to make money with your blog, you’ll also want to do some quick research to see if there is a market demand for your niche. You want to find out if people are actively searching for what you’re writing about.
The only way to create a business from your blog is to solve a real problem for people. To do this, you need to understand who your blog target audience are. Once you know their pain points, you can start creating helpful content that answers their questions and make their lives easier.
More importantly, your blog has to add something new to the internet. Chances are that you will blog about something that’s already been covered online. To stand out, your content must add to what’s already there. Make it personal and share you own, unique experience!
How to come up with blog post ideas?
Try these methods to generate some unique blog post ideas:
- Brainstorm blog topics: Start with 5 minutes and write down as many ideas and keywords as you can. Think about your target audience: What problems are they struggling with? What questions are they asking?
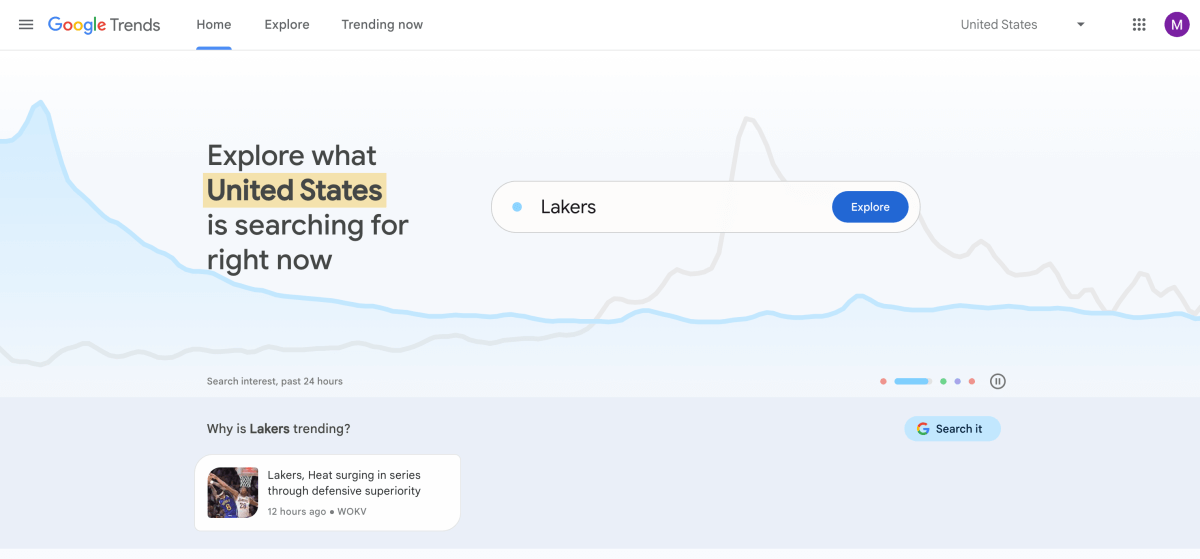
- Use a keyword tool for more ideas: Gather additional ideas using free keyword tools like Moz, WordStream, or Google Trends. These tools show you how much traffic specific keywords are getting, i.e. how much market demand there is.
- Gather your ideas in a spreadsheet: Time to put all your ideas together and prioritize. Low-competition keywords are great to start with when your blog is new.
For even more ideas and inspiration, I use these tactics:
- Find my most successful blog posts to see what readers love.
- Seeing what other bloggers in my niche are doing (and how they’re doing it).
- Repurposing old content into roundup posts.
- Looking back at past mistakes and sharing my takeaways and lessons learned.
By this point, I’ve usually filled up my content calendar for at least a few months.
Need more ideas? Here are 14 quick ways to find blog post ideas.
How to write your first blog post in WordPress
Once you’ve decided on the first blog post you want to write, navigate to Posts > Add New in your WordPress dashboard:
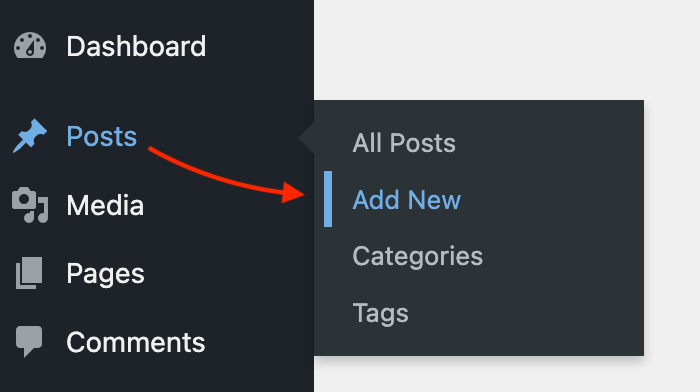
This will take you to the blog editor (also known as the Gutenberg editor):

Write a blog post headline that attracts readers
Let’s start at the top, where you see a field for the post title:
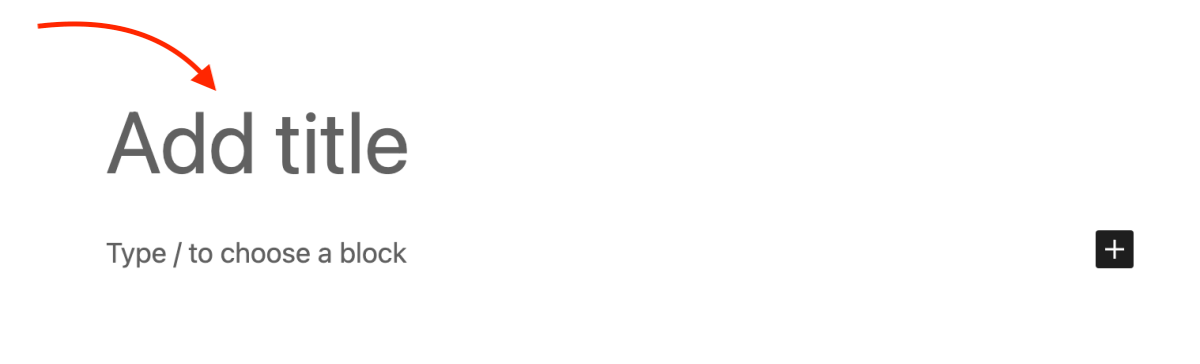
The only reason people visit your blog is because they see an intriguing blog post headline, right?
Thus, you want to put some effort into learning how to write enticing, catchy headlines and – even more importantly – deliver what your headline promises.
Start by doing some research in your niche. Browse through other bloggers’ headlines and pay attention to these key points:
- Do they often include numbers?
- How many headlines start with “how to”?
- Do they capitalize the first letter of every word?
- What benefit words do you see, e.g. “easy”, “quick”, “instant”, “proven”?
- How many article headlines include parentheses?
Feel free to peruse my blog archives to see how I structure my blog post headlines.
Also, remember that you can adjust your headline in the future. For example, if you’re writing a blog post about the “best women’s summer yoga pants in 2026”, you should update the guide for 2027 and change the headline accordingly.
If you’re not 100% sure about your headline, head over to Google and search for your target keyword phrase. It’s perfectly OK to gather some inspiration from others in your niche, as long as you’re not copying their ideas.
Finally, use the free AIOSEO Headline Analyzer Tool to craft the perfect headline easily. Just enter your title into the field and click Analyze to see tips to improve it:

Choose an SEO-friendly blog post URL (aka permalink)
Your blog post URL (or permalink) should always include the main keyword for your blog post.
Since you should only write one article for each target keyword phrase in your niche, you don’t have to worry about having duplicate permalinks.
Permalinks should be as easy to remember and read as possible. Consider using just your target keyword phrase as the permalink.
When you’re done writing your article and you’re ready to publish it, you can change the permalink in the Post settings:

Write a compelling blog post introduction
Once you have a rough outline for your blog post title, you should think about your introduction next.
Some bloggers like to write their introduction first, while others prefer to write it once they’re done with the actual body of their post.
Try both methods and see what suits you best. I suggest writing at least a rough outline for your intro before starting with your body.
Remember: Your blog post needs to solve a problem for your readers. Therefore, you should promise a solution in the introduction. Once you have a draft for your intro, it’s much easier to stay focused on that solution while writing your article.
So how do you write the perfect introduction, then?
One simple solution I’ve discovered so far is the Agree-Promise-Preview (or APP) formula. With the APP method, you divide your introduction into three blocks:
- Agree: Start with an idea your readers will agree with. Show them you understand what they’re struggling with.
- Promise: Paint a pretty picture of how your blog post can make their lives easier. Tell them how their world will be a better place when they keep reading and use your solution.
- Preview: Show your readers what they’ll get from your article. Use exact numbers or figures if possible and tell them what they can achieve after reading your post.
The quicker you catch your reader’s attention by establishing trust and relevance, the more likely they will stick around and share it with others.
Optimize the layout of your blog post (for readability)
People have short attention spans. If they can’t find what they’re looking for or if your blog post is one endless paragraph of text, they won’t keep reading.
Hence, design and layout matter just as much as your blog post content itself.
Since this is your first blog post, it may feel difficult to know how to format your content.
Luckily, there are a few design and layout guidelines you can follow. It all boils down to making your blog post as easy to read and skim through as possible.
Here are a few key rules for structuring the perfect blog post layout:
- Make your blog posts easy to read:
Keep your colors, fonts, and layouts simple. Avoid distractions and make the reading experience as enjoyable as possible. Your font size should be at least 16px. Use plenty of white space and keep your paragraphs short. - Break up your text:
Use headings to structure your blog post and lists to improve readability. If you can, use relevant images to break up the flow of your text. - Use bolding and italics sparingly:
Highlighting and emphasizing key parts is easy with bolding and italics. Only use them for extremely important words or phrases – less is more.
Proofread and check your grammar
The hard part is over now! You’ve finished writing, and we’re almost ready to publish.
But first, let’s improve readability even further by checking for any typos and grammar mistakes. Here’s a quick checklist you should go through:
- Check your spelling:
Take your time and read your post like it was written by someone else. Use a free grammar and spelling check tool for this to save time. - Preview the post:
Click the Preview button in the “Publish” menu widget in the upper right corner of the blog post editor. - Test your links:
In the preview window, check if all your links are pointing to the pages they should link to. - Remove any editing remarks:
Check that your post doesn’t have any editing notes you’ve added while writing and editing it.
Optimize your blog post for organic search (SEO)
Once you’ve written your first blog post, you’re almost ready to publish it!
Before you do, let’s make sure your blog post is SEO-friendly. This gives you a better chance of ranking well in Google’s search results for your target keyword phrase.
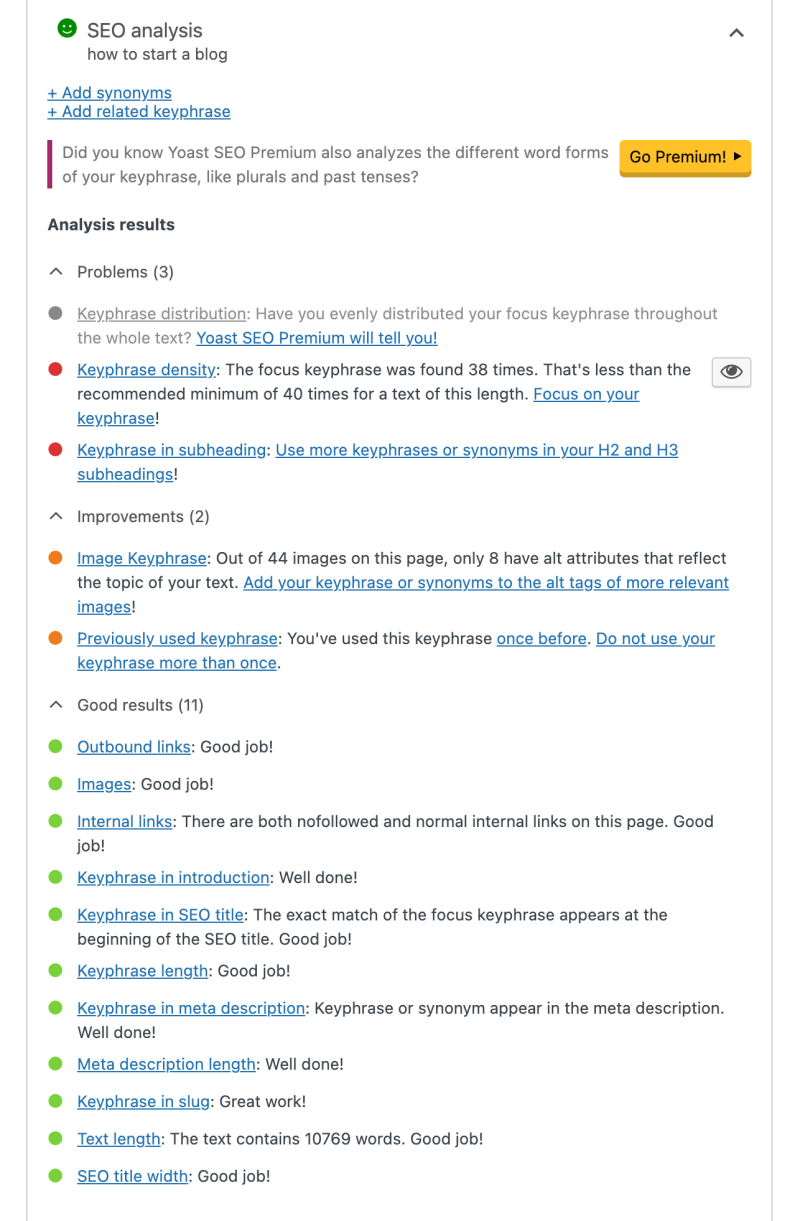
The free Yoast SEO plugin offers quick, actionable optimization suggestions for your blog post:
Take a few minutes to double-check whether your content fulfils the basic SEO guidelines and best practices.
Publish your first blog post
After you’re through with the SEO settings, create a category for your new blog post in the right-hand side settings by selecting Add New Category and naming it:
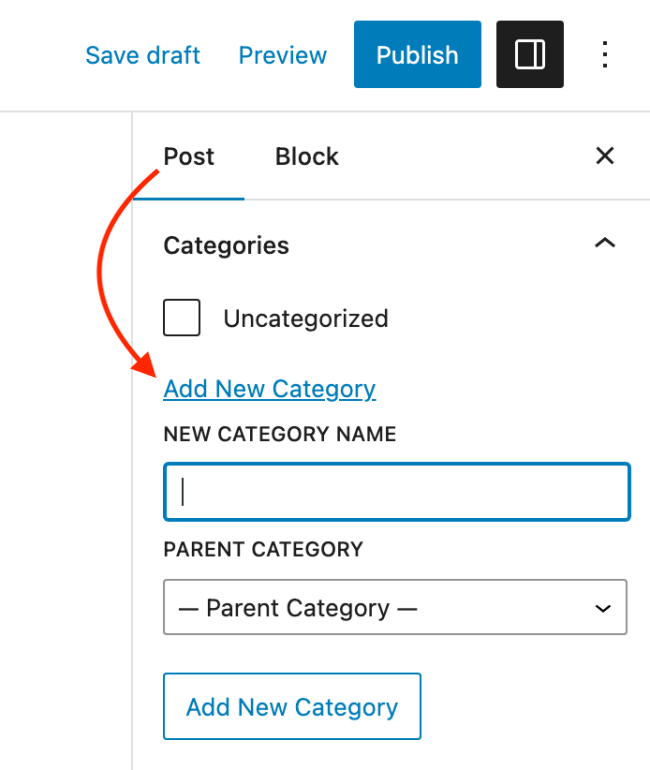
Once you’ve assigned a category to your blog post, hit Publish!
Congratulations! You just published your first blog post, yay!
We’ve come a long way in this guide. You’ve set up the technical parts of your blog, customized the design with a WordPress theme, and now published your first blog post. I’m glad you’re still with me!
By this point, you’re all set for creating high-quality blog posts that your readers will love.
Next, let’s think about what happens once you publish more and more content: promoting your blog posts, generating blog traffic, and ultimately making money from your blog.
Step 5: Promote your blog to get readers and traffic
Publishing great content is just the beginning. To build a thriving blog, you need to attract readers consistently — and that means learning how to promote your blog the right way.
Over the years, I’ve helped dozens of website clients and grown my own blogs to reach millions of visitors by implementing a handful of proven traffic strategies. And I’m really damn good at it!

But here’s the thing: it’s not about doing everything you can — it’s about choosing the right strategies for your blog, your niche, and your time.
In this part of our blogging guide, I’ll teach you the 9 most powerful beginner blog traffic strategies that will help you get your content in front of the right audience — even if you’re just starting from scratch. Let’s do this!
1: Use social media to promote your blog posts
The first place to turn when you want to find readers is social media.
Social networks like Instagram, Facebook, Twitter, YouTube, LinkedIn, Reddit, Snapchat and TikTok have billions of users worldwide. Everyone uses social media!
With that said, if you’ve just published a new blog post, your first instinct might be to share it across every platform.
But here’s my honest take:
As a new blogger, you don’t need to be on every platform. That’s a fast road to burnout.
Instead, choose 1–2 platforms where your audience already hangs out, and learn how to use them strategically.
It’s better to show up consistently and intentionally on one or two platforms than to burn out trying to be everywhere at once.
Let’s look at how to use social media to actually drive traffic to your blog — even if you’re just starting out.
Which social network should you use?
Each social platform appeals to a certain niche and type of reader. Depending on the content you publish, you want to focus on the network where your target audience hangs out online.
For example, my readers are aspiring bloggers and online marketers who search for information on Pinterest and connect with each other on Facebook. Therefore, I use both networks for blog traffic. I wouldn’t go and invest a ton of effort in creating TikTok videos because that’s simply not where my readers hang out.
When you’re just starting out with your blog, I recommend Pinterest + 1 other platform depending on your niche.
Let’s look at the most relevant platforms and how they fit different blogging goals:
Facebook (Good for community-building)
Facebook’s organic reach is low, but Facebook Groups can be incredibly effective for connecting with other bloggers or niche communities.
My tip: Join 2–3 groups related to your blog niche. Contribute meaningfully. Don’t just drop links — instead, help others, and only share your blog content when it’s truly relevant.
Instagram (Great for visual and lifestyle niches)
Instagram works best for lifestyle, food, parenting, or travel bloggers — anything visual.
How to use it:
- Focus on high-quality images (take your own or use Canva)
- Turn blog tips into quick carousels or Reels
- Share behind-the-scenes content
- Use strong CTAs in your captions to encourage clicks to your blog (use Linktree or a custom landing page)
My tip: Focus on sharing your personal journey and experience on Instagram. People love discovering entertaining, educational, and emotional content on this platform. To generate as much engagement and followers as you can, just be you! Share behind-the-scenes material, be transparent about your own mistakes and how you overcame them, and your audience will find you and give you a follow.
X/Twitter (Low traffic but good for building authority)
X (formerly Twitter) has limited traffic potential, but it can help you build connections and authority in certain niches (like tech, finance, or blogging).
My tip: To offer users as much value as possible, create X threads packed with quick, actionable tips and advice. Go through your most popular blog posts and base your X threads on your best-performing content. Remember to engage with other creators in your niche and respond to comments promptly. I personally use X for networking and staying on top of trends in my niche.
LinkedIn (Best for business and career-related blogs)
If your blog is in a professional or educational niche, LinkedIn can be great for content repurposing.
Try this: Turn your blog posts into helpful list-style posts, tag relevant people, and use a clear CTA to direct readers to your full article.
YouTube (Video search engine with massive traffic potential)
If you enjoy creating tutorials or speaking on camera, YouTube can be a powerful platform to grow your blog — especially over the long term.
YouTube is a search engine, just like Google and Pinterest. That means your videos can continue to generate views and clicks to your blog for months or years after publishing.
Even short videos (like 3–6 minutes) that answer simple questions from your blog post can perform well. Just remember to:
- Include a link to your blog in the video description
- Mention your blog post and tell viewers why they should check it out
- Use relevant keywords in your title, tags, and description
Pro tip: Use a free tool like TubeBuddy to research video keywords before you hit “record.”
TikTok (For fast traffic growth with bite-sized content)
TikTok is ideal if you’re comfortable being on video — and you want to tap into one of the fastest-growing platforms for content discovery.
While most TikTok users aren’t looking for full blog posts, the platform is great for building authority, sharing quick wins, and driving clicks to your blog via your bio or Linktree.
Share content like:
- “3 tips” from your latest blog post
- Behind-the-scenes snippets of your blogging journey
- Personal stories that tie into your niche
- Quick tutorials with a CTA to “read more on the blog”
Pro tip: Include a call-to-action in the last 3 seconds of your video. Ex: “Want the full list? It’s on the blog — link in bio!”
Share your new blog posts (strategically)
Whenever you publish a new blog post, create a few social media posts to promote it. Sharing new posts regularly and encouraging engagement is the best way to build momentum in the content distribution algorithms of social networks.
I usually create the following for new blog posts:
- 1 Pinterest pin (I use Canva for this)
- 1 Facebook post
- 1 X (Twitter) post
Now, how should you build your social media posts?
The most important thing is the headline. When you’re sharing your blog posts on social media, your headline must be click-worthy. Otherwise, it won’t stand out and people won’t pay attention.
Hence, start by writing a benefit-driven headline. It should include:
- A short, catchy hook (ask a question or call out a pain point)
- A hint of the value your post provides
- A link to read the full post
Your headline should speak directly to your target audience. If you want to generate blog traffic from a social media post, know what they struggle with and offer them a solution!
💡 Example post for Facebook or LinkedIn:
“Spending hours on social media without seeing real blog growth? Here are 7 smarter ways to drive free traffic in 2026 — including the one that doubled my blog traffic in just 6 weeks.”
🔗 Read now: https://bloggingexplorer.com/growing-your-blog/
Build trust, engagement, and relationships
Social media is where you build your brand voice. It’s where you can connect with your target audience like you were hanging out with them.
To see faster traffic growth, make sure you offer even more value by sharing everything you know. Think of your followers as your friends! Do your best to help them out — just like you would do with an old friend.
To build real relationships and engagement with your followers, here’s what you should share on social media:
- Behind-the-scenes content
- Personal insights or lessons learned
- Quick tips pulled from your longer posts
- Audience polls or open-ended questions
The more value you give and the more unique experiences you share, the more readers will click when you share a new post.
Automate your social media promotion (to save time)
The best way to generate blog traffic from social media is to stay consistent with promoting your content. For most networks, that means sharing content and tips every day.
With that said, managing your social media promotion can be a lot of work.
Luckily, some social networks allow you to schedule your posts in advance. For example, Pinterest, Facebook, and X let you create a post and choose when you want to publish it. This way, you can plan and schedule your social media sharing for 1–2 weeks in one sitting.
There are lots of tools that help you fully automate your social media posts. With the right tool, you can save heaps of time and promote all your posts in just an hour or two a week.
Here are my favorite social media automation tools:
- Tailwind: The best automation tool for Instagram and Pinterest hands-down — big fan here! I started with the free plan with all core features and upgraded to a paid plan later to unlock the full toolkit.
- Buffer: One of the easiest ways to schedule social shares in advance for Instagram, Facebook, X, Pinterest, and LinkedIn. I love their browser plugin for quickly adding relevant posts I find online to my social sharing queue.
- Hootsuite: If you want something a bit more advanced, Hootsuite is a powerful social sharing, scheduling, and automation platform. It’s a lot to take in for beginners, but keep it in mind for the future.
Now, if you’d rather grow blog traffic without social media, there are a handful of evergreen strategies like Pinterest and SEO. Let’s look at those next.
2: Use Pinterest to grow your blog traffic
I usually don’t play favorites when it comes to blog promotion tools and social media. But Pinterest has earned a dedicated spot in this list.
If you’re wondering how to get traffic to a new blog quickly without relying on social media algorithms or Google SEO alone, Pinterest is one of the best tools for new bloggers.
Back in 2018, I was struggling to grow my first blog I started two years earlier. My content was top-notch and I was getting great feedback from my readers. Google was already sending significant traffic to my blog. But I wanted more.
At that point, I turned to Pinterest. I had never used it before, but people kept telling me how great it was for generating free blog traffic.

If you’re not familiar, Pinterest isn’t exactly a social network. It’s a visual search engine. Since I was familiar with search engine optimization for Google, I knew mastering Pinterest would be fun.
I tried hundreds of Pinterest traffic techniques and hacks I found online. Sure, most of them were absolute rubbish, but I developed my own approach to succeeding on Pinterest.
To share my findings, I packaged them into one simple but powerful Pinterest marketing strategy that works for any niche. Within two months, my blog traffic grew by 200%:
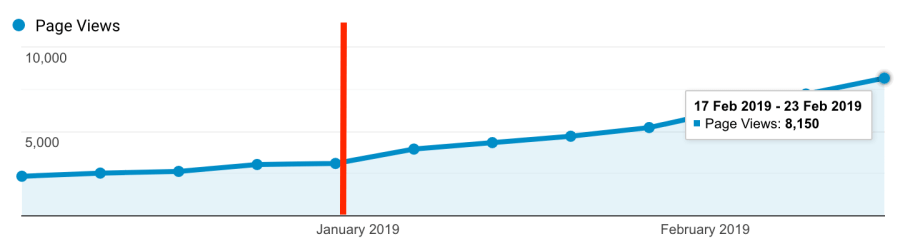
Needless to say, I fell in love with Pinterest.
But that was back in 2019 — what’s changed with my Pinterest traffic strategy since?
Not much, really. It’s 100% evergreen. I just can’t be bothered with strategies that I have to tweak every 2 months because of some random algorithm update.
So I still use the same Pinterest marketing strategy today. Just recently, I helped a client of mine go from 400 to 3,000+ daily outbound clicks in less than 3 months:

That’s an increase of 650% using the exact same Pinterest techniques I share in detail in my Smart Pinterest SEO e-book.
The biggest secret to success on Pinterest is consistency. For best results, you need to save new, relevant content to your Pinterest boards daily. Of course, that’s time-consuming in the long run.
So here’s my best hack to save time and get more done for even faster traffic growth:
I use the Tailwind scheduling tool to promote my blog posts on autopilot.
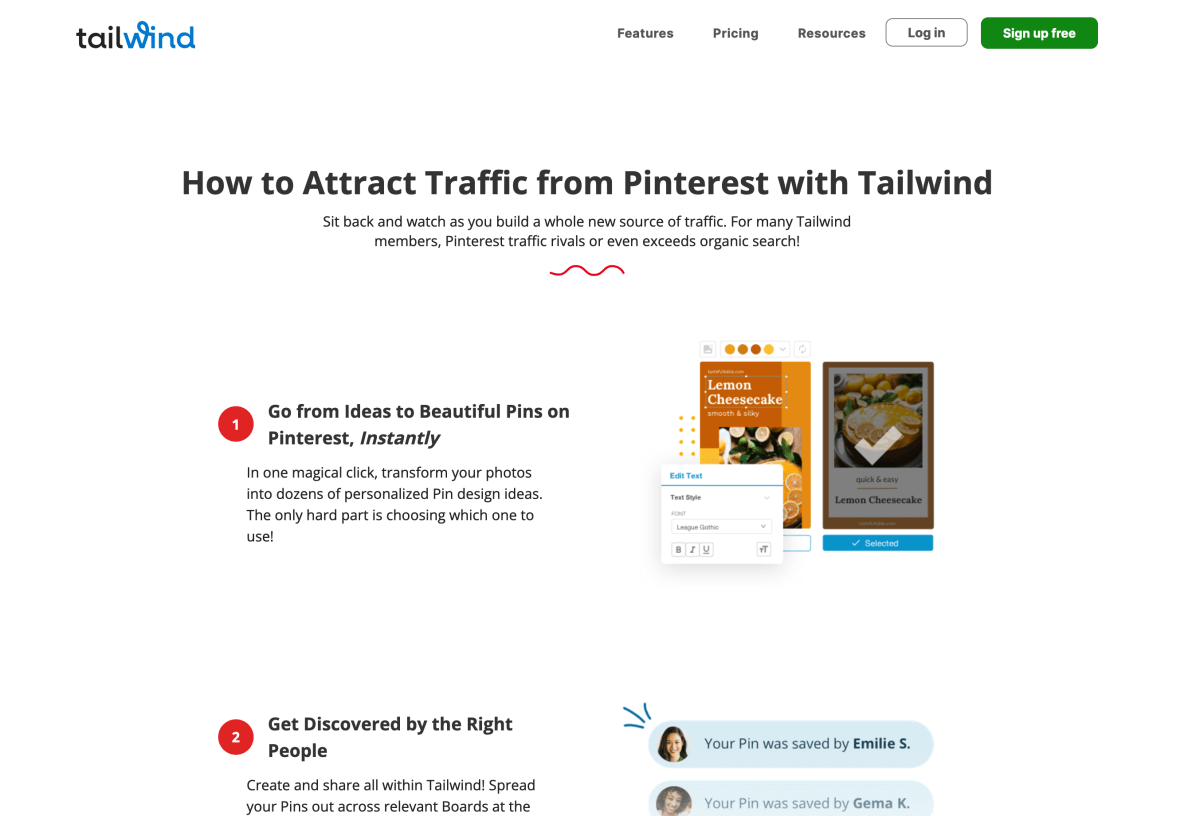
With Tailwind, I choose how many pins I want to share daily and schedule them in advance:
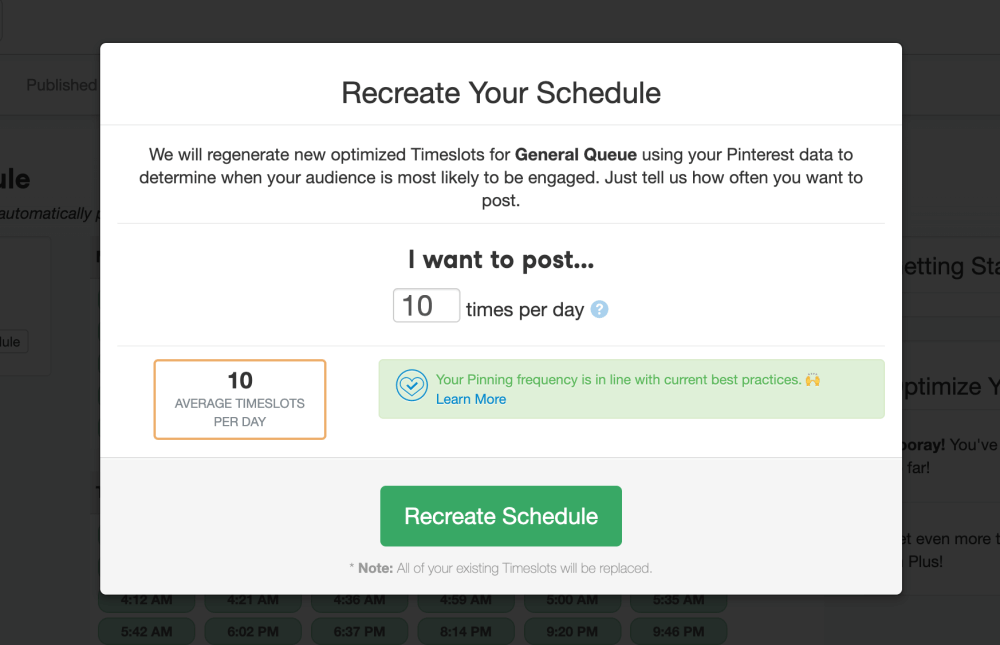
The tool automatically picks the best time slots for my posts so that as many people as possible see my content on Pinterest:
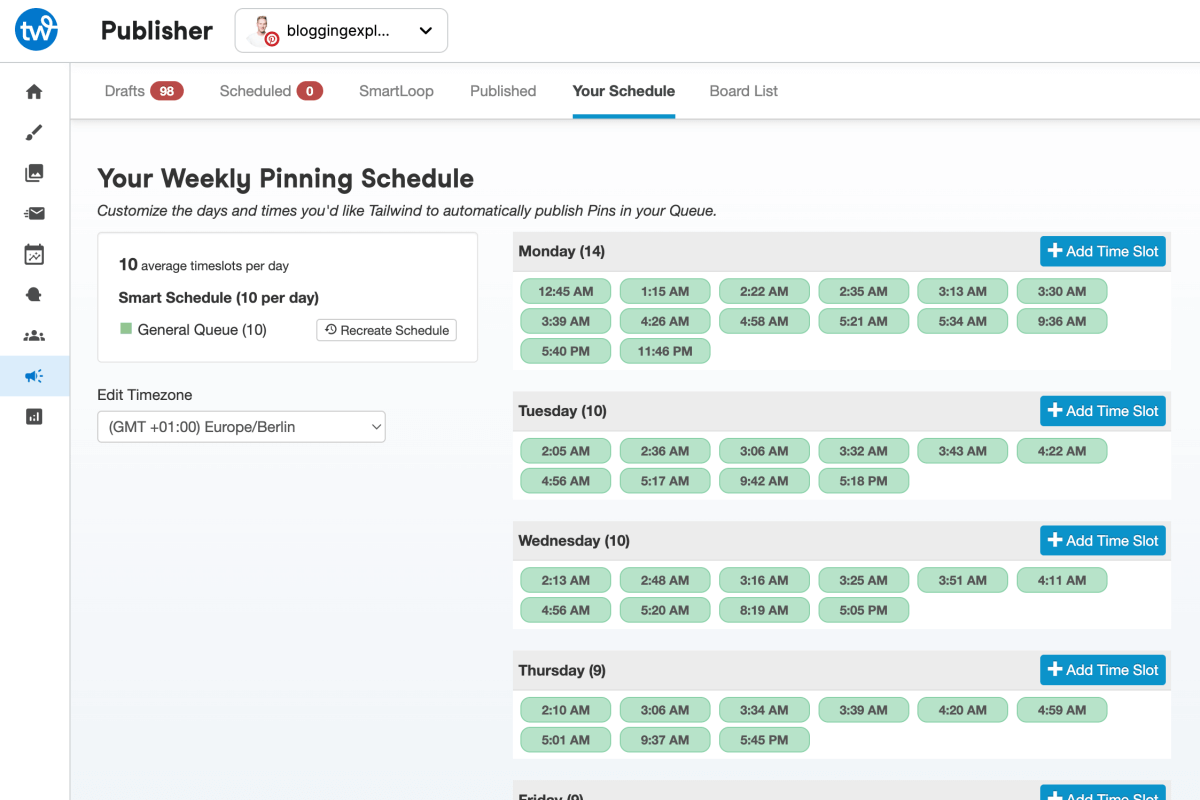
Now all I need to do is add pins to my publishing queue, and Tailwind will post them to my Pinterest boards following the time slots in my schedule. This tool has saved me hundreds of hours of work — and counting!
All in all, I strongly suggest you use Pinterest for promoting your blog posts. If you want to learn how to drive traffic to your blog fast, Pinterest can give you a head start. For a detailed guide, check out my complete Pinterest blog promotion strategy.
3: Use email marketing to grow your blog audience
Finding new readers for your posts time after time is your primary goal, but building a list of loyal followers using email marketing is just as important.
Here’s how email marketing works:
- You collect email addresses from your readers by allowing them to subscribe to your newsletter.
- You use that direct contact channel to notify them about new posts or other topics per email.
- Your email subscribers keep returning to your blog.
- You get more visitors and build a closer relationship with your readers.
Hence, building an email list means you build a direct connection with your readers. Once someone signs up, you can reach them again and again, bring them back to your blog, and guide them towards your digital products, affiliate offers, and more.
Your subscribers trust you and want to hear what you have to say. Sending the right welcome emails and providing ongoing value, you build trust end credibility. At the end of the day, that trust is what drives conversions.
If you haven’t already, I recommend you sign up and start building your email list right away.
How to start collecting emails on your blog
Here’s a simple, beginner-friendly system to get started with email marketing today:
- Choose an email marketing tool:
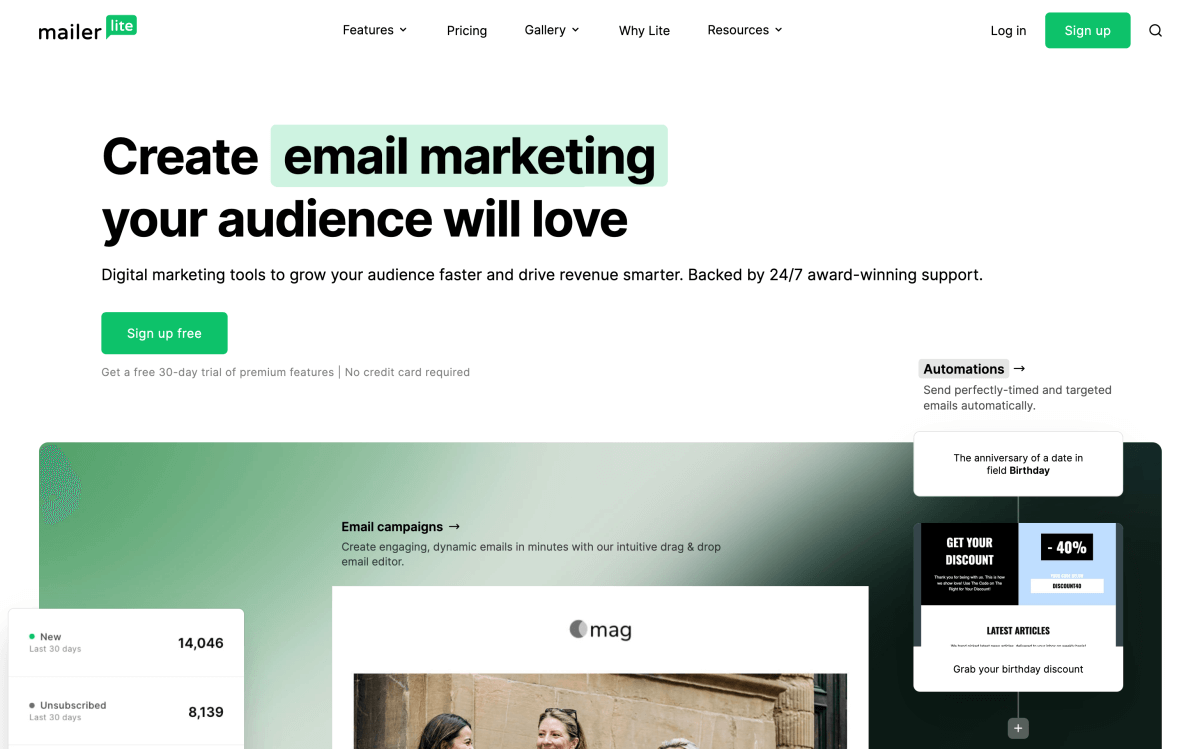
I use MailerLite for all my blogs for email marketing. They offer a free plan for up to 1,000 subscribers, which is more than enough for at least the first few months. I’ve written a full MailerLite review with all the details. - Create a valuable freebie:
This is something helpful your audience can download for free in exchange for their email address. It could be a checklist, worksheet, short e-book, or a template — anything that solves a small, specific problem for your reader. - Add a simple opt-in form to your blog:
You can place your form (1) at the top of your blog sidebar, (2) within relevant blog posts as a content upgrade, or (3) in a pop-up (sparingly — don’t annoy your readers!) - Set up a welcome email (or a short series):
As soon as someone subscribes, send them a friendly email thanking them, introducing yourself, and delivering your freebie. From there, you can schedule 2–3 follow-up emails to keep the conversation going and lead into your products or affiliate recommendations.
What to email your subscribers
Not sure what to send after the welcome email? Whenever I launch a new blog, I usually start with this:
- Personal story: A short story about how I started my blog — great for first introductions!
- Best content: Links to my most helpful beginner-friendly posts
- Quick lessons: A list of 5 important lessons about my blog topic that I wish I’d learned sooner
- Helpful resources: A list of relevant, time-saving tools or resources I use and recommend
💡 Pro tip: Don’t wait until your blog has “enough traffic” to start an email list. Even 10 email subscribers are 10 people who trust you more than a random visitor. Start now, and your future self will thank you.
Sign up for the free plan with MailerLite here in 5 minutes and create a simple sign-up form to embed on your blog right away.
MailerLite offers a full library of helpful step-by-step video tutorials to get you started. Plus, you get full access to their 24/7 support for the first 30 days with the free plan.
4: Learn Search Engine Optimization (SEO) to increase organic traffic
Search Engine Optimization (SEO) is a fundamental strategy for enhancing your blog’s visibility in search engine results. It’s one of the best ways to generate free, organic traffic to your blog.
I know SEO might feel complicated and technical, but it’s much easier than you may think. Even if you’re entirely new to blogging, you can learn the basics of SEO in a few hours.
The only thing you need to understand is: People use Google to find solutions, answers, and information.
Hence, you need to know what your blog target audience is struggling with. Once you know what they are searching for — the keywords — you can write blog posts that deliver easy, practical solutions to their problems.
Optimizing your content for relevant keywords helps you attract readers who are actively searching for information in your niche.
As long as your blog posts offer the best, most in-depth information for your niche and target keyword phrase, your Google rankings will improve over time.
Here are four essential SEO strategies for blog traffic:
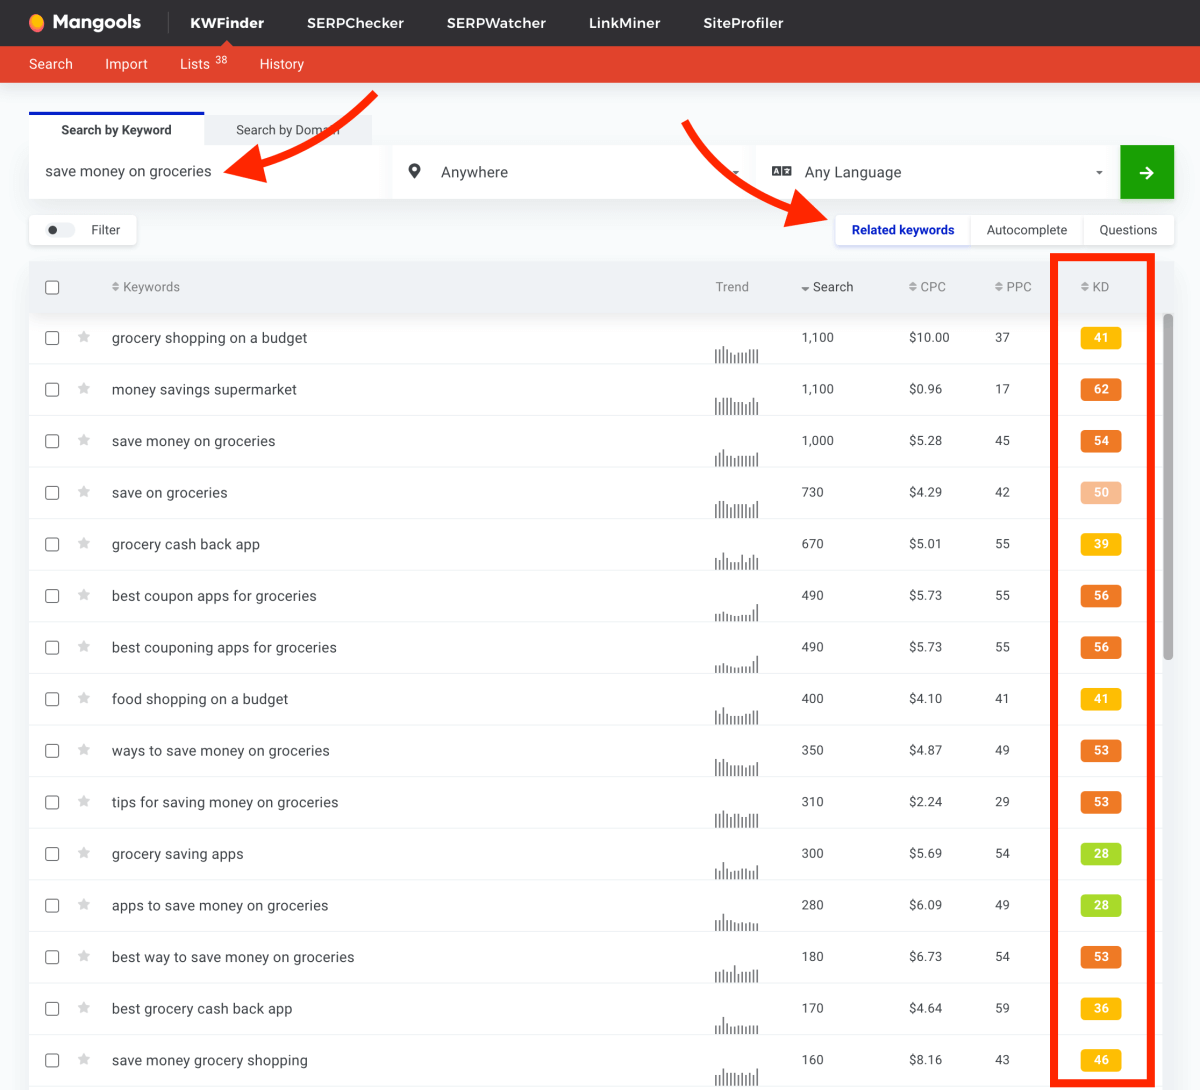
- Conduct keyword research: Use tools like KWFinder or Ubersuggest to identify keywords relevant to your blog topics.
- Optimize on-page elements:
- Title tags and meta descriptions: Use the free Yoast SEO plugin to ensure each post has a compelling title and a concise meta description that includes your target keyword.
- Headings: Use H1, H2, and H3 tags to structure your content, making it easier for search engines and readers to navigate.
- Internal linking: Link to other relevant posts on your blog to help readers find additional, related content.
- Create high-quality content: You MUST create informative, engaging, and original content that solves your audience’s problems and needs.
- Build backlinks: Reach out to other bloggers or websites in your niche to earn backlinks and improve your domain authority and search rankings. For example, write guest posts for other blogs for natural, organic backlinks.
SEO is a long-term investment. It may take several months to see significant results, but consistent effort will yield sustainable organic traffic over time. The more you practice by creating new content, the faster you’ll improve your skills and grow your traffic.
Want to dive deeper into SEO for beginners? Check out my SEO tips for bloggers to learn how to optimize your content step by step.
5: Guest blogging on other blogs, Quora, and Medium
When you’’e just starting out, one of the hardest things is getting your blog in front of the right audience.
One way to get your voice heard is by sharing your thoughts on other blogs and publishing platforms. Guest blogging on other relevant sites is one of the best ways to connect with an already established audience.
Guest blogging means writing a free blog post for someone else’s website — ideally one that already has an engaged audience in your niche.
Here’s why guest blogging is a win-win:
- You offer helpful, valuable content to readers of another blog, website, or platform
- You get exposure to a new audience who might click through to your site
- You often earn a backlink to your blog (which helps your SEO)
Start by looking for places where your audience spends time. That’s where you want to build your own presence. Whether that’s other blogs, discussion forums, or online communities – you need to know where your readers hang out online.
Why guest blogging is so effective
Back when I started blogging in 2016, guest blogging gave me a huge boost. I didn’t have much of an audience yet and my writing skills weren’t anything to write home about, either — but I knew I could offer value.
So I reached out to a handful of tech blogs I looked up to, offered a handful of topics to write a detailed tutorial, and included a link back to my site in my author bio.
Not only did I get new readers early on in my blogging journey, but those backlinks helped improve my rankings in Google, too.
Remember this key SEO technique: Google sees backlinks from other reputable blogs as a signal that your content is trustworthy and relevant. The more high-quality links you earn over time, the stronger your blog’s domain authority becomes.
All in all, guest blogging is one of the smartest answers to how to promote your blog for free. You provide value to someone else’s audience and send traffic back to your site without spending a dime.
How to land your first guest post
Chances are that most blogs in your niche accept guest posts.
The idea of a guest post is you propose a relevant topic to another blogger, write a full article, and publish it on their blog website.
Here’s how to find guest blogging opportunities in your niche:
- Head over to Google and search for:
- “[your blog niche] guest post”
- “[your blog niche] write for us”
- “[your blog niche] contribute”
- Browse interesting blog websites that are relevant to your audience.
- Review their guest post guidelines.
- Make sure they link back to guest authors’ websites.
- Pitch them a valuable guest post idea that would be a great fit for their audience. Keep your pitch short, polite, and personalized.
- Include 1-2 links to your own content inside your guest post (as long as they’re helpful and relevant).
- Show that you appreciate the chance of getting your content published on a new platform — let them know you’re thankful!
Scared of guest posting? Don’t worry if your blog is brand new!
If you write well and offer useful, solution-oriented content, many blogs will be happy to publish your work.
I submitted my first guest post pitch in my second week of blogging. Initially, they turned down my idea, but I approached them just a few weeks later and my pitch landed! They saw how much work I had been putting into my brand new blog and we’re impressed by my work. That immediately gave me confidence and validation — I really can’t recommend guest posting enough.
How to republish your content on Quora and Medium
If a full-scale guest blogging campaign isn’t your thing, try reposting your content on Quora or Medium.
Quora is a question-and-answer platform where people as questions on just about any topic you can imagine.
You can search for questions related to your blog niche, provide helpful answers, and (when relevant) link to your blog posts for more information.
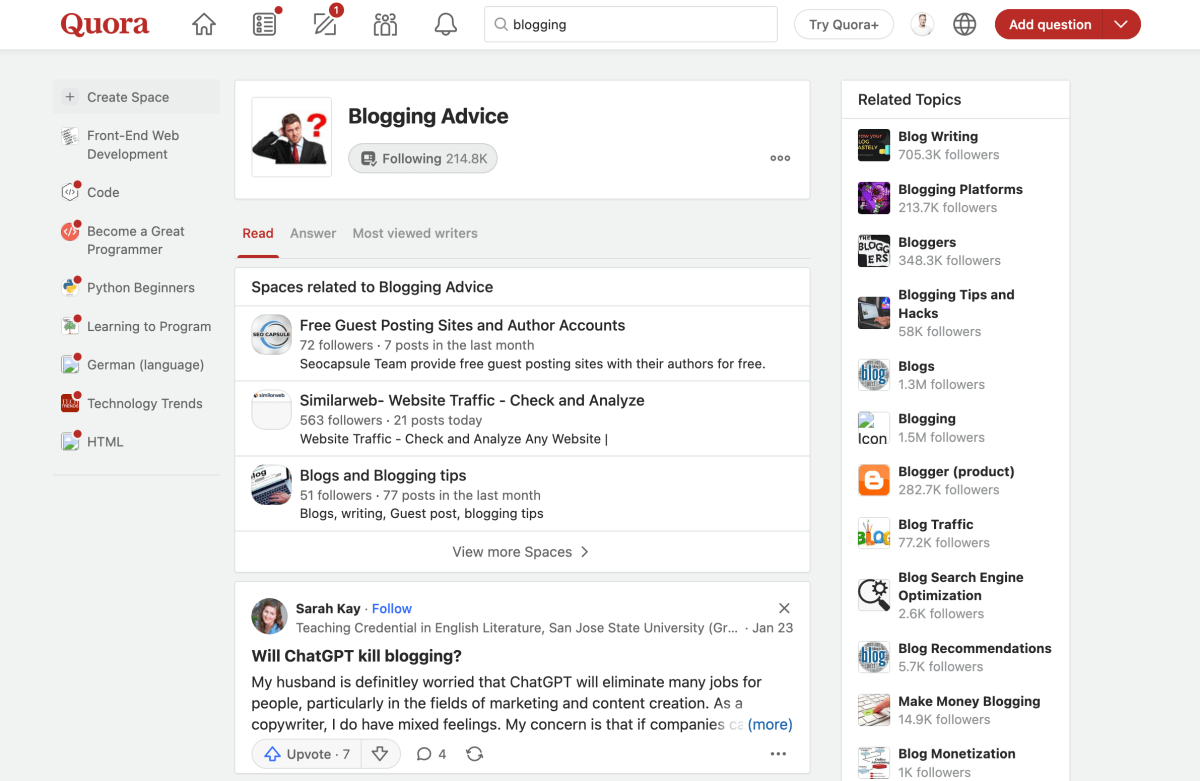
Post detailed, valuable answers and add a link to your blog post for more details. Be careful not to over-promote your own content. Only add backlinks to your website where it feels natural and adds value.
Why Quora works:
- You’re showing up exactly where people are already asking questions.
- If your answers are valuable, they get upvoted and shown to more users.
- Quora answers can rank well in Google — especially for long-tail search terms.
How to use Quora for blog traffic:
- Create a profile that links to your blog.
- Search for topics you already write about.
- Give detailed, helpful answers (don’t spam!).
- Add a relevant blog post link at the end, like:
“If you’d like to dive deeper into this, I wrote a full guide here: [Your Blog Post Title]”
Medium is a blogging platform with a massive, global reader base you can tap into. You can publish original articles or repurpose existing blog posts to grow your blog traffic organically.
You can even look for a Medium Publication popular in your niche and submit your blog post to them to reach an even larger audience.
Republishing content on Medium doesn’t hurt your SEO. You can use a canonical link to credit your original post and avoid duplicate content issues.

Why Medium works:
- Medium articles often rank well in Google (especially compared to brand new blogs).
- You can tap into topic tags to get discovered by new readers worldwide.
- It’s a great platform for building thought leadership in your niche.
How to use Medium for blog traffic:
- Set up a free Medium account and customize your profile.
- Use your existing blog posts and reformat them for Medium.
- Add a short note at the top: “This article originally appeared on my blog at [URL].”
- Link to your lead magnet, email list, or other blog posts at the end.
💡 Pro tip: Choose just one platform to start with. Whether it’s Quora or Medium, consistency is what drives results.
6: Link to other relevant blogs
When you’re short of ideas for great blog posts, why not consider writing a response to a post on another blog?
It’s one of the best ways to create connections to other bloggers around your topic and to create more discussion within your target audience, too.
If you choose to try this method, I’d recommend writing a post where you add something to the post on that other blog. It’s easier to cultivate a positive atmosphere and a supportive community within your field rather than writing a post where you simply disagree with the other post.
When you’re writing the post, make sure you add a link to the post you’re responding to. That way, the other blogger will receive a notification about your post and will most likely read what you have to say.
And if that wasn’t good enough, they’ll perhaps even write you a comment and inser a link to your content into their own blog post.
7: Comment on other blogs in your niche
Part of the beauty of blogging is the possibility to connect with your readers by asking them to share their thoughts by writing a comment below your post.
And this works both ways: You can comment on other blogs, too.
Because the thing is:
Blogging can make you feel lonely at times. In the early days of your blogging journey, you might feel like you’re on your own island, writing into the void. Connecting with other bloggers will work wonders on your motivation, help you learn more about your blog niche, and build genuine relationships with like-minded content creators.
When you write a comment to a blog post, you can often add a link back to your own blog. This is an opportunity that you should think about carefully before using it because it’s easy to use it for spamming.
Why blog commenting still works (yes, even in 2026!)
Only leave helpful, thoughtful comments that add real value to the conversation.
For example, you could share a personal, interesting perspective on the blog post. Or if you see someone asking a question in the comments, you can write them a helpful, in-depth answer — unless, of course, the question is aimed at the author of the blog.
When you leave a valuable comment on someone else’s blog post — not just “Great post!” but something that adds to the conversation — two things can happen:
- The blog owner might check out your site. That could lead to a new connection, a backlink, or even a future collaboration.
- Other readers see your comment. If they like what you said, they may click through to your blog to learn more.
Hence, blog commenting is one of the most organic, underrated ways to get in front of like-minded readers and fellow creators — especially when you’re just starting out. In fact, trying to grow your blog in isolation is one of the biggest blogging mistakes new bloggers make, and one that’s easy to avoid with a bit of intentional outreach.
How to get started with commenting on other blogs
- Find a handful of blogs in your niche:
Look for bloggers who are just a bit further ahead than you — they’re often more open to connecting. - Leave genuine comments:
Share something specific you liked about the post, or a small insight or question that shows you actually read it. - Use your blog name when commenting:
If the comment form allows it, include a link back to your blog so interested readers can easily find you. - Follow up:
Subscribe to their email list, reply to their newsletters, or share their content on social — this is how you build relationships over time.
Summing it up: Don’t just comment to get traffic — comment to connect. Relationships are what lead to the best growth opportunities.
8: Repurpose your blog content to reach more people
You don’t need to constantly reinvent the wheel to grow your blog traffic.
In fact, some of the most successful bloggers get massive results by repurposing a single blog post into multiple formats — and using those to reach new readers across different platforms.
Repurposing simply means taking the same content and reworking it for another format or channel. It saves you time and helps you show up in more places without having to start from scratch each time.
What repurposing might look like:
Let’s look at my article “Affiliate Marketing for Dummies”. It covers 13 key steps to becoming a successful affiliate marketer based on my experience throughout the years.
Now, I can repurpose that blog post into another format or for another platform. That way, I can diversify my traffic sources for the guide and reach a larger audience online.
Here’s how I would repurpose the blog post:
- Turn the blog post into a Pinterest pin linking back to the article.
- Record a short video for TikTok or Instagram Reels summarizing my top 3 tips and teasing the others.
- Create a carousel post on LinkedIn or Instagram with a visual tip-by-tip breakdown.
- Write a newsletter version of the post for my email list.
- Use snippets or quotes from my blog post to create valuable X threads.
- Republish the post on Medium with a link back to my original article.
- Answer a relevant question on Quora and reference my blog post as a deeper guide.
- Turn the post into a downloadable checklist or infographic using Canva — these are fantastic content upgrades and lead magnets to grow your email list!
Why content repurposing works for growing your blog traffic:
- Different people consume content in different ways (text, video, audio, visuals).
- You get more visibility without creating new content from scratch.
- You can get your content in front of new audiences on platforms like YouTube, Pinterest, Instagram, LinkedIn, and more.
- Repurposing reinforces your authority — it makes you more visible and consistent without creating brand-new content from scratch.
I suggest you choose 1 or 2 repurposing formats that feel natural to you right now. For example, if you enjoy graphics and visuals, repurpose your posts into Pinterest pins and Instagram carousels. If you’re more of a talker, try video or audio formats for YouTube, TikTok, or start your own podcast.
💡 Pro tip: Keep a list of your best-performing blog posts, and schedule time each month to repurpose one into new formats. Focus on repurposing your evergreen content — blog posts that stay relevant over time. These will give you the best ROI.
9: Publish content regularly and consistently
Needless to say, the blog promotion methods above require a lot of effort and planning. Since you only have so many hours in a day, sometimes it’s a better idea to use your time for creating more content for your blog.
Why consistency matters
Publishing new content consistently is the only way to make sure your readers will find what they are looking for every time they visit your blog. Unless you offer them helpful, fresh content, someone else will.
Here’s why consistency is crucial:
- Search engines love fresh content:
The more high-quality blog posts you publish, the more opportunities you create to rank for keywords and get found on Google. - Readers start to trust you:
If you’re consistently creating helpful content, your audience will come back — and they’re more likely to subscribe, share, and buy. - You get better at blogging:
Writing regularly is the best way to sharpen your voice, improve your SEO skills, and discover what your audience actually wants.
When you’re starting out, you don’t need to publish five blog posts a week, be on every social media platform, or have a perfect email funnel in place. You just need to keep showing up — one blog post at a time.
How to stay consistent (even when you’re busy)
Publish new, valuable content as often as you can. But stick to a realistic publishing schedule that you can follow consistently.
If you have a full-time job and a family with three kids, you probably can’t spend hours every day writing blog posts. On the other hand, if you only publish new content once every other month, your readers are likely to forget about your blog altogether.
Over time, you will spend more time on updating and improving your existing articles. After 2 years of blogging, you might publish a new post once a month.
Find the right balance for both yourself and for your readers. Don’t burn yourself out thinking you must post every day. But at the same time, consider how often your readers would like to hear from you.
Here are four easy tips to stay consistent with blogging:
- Set a realistic publishing schedule:
Publish 1 new blog post per week. That’s 52 posts in your first year! - Batch your blog content:
Work on several blog posts at once during a single focused writing session to get ahead. - Track your progress:
Use a simple content calendar to map out your blog topics, draft deadlines, and publishing dates. - Repurpose content:
Turn each blog post into multiple pieces of content: email newsletters, Pinterest pins, social posts, and even guest post ideas.
When I started my very first blog, I didn’t know how important consistency was — and honestly, I struggle to keep up at times. What matters the most is that you keep blogging and stay connected with your readers and subscribers.
You don’t need to be perfect. You just need to be persistent.
Now that you’ve seen the best free traffic sources for bloggers, you can pick 1–2 that feel right for your goals and start building traffic momentum today. What’s it going to be? Let me know if you have any questions in the comments below!
Step 6: Make money from your blog
You’ve come all the way from laying the very first foundation for your blog to creating amazing content and promoting your blog to grow your traffic.
Everything you’ve learned so far is enough to keep you busy for a few months. Listen to your audience, write high-quality blog posts, and promote your blog on relevant social networks. You want to keep learning more about blogging!
But I know you’re probably starting a blog to earn some extra income. Whether you want to earn a bit of extra cash on the side or build a full-time income like I did, the good news is this:
You don’t need thousands of monthly readers or dozens of blog posts to start monetizing your blog.
However, blogging isn’t a get-rich-quick scheme. It takes time to generate significant income from your blog.
Although you may see bloggers share their six-figure income reports, remember that they worked very hard to achieve that. That kind of success doesn’t happen overnight.
Unless you have a huge audience on a social media platform already, you can’t expect to make money right away. Monetization should not be your #1 focus at this point, but rather something to work towards.
Nevertheless, you want to have an overview of the different ways you can make money blogging as you start your journey. Some monetization strategies will be easier to implement than others, and some strategies work better for certain niches.
I started my blogging journey with zero intention of making money — I was just sharing what I was learning. But once I saw my traffic grow, I realized I could monetize my blog by recommending the tools and services I was already using and loving.
So, since 2019 I’ve earned a full-time income from affiliate marketing, display ads, and digital product sales — all built around content that helps my readers succeed. My monthly blogging income fluctuates due to seasonality, but it’s a fantastic extra income source on top of my website business.
In this step, I’ll walk you through the most popular (and beginner-friendly) ways to start making money with your blog — including real-world tips and strategies I’ve used myself.
Here are 5 popular ways to make money from your blog:
1: Affiliate marketing
Affiliate marketing means you sell someone else’s products or services and make a commission for every purchase. If cone correctly, it can be a fantastic source of passive income that keeps paying off for months and years to come.
Affiliate marketing is how I earned my very first dollars on my first blog and how I now make a full-time income blogging. About 85% of my total blog income is from affiliate sales.
Hence, affiliate marketing has become the largest passive income source for my blogging business. And it’s not a coincidence — it’s been my plan ever since I earned my first affiliate commission.
What I love about affiliate income is that it’s a system that can run on autopilot. I build all my blogs to generate affiliate income once I’ve done the work that’s necessary to establish a sustainable level of traffic.
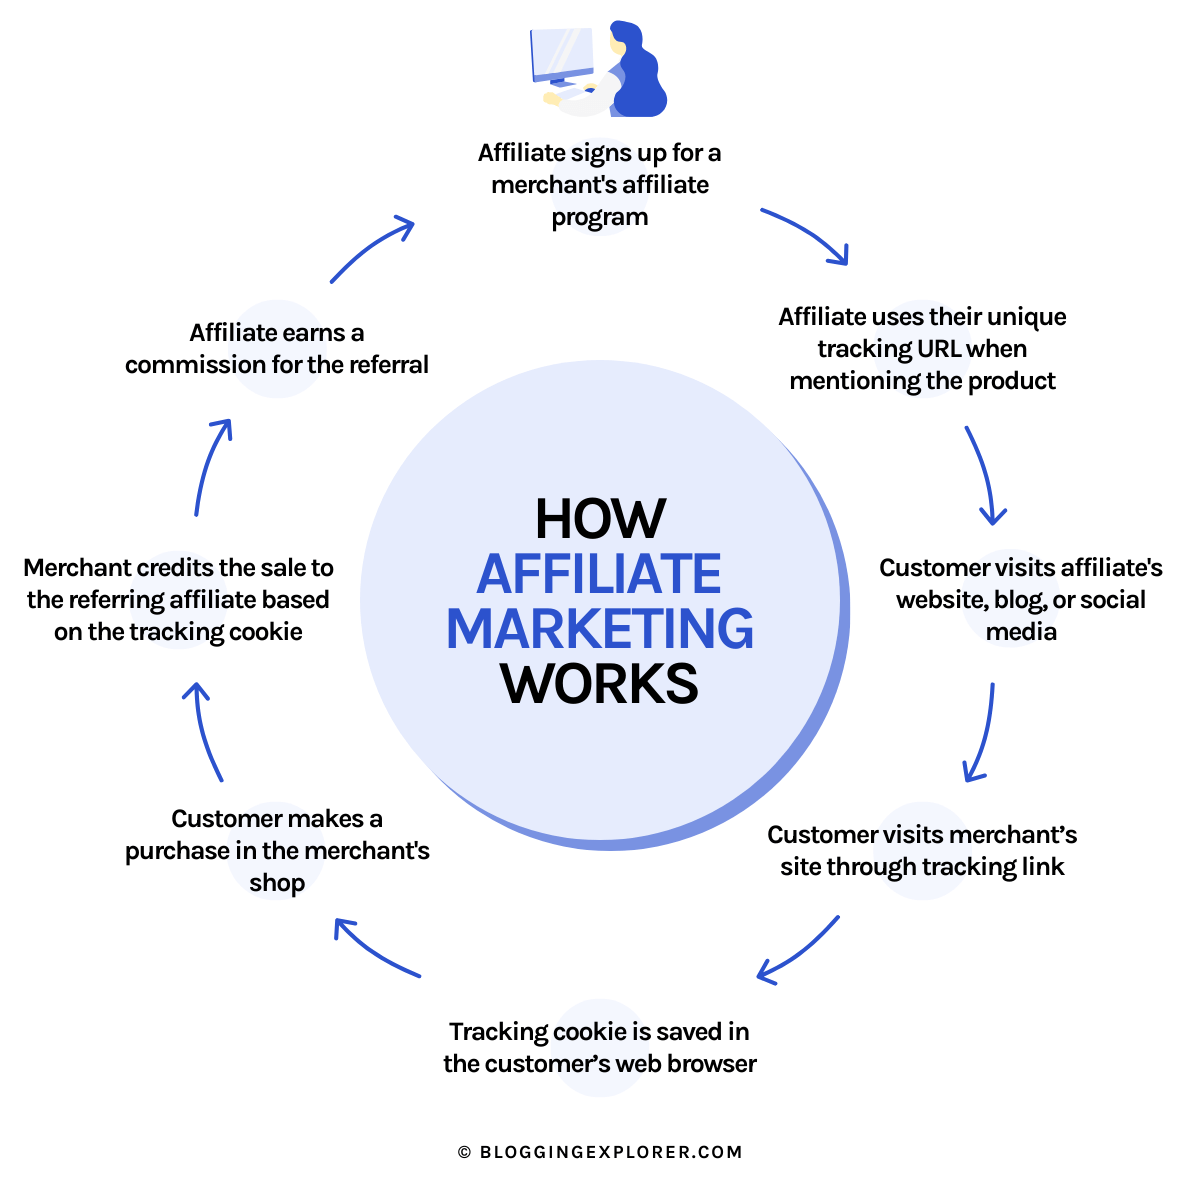
Here’s how you can start affiliate marketing to monetize your blog content:
- Choose a product you use and trust
- Join the affiliate program for that product
- Get your unique, trackable affiliate link to the product
- Share your success story with the product (create top-notch blog articles)
- Convince your readers why they need the product
- Drive traffic to your blog content
- Earn commission when readers buy through your affiliate link
Most bigger brands and companies have affiliate programs. You can either join their own programs or tap into a larger pool of potential partner brands through an affiliate network such as Impact or Awin.

Want to learn how affiliate marketing works in detail? Check out my complete Affiliate Marketing for Dummies guide — I wrote it especially for beginner bloggers.
2: Display ads
Display ads are another popular option, especially once your blog starts getting consistent traffic.
The idea with placing display ads on your blog is simple:
- You sign up with an ad network (like Google AdSense, Ezoic, or Monumetric)
- They place ads on your blog website
- You earn ad revenue based on views or clicks (or both)
In the beginning, your ad revenue will be low because you don’t have much traffic. But once you gain momentum and your traffic starts growing, your ad income will increase, too.
The best part is: display ad income is 100% passive. Once you’ve set up your ads, you will make money with display ads while you sleep.
3: Selling your own products
Selling your own products is one of my favorite blog monetization methods because it gives you full control over what you create and how you sell it.
The idea behind earning money from your blog by selling your own products is simple:
- Listen to your audience
- Learn what they’re struggling with
- Create a product that solves a real problem for them
How do you know what your audience needs?
I recommend mastering affiliate marketing before creating your first product. That allows you to learn what types of products your readers need. Once you know exactly what they want, it’s easier to create the perfect product.
For example, some time ago I promoted a Pinterest marketing guide as an affiliate partner, and I earned about $2–5 per sale.
Even if I sold 10 products every day, my affiliate income would only be $60–300/month. That’s a great start, but it wouldn’t even cover my grocery bills.
So I thought: OK, my readers love getting more blog traffic from Pinterest. I just have to find out what they struggle with the most.
This is what I knew:
- My audience loves blog traffic.
- They love using Pinterest to drive free traffic to their websites.
- Almost everyone was using Pinterest the wrong way.
- I have a Pinterest strategy opt-in and a few thousand subscribers on my list.
- A team of Pinterest reps would help me confirm my techniques.
The next step was easy: I needed to craft a top-notch product to help my readers understand how Pinterest marketing really works. My insider contacts at Pinterest were more than happy to help me out.
That’s how my popular Smart Pinterest SEO e-book was born.
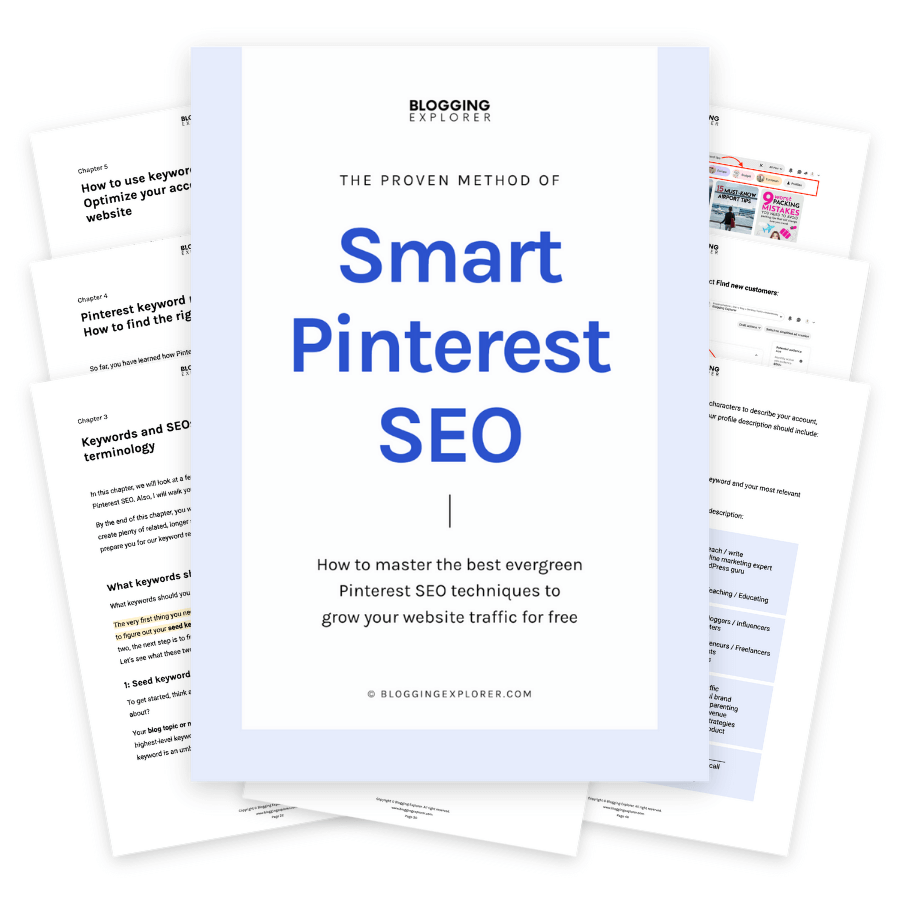
Overnight, my $2/sale commission became $48/sale.
The best part? With your own products, you get to keep 100% of the revenue.
Also, you can gather feedback directly from your customers and improve your product continuously. That feedback can be a goldmine for further product ideas.
Here are a few ideas for products you can sell:
- E-books
- Online courses
- Graphics (photos, templates)
- WordPress themes and plugins
- Canva templates
- Printables (planners, worksheets, checklists)
The easiest way to sell digital products is to use a platform like SendOwl. Their tool allows you to set up your product and create a simple sales page within minutes. They handle the payments and take care of the technical stuff. I can’t recommend them enough.
4: Freelancing (offering your own services)
If you want to start earning money from your blog as quickly as possible, then selling your services and skills is the easiest option.
All you need to land a freelance client is a strong pitch and relevant skills. Hence, starting a blog (first) will help significantly with reaching your target clientele.
To offer your services to clients, you want to build out your key pages (About, Contact, Hire Me) and showcase at least a few work samples from past, relevant projects. Make sure to include reviews from past clients or partners if you can.
If you don’t have any work samples yet, don’t worry. Create your own sample articles or designs and present them on your own blog website as if they were a real-world project you got paid to produce.
Here are a few skills you can sell as a freelance service:
- Writing
- Design
- Marketing
- Social media management
- Web development
- WordPress development
- SEO and content marketing
- Project management
- Virtual assistance
You can easily find small freelance jobs on websites like Upwork.com or Freelancer.com.
It might take some work to land your first job and your rate might be lower than you expect. But once you have your first stellar review from a client, getting your next job will be much easier.
5: Paid sponsorships and brand collaborations
Another powerful method to make money blogging is to publish paid or sponsored content on your blog.
The idea behind paid content is simple: You team up with a brand and give them an opportunity to publish an article with promotional content for their products or services.
In other words, you’ll write a blog post where you share your thoughts or experience about a specific product to promote it.
Most often, sponsored articles are:
- Informative reviews
- Assessments of products or services
- Comparison articles
- Analyses of companies or brands
- Endorsement articles
- Informational posts about the company or brand
Thus, the main goal of paid content is to help increase the outreach of a brand.
If a company can see that your readers represent their target demographic, they might be interested in publishing paid content on your blog.
The biggest issue with paid content is the risk that your blog will lose your personal tone and vibe.
If you’re an established blogger in your niche, your readers “know” you. They’re familiar with your style and how you write in general.
Thus, publishing paid content can quickly make your articles too promotional for your audience. And since each sponsored article translates into higher income, it’s easy to overdo it.
If that happens, your blog will become a glorified billboard. Your readers will notice that you’re not trying to help them anymore like you used to.
With that said: When it comes to sponsored blog posts, less is more.
How to start a blog and make money in 2026: Final thoughts
Starting a successful blog is all about staying persistent and focussed on your long-term goals. If you want people to read your blog posts, you need to know what they need and create helpful, targeted content that makes their lives easier.
Write top-notch, value-packed blog posts that blow their socks off! Show how enthusiastic you are about your blog topic, connect with your readers, and put your personal touch into every blog post you publish.
Be mindful of why you’re starting a blog. How do you want your life to change through blogging? Perhaps you want to earn a side income from your blog to achieve more financial freedom and flexibility in life?
Whatever your “why” is, don’t lose sight of it. At the end of the day, it’s going to keep you motivated for years to come.
Once you get the ball rolling, your blog traffic will grow and you can start to monetize your blog.
I created this free guide because starting a blog has been one of the most empowering decisions I’ve made in my life. It helped me feel more confident in what I do and who I am, simply by sharing my experience with the world.
And I couldn’t be more excited to guide you through your own blogging journey, helping you with what I’ve learned so far.
I hope you’re feeling as excited as I am, confident enough to take the leap and start a blog of your own, too.
I’d love to have you join my free 7-day blogging course that builds on this guide. I’ll share further tips and resources in the course, diving deeper into topics like blog traffic, monetization, and more.
Summing it up: How to start a blog and make money (Step-by-step guide for beginners)
Let’s sum up the step you need to take to start a profitable blog:
- Choose your blog topic and name
- Get your blog online (web hosting and WordPress)
- Customize your blog design (with a WordPress theme)
- Write your first blog post
- Promote your blog to get readers and traffic
- Make money from your blog
Ready to start? Awesome!
Follow this step-by-step guide to starting a blog and you’ll achieve your goal sooner than you expect.
If you’re looking for some extra reading to help along on your blogging journey beyond this guide on how to start a blog, then check out these popular guide I’ve created for you:
- How Much Does It Cost to Start a Blog?
- How to Find the Best Blog Hosting? Blog Hosting Review
- 7 Things You MUST Do Before You Launch Your Blog
- Growing Your Blog: 7 Powerful Blog Traffic Tools
- Pinterest Strategy Guide: How to Grow Your Traffic With Pinterest
- Pinterest SEO: The Ultimate Guide for Massive Blog Traffic
- What is Search Engine Optimization? SEO for Bloggers
- What To Do When Your Blog Traffic Is Low? 13 Powerful Traffic Hacks
- How to Start an Email List as a Beginner Blogger: 7 Easy Steps
- How to Make Money Blogging for Beginners: Step-by-Step Guide
- How Do People Make Money Blogging?
- How to Monetize Your Blog? 5 Powerful Ways to Make Money Blogging
- 15 Reasons Why Your Blog Isn’t Making Money (And How To Fix Them)
- Affiliate Marketing for Dummies: How to Make Money Step-by-Step
- 11 Best Ad Networks for Bloggers
- Increase Display Ad Income: 15 Easy Tips For More Passive Income
- Best WordPress Themes For Blogs (Free and Paid)
- 10+ Best WordPress Plugins for Bloggers (All Free)
- What Is the Difference Between WordPress.org vs WordPress.com?
- 160+ Profitable Blog Niche Ideas That Make Money
- How to Find the Perfect Blog Topic: Step-by-Step Beginner’s Guide
- 14 Quick Ways to Find Blog Post Ideas for Writers
- How to Write a Great Blog Post (Every Time): The Ultimate Guide
- 6 Time-Saving Tips to Write Blog Posts Faster
- How to Treat Your Blog Like a Business? 8 Practical Tips
- 6 Worst Blogging Mistakes (And How to Avoid Them)
- Feeling Overwhelmed With Blogging? 6 Practical Tips to Recover Instantly
Now, I want to know how you’re feeling and how your blogging journey is going so far. Ask any question or drop me a line in the comments below!