So you want to learn how to make money blogging for beginners, but you’re not sure where to start? And you want to see results fast without waiting months to see your first dollars rolling in?
You are in the right place!
It doesn’t matter whether you’re just planning to start a blog or if you’ve been blogging for a while now! Learning how to make money blogging can be easier than you think — and you can start earning income through your blog in a matter of days.
In this post, I’ll show you exactly how you can make money from your blog.
I’ll also share all the monetization strategies I used to start earning money with this blog in just 2 days.
Please note: This post contains affiliate links to products I use, trust, and recommend. If you choose to purchase a helpful product using these links, I may receive a small commission for referring you – at no extra cost to you. These funds help me keep this blog up and running.
How I started making money blogging (in 2017)
Dreaming about quitting your job and working from home?
Thinking about how good it would feel to achieve financial freedom?
If you had told me 8 years ago that I’d quit my super-safe full-time job, become an online entrepreneur, and make a full-time income from blogging, I would have shown you the door.
Most likely, my response would have been:
“How do people make money from blogging in the first place? How is that even possible?”
Back in 2017, I was working as a business analyst in aviation.
My days followed the same pattern: working 9-to-5, wasting my time in meetings, and missing a sense of fulfillment.
My work was NOT making me happy. It was NOT how I wanted to live in for decades to come.
So, the whole 9-to-5 life was making me feel frustrated because:
- I didn’t have control over how I spend my days.
- Feeling like my work didn’t make a difference.
- I was stressed about stuff that didn’t really matter.
- Office politics paired with useless hierarchies and unprofessional management.
While the consistent paychecks and lovely coworkers were great perks, I didn’t feel like my time and efforts were appreciated.
So I decided it was time for something new. But I didn’t want to work for someone else. I wanted to become self-employed and be in charge of my own life.
Once I started looking at my options, I came across the idea of earning passive income online.
So I thought:
“Wouldn’t it be fantastic if I could set up a system and worry less about money in the future?”
However, since I didn’t really understand how blogging worked, making money from it wasn’t on top of my plan.
I simply wanted to blog about a topic I love. If I could make a few bucks on the side, what could be better!
I never would’ve thought that someday blogging would allow me to earn a full-time income.
My blogging story
Let me make one thing clear right away:
I didn’t start my first blog in 2017 with the goal of making money blogging.
Instead, my blog was a place where I:
- Shared my experience of learning how to code
- Helped my readers by sharing helpful resources and strategies
The idea to monetize came to me much later.
I put tons of work into writing articles, but it was far from a successful online business. I didn’t have the right mindset to make money from home with my blog.
But when I got the idea to monetize my blog, things started moving quickly.
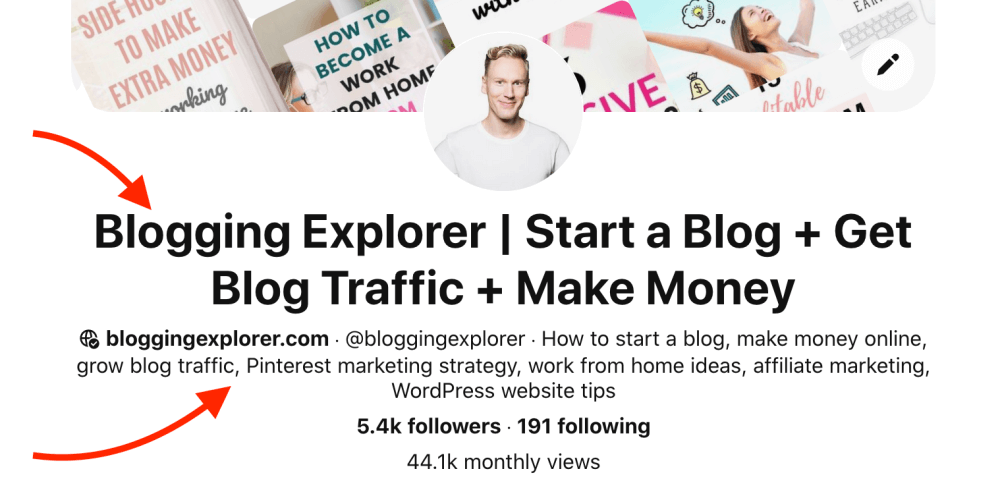
When I launched Blogging Explorer in late 2018, I had a completely different approach.
I know starting a blog to make money online can feel overwhelming. It’s difficult to know where to start and how to make sure you don’t waste your precious time on the wrong things.
Thus, Blogging Explorer is my way of answering all the questions and solving the problems I struggled with as a beginner blogger.
And the idea worked. I was looking to help others achieve what I had, but I also wanted to make money blogging.
My goal was to make $1,000/month within 12 months of starting my second blog.
If I could do that, I knew I could grow my passive income and blogging business even further.
But first, I needed to learn how to make money blogging step-by-step and create a system for consistent passive online income.
The good news:
I reached that $1,000 goal with Blogging Explorer in my fourth month after the launch.
Fast forward 12 full months and this is where I was at with both of my blogs in late 2019:
$3,781
All of my blog income came from affiliate marketing and display ads.
I hadn’t created any of my own products or courses. Thus, I know it’s possible to make money blogging without writing e-books or selling online courses.
And more importantly:
I still felt like I was new to blogging! I didn’t have years of experience and I still didn’t see my blogs as my primary job.
So how did that happen? How did I do it exactly?
Before we jump into the nitty-gritty of how to make money blogging and where to start, let me make a few points clear:
- I’m not a professional writer. (English isn’t even my first language!)
- I don’t like social media.
- I launched my first own product in April 2020.
- I’m spending 2-16 hours a week to maintain and manage my blogs.
So, if you’re thinking you don’t have what it takes, you’re wrong.
If you feel it’s too late to start a blog this year to make money online, wrong again!
I taught myself how to make money blogging and if I could do it, so can you!
How I did it step-by-step
Alright, let’s jump into the juicy part of how to make money blogging for beginners. But before we do, I really want you to be mindful and aware of a few important things.
First off: making money blogging is possible for anyone – people like you and me – but it’s hard work.
If you’re looking for a get-rich-quick scheme, blogging isn’t going to be the right choice for you.
Or if you read a guide that says you can start a blog in 10 minutes and make $10,000 in a few months, that’s very unlikely what’s going to happen. At least that’s how my experience has been.
Blogging takes a lot of time and – most importantly – commitment.
You will have days when you feel like all your work has been for nothing. You don’t see enough people reading all the amazing content you’ve put out there. So you end up feeling frustrated. I would know – I’ve had plenty of those days!
But you just need to stick to it and keep pushing, even when things don’t feel rewarding or fun.
To stay motivated, I want you to write down your goal and remember why you want to make money blogging in the first place. Keep that goal in mind, always.
The bottom line is: if you want to learn how to make money blogging, you will need to put in a lot of hard work.
You need to:
- Try new things
- Learn what works best for you
- Listen to your audience
- Keep learning continuously
- Stay on top of current trends
- Find ways to get more work done in less time
Ultimately, it’s up to you how much time you invest. The more hours you put into your blog, the faster you will start seeing results.
Now, I know that your time is limited. So, you need to do the right things at the right time to achieve your goal faster.
If you’re still reading this, it means you’re determined to make this work. Keep reading!
How to make money blogging: step-by-step guide
Now, as a new blogger, it’s difficult to know where to start. You hear people are making money with their blogs, but it just feels confusing.
How do they do it exactly?
I put together this comprehensive guide on how to make money blogging for beginners to help you out. It’s your step-by-step plan to learn how to start earning passive income from your blog.
This guide isn’t a quick read. You’ll probably need a couple of days to go through everything because I’m sharing ALL the steps I’ve taken to create a successful blog that earns me a full-time income.
If you feel like you need more details, check out my more thorough guide on how to start a successful blog from scratch.
Here are the steps to make money blogging for beginners:
- Set up a blog website (the right way)
- Create high-quality content
- Monetize your blog
- Use Pinterest to grow your traffic
- Plan a consistent blog content strategy
- Start an email list
Let’s jump right in!
1: Start a blog that can make money
First things first: your blog will be your business, so you want to set everything up properly.
One of the first things I learned was:
You can’t monetize a poorly constructed blog.
People won’t read your blog if the technical side of it doesn’t work. Makes sense, right?
Also, to make money blogging, you need to make sure you’re not using a free blogging platform.
Here’s why free blogging services are a no-no:
- You WON’T own your blog content if you use a free blogging service.
- You can’t monetize your blog freely (every service has its restrictions).
- You can’t customize your blog design to match your business and aesthetics.
- You will have limited support to help you.
If you want to make money with your blog, you need to create a self-hosted website that allows you to manage and customize your blog freely.
But before you think you’re not experienced enough to set up anything like that, hold on.
Setting up a self-hosted blog website has never been easier. You can use the free WordPress.org blogging and website platform to get your blog up and running with just a few clicks.
WordPress is insanely flexible, powerful, and user-friendly. And while there are a lot of things you can do with it, you only need to learn a few basics to get started.
Now, while the WordPress software is free, you will need to invest a few bucks in a web hosting plan to host your blog website files on a server.
This means you’ll use a hosting provider such as Bluehost. This comes at a cost, but you won’t be able to make money with your blog if you set up your website the wrong way.
I use WordPress and Bluehost for Blogging Explorer and my other websites, too. Let’s see why…
Why you should use Bluehost, too
- WordPress.org itself recommends Bluehost for web hosting
- You get a FREE domain name for your blog
- They install WordPress for you automatically
- You can access your blog website almost instantly
- They offer the best affordable hosting for bloggers if you’re new to blogging and you have limited resources to invest in your blog
Although setting up a blog website may feel technical and overwhelming, it really isn’t. In fact, it’s the quickest step in this entire guide!
I’ve even negotiated a special deal with Bluehost so you can get started for just $2.95 a month.
Let me show you how to create a blog with Bluehost.
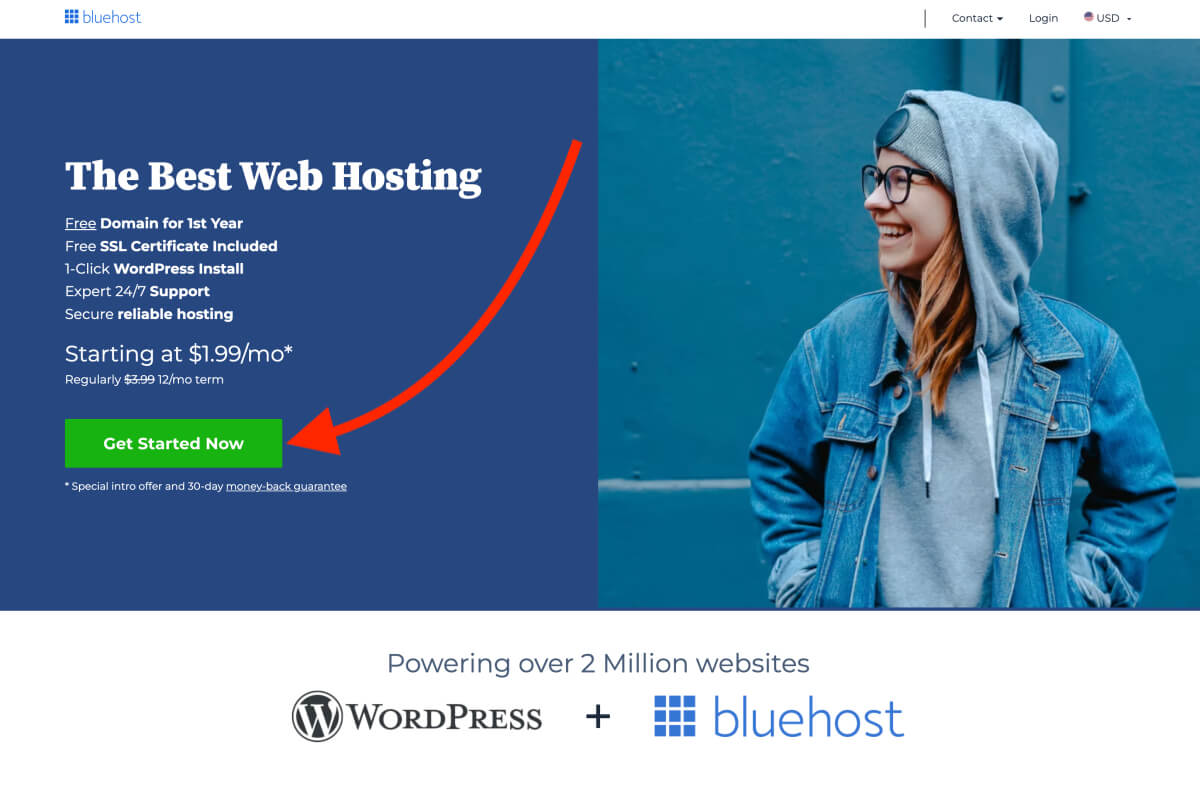
Step 1: Head over to Bluehost.com
You simply need to head over to Bluehost.com and click on the green button that says Get Started Now:
Step 2: Choose your blog hosting plan
On the next page, select the Basic plan on the left. It’s cheap and has all the features you need right now:
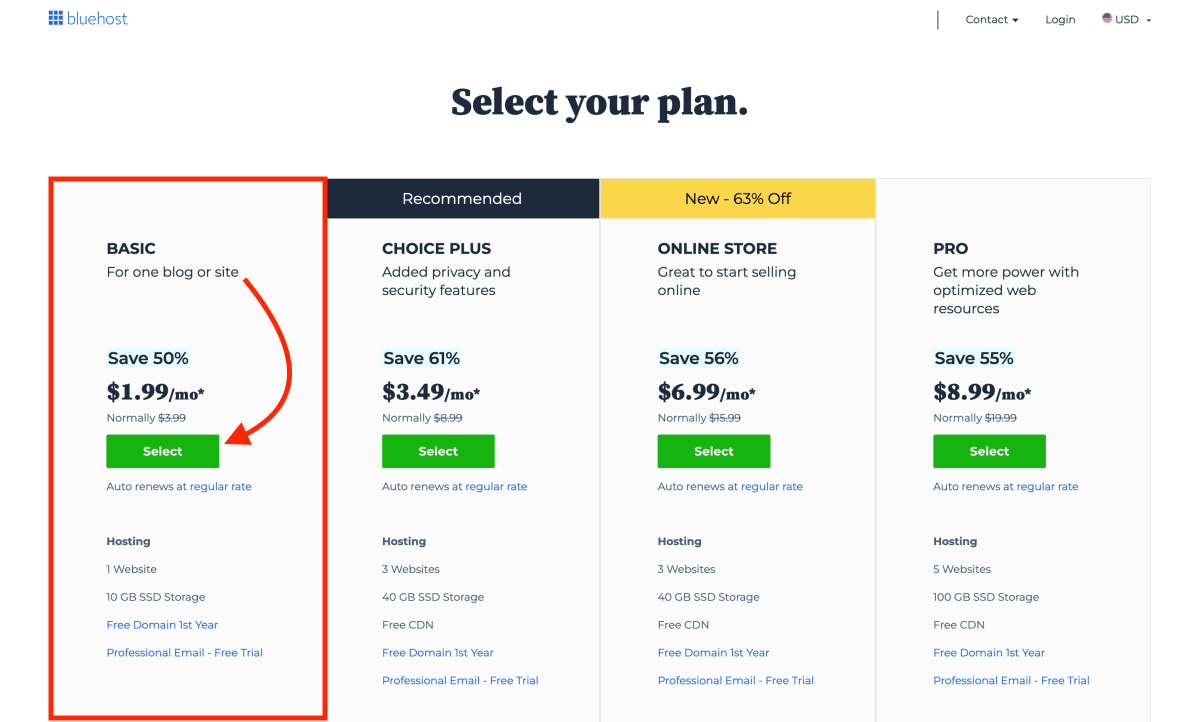
Now, when I was starting my first blog, this initial investment in web hosting felt like a big buck.
I was on a super tight budget, and I didn’t want to spend all this money on technicalities that I didn’t even understand that well at that point.
If that sounds familiar, I feel you.
And that is exactly why I wrote this guide on how to make money blogging for beginners.
Signing up for blog hosting is simply a necessary investment at this point. It gives you the power to make that money back with your blog faster than you think.
So, when you find a hosting plan that suits your needs, click on the blue button that says Select.
Step 3: Pick your blog domain name
On the next page, you can choose your domain name:
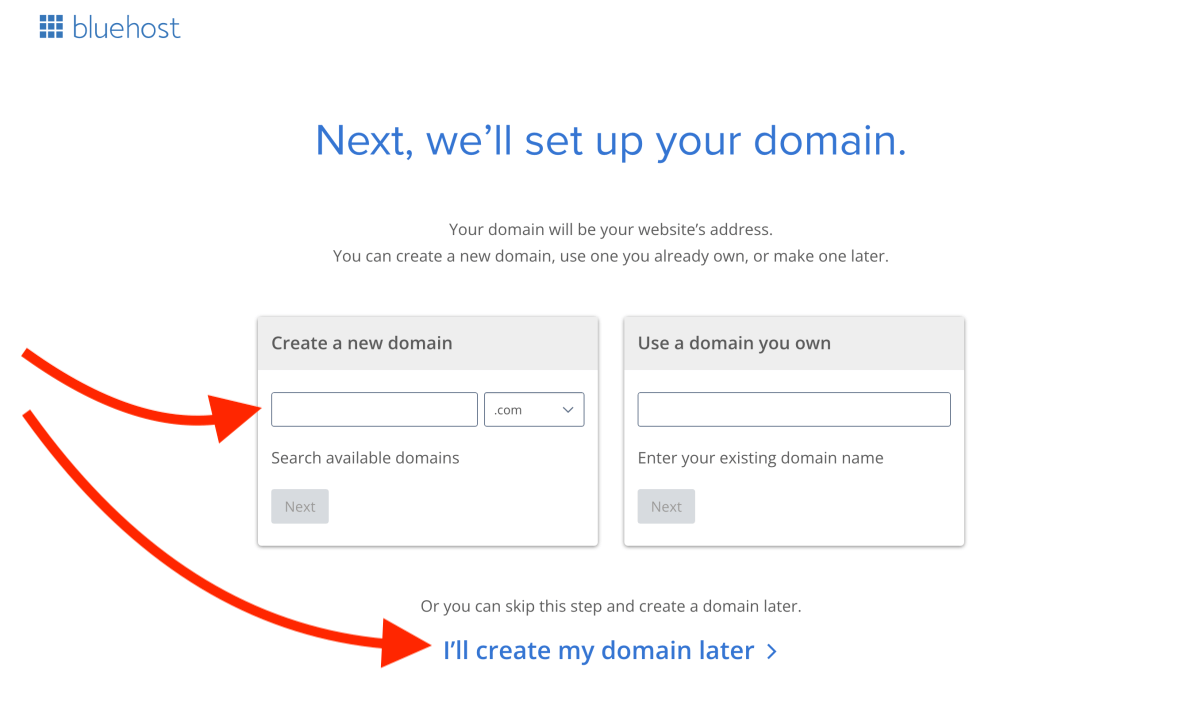
If you have a domain name in mind, you can register it for free where it says “Create a new domain”.
Type your domain name into the field and click Next.
If you haven’t found the perfect domain name yet, don’t worry. You can choose one for free in your Bluehost dashboard any time.
If that’s the case, skip this step by clicking I’ll create my domain name later at the bottom.
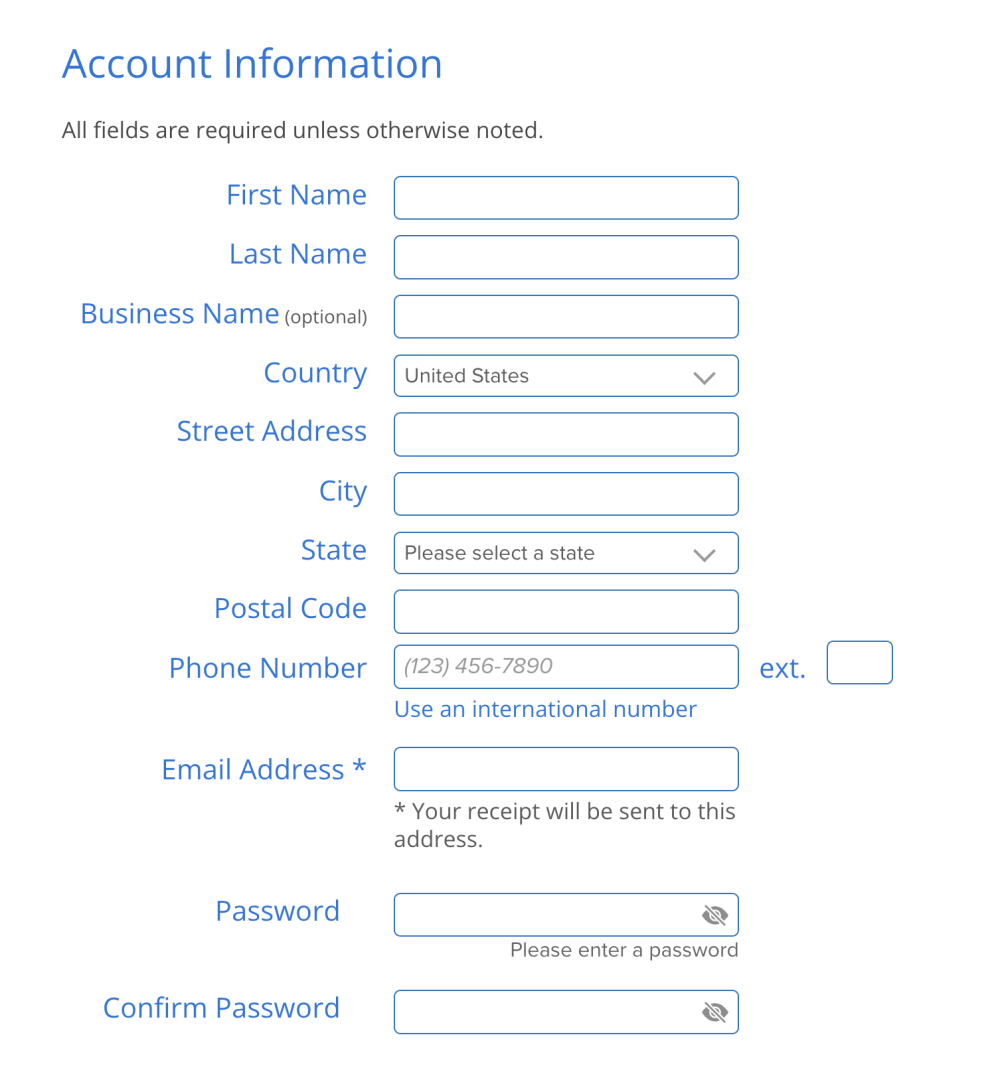
Step 4: Finish your signup process
Next, you will be taken to a new page where you can enter your account details to finish up your Bluehost signup process.
(I told you this would be easy!)
Account Information:
First, fill in your account information:
Package Information:
Second, choose the duration of your Bluehost web hosting plan under Service Term:
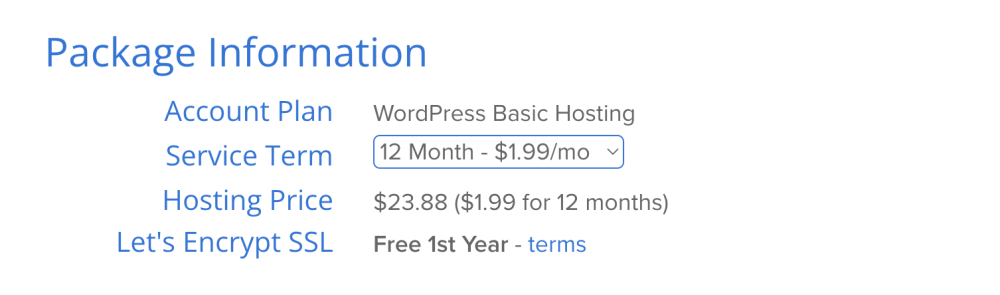
The 12-month plan secures you the lowest price for an entire year.
Package Extras:
Thirdly, you can choose some additional services for your blog under Package Extras:
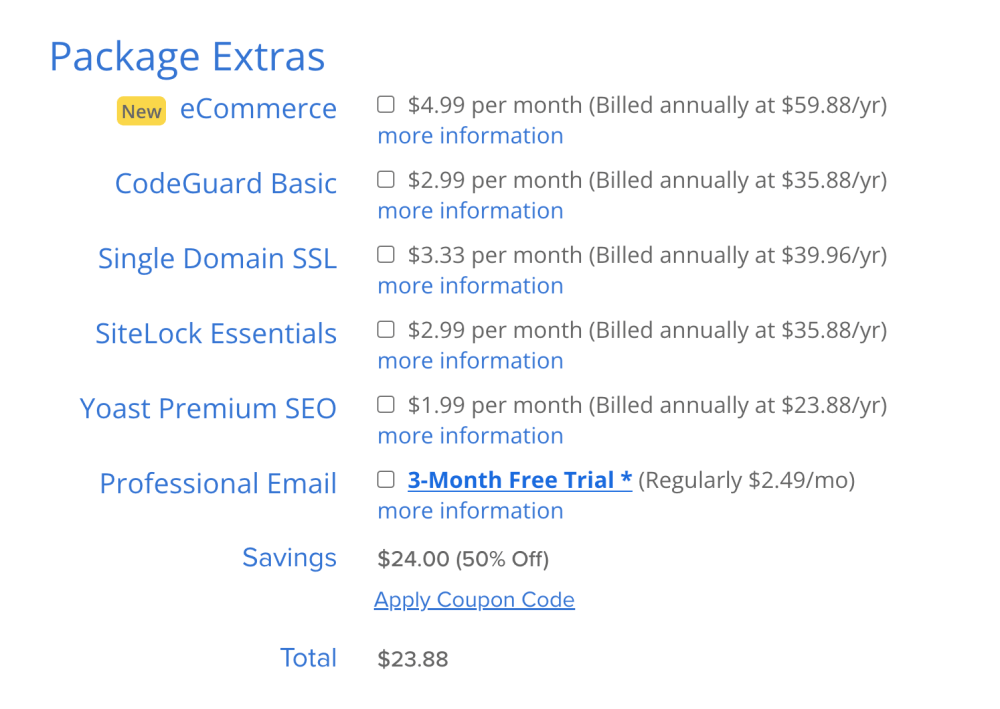
You can click “More information” below each point to learn more about them.
If you ask me, you don’t need any of them. The price can go up quite a bit if you choose to buy some, so the decision is yours. I didn’t choose any extras for my hosting plan.
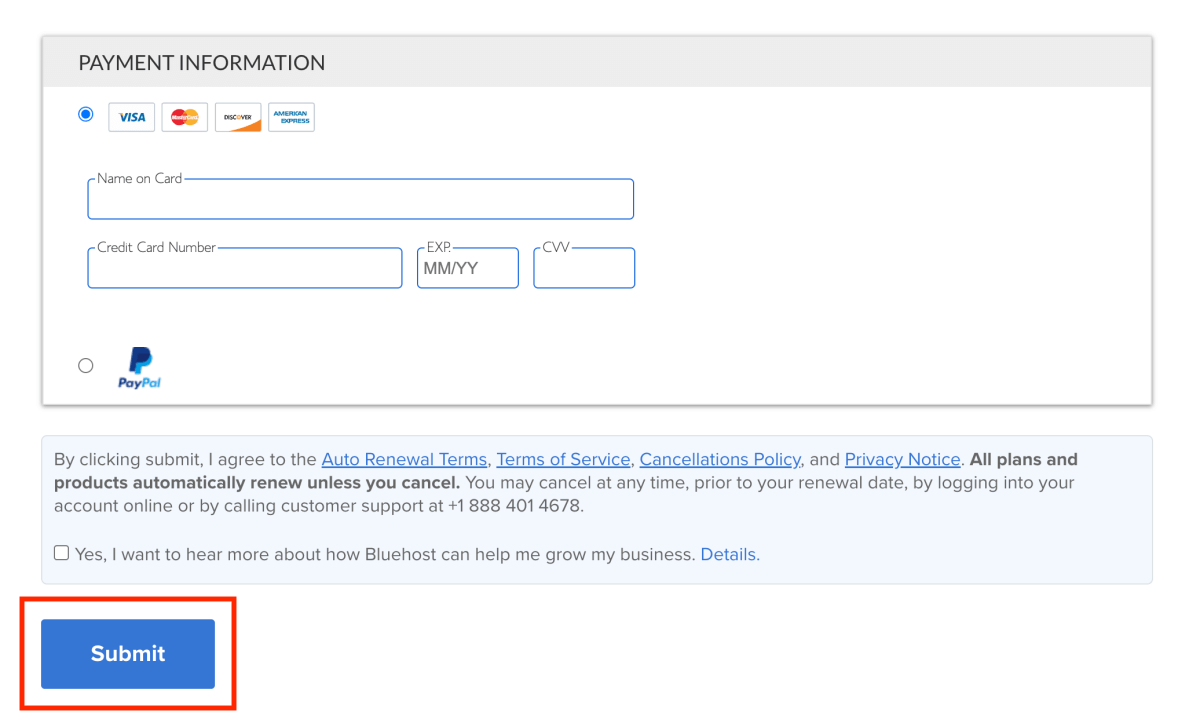
Payment Information and Terms:
Next, enter your payment details, read the terms and cancellations policy carefully, and click Submit:
Congratulations!
You are now officially a happy member of the Bluehost community with your very own blog hosting plan!
Nice job!
What’s next?
Now that you have the technical side of your blog set up, take a deep breath and sit back.
Your domain name and blog hosting are all set (for years to come).
Now is the perfect time to get familiar with your daily and weekly blogging tasks.
At the end of the day, successful blogging is all about planning and creating content and connecting with your readers.
Hence, as long as you stay consistent and help your visitors with useful blog posts, you’re on the right track.
To help you get started the right way, the next steps of this guide on how to make money blogging for beginners will help you:
- Create helpful, valuable content for your readers
- Find the right way to make money with your blog
- Generate free traffic to your website
- Set up a consistent blog content strategy
- Start an email list to grow a loyal audience
I’ll share with you the exact tools and strategies you want to use to make things easier for you and to save heaps of time in the long run.
Let’s start with learning what type of content you want to create.
2: Create helpful, valuable content that people are searching for
The only way to make money blogging is to get visitors to your website.
If no one is interested in reading your content, how will you monetize it?
The only reasons people will come to your blog are:
- You can solve their problems
- You can answer their questions
Your readers need to get something from you. Something valuable, helpful, and useful.
Nobody wants to read about your personal problems — unless you share your solutions and how you overcame them!
Make sure you’re not just writing a journal for yourself. Instead, write for your readers.
Share your story and how you managed to overcome your own struggles. That’s how your readers will relate to you AND find valuable solutions for their own problems.
How can you know what your readers want?
You need to do some research!
There are already tons of popular blogs out there for any topic you can imagine.
All you need to do is find out why they’re so popular:
- What are they doing that attracts all those readers?
- What type of content do they publish?
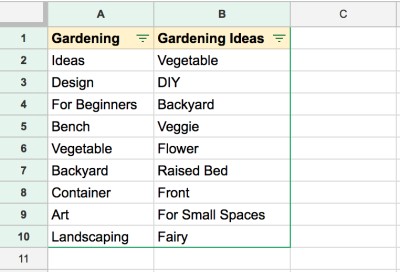
First, make a short list of 5-10 most popular blogs for your favorite topic.
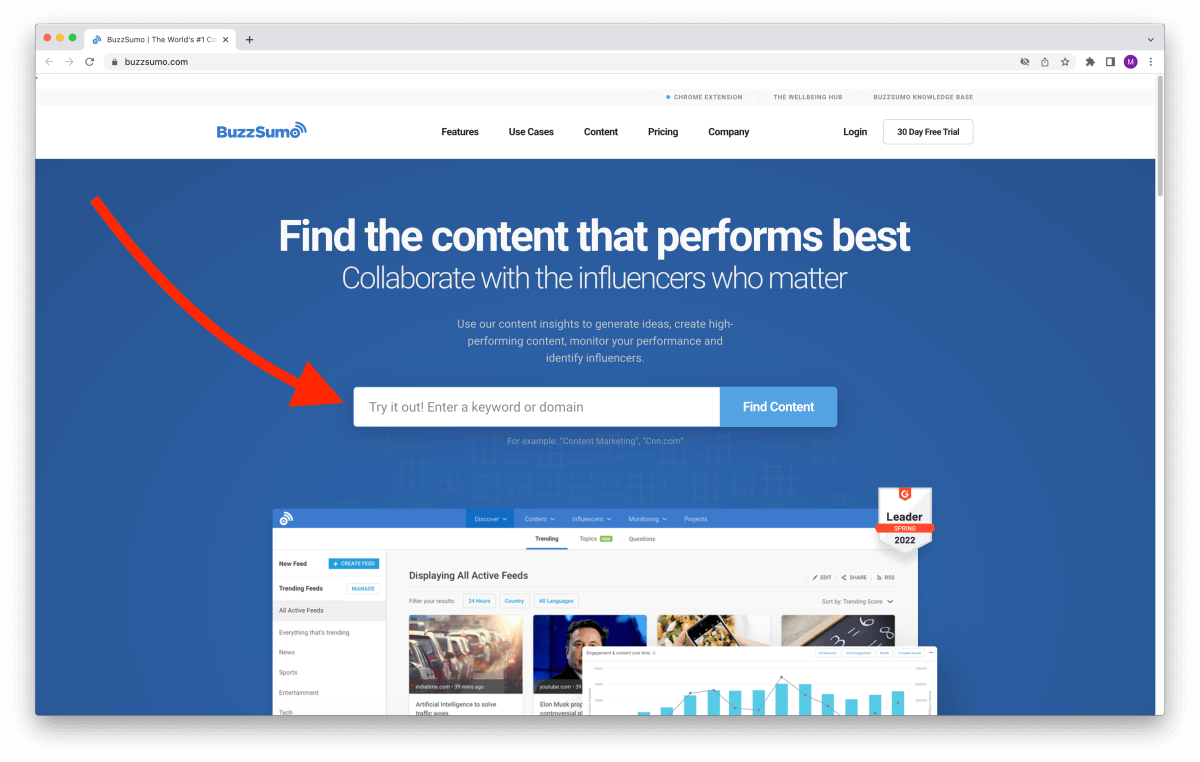
Then, head over to Buzzsumo.com. It’s the quickest tool to find out which articles are the most popular and the most shared for each blog on your list.
One by one, enter the blog URLs in the search bar:
Next, check which blog posts receive the most shares on social media. You can easily see the numbers in the results list:
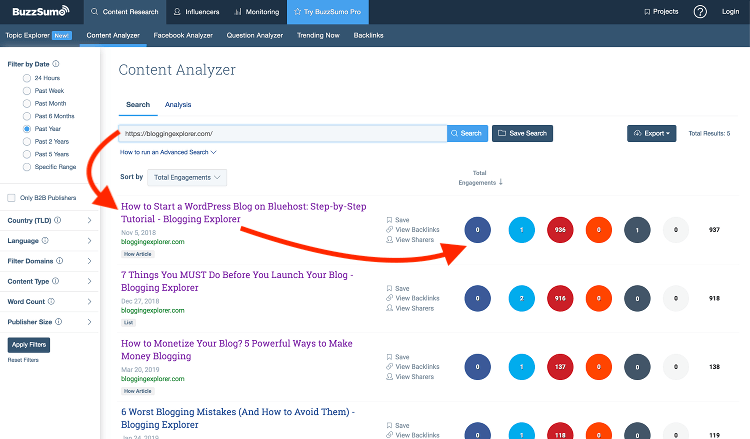
Write down all your findings right away. These are real-life examples of blog post ideas and articles that are proven to work!
If thousands of readers have shared an article, they are most definitely loving it. Use these insights to find out what your target audience is interested in.
For more tips on finding out what your readers want, check out my guide to find blog post topics that generate massive traffic.
3: Monetize your blog the right way
Now that your blog is set up and you know how to create in-demand content, it’s time to think about monetization.
- How will you make money blogging exactly?
- What monetization methods should you use?
Some bloggers make a lot, some very little, and some none at all.
Blog income depends on so many factors that it’s simply impossible to know how much money your blog will make in advance.
The most important things are:
- What you blog about
- How you drive traffic to your blog
I have a separate article on how to choose the perfect blog topic that goes into more detail.
How do bloggers make money?
All in all, building a money-making blog doesn’t have to be difficult. It all boils down to choosing the right monetization methods that fit your blog the best.
When I made my first dollars from blogging, it felt amazing! And although it was just $2, I was feeling so happy, overjoyed!
I spent most days working from home, creating content with a level of motivation I had never experienced before.
Knowing I could grow that small income with my own efforts felt so empowering!
Trust me, you can see your first dollars rolling in faster than you think.
To help you get started, let me walk you through a few popular ways to make money blogging next. Once you’re familiar with them, I’ll make a few suggestions to help you start making money in a matter of days.
Here are three main potential income sources for you as a blogger:
1: Display ads
The idea with placing ads on your blog is simple: you sell advertising space, your readers see an ad on your blog, and you earn a commission.
Ad income is 100% passive, which I love. Once you’ve set up your ads, you will make money with display ads while you sleep.
You can choose from dozens of top ad networks for bloggers to place ads on your blog easily.
At first, your income will be small, so you need patience. But as you generate more traffic, the income potential will grow.
I use display ads on Blogging Explorer, too. I’ve teamed up with Monumetric, an ad network that takes care of almost everything for me.
The best part?
They have a team of experts to help me with my ad placement strategy. Learning how to optimize everything can take a lot of time, so they’ve been super helpful and supportive along the way.
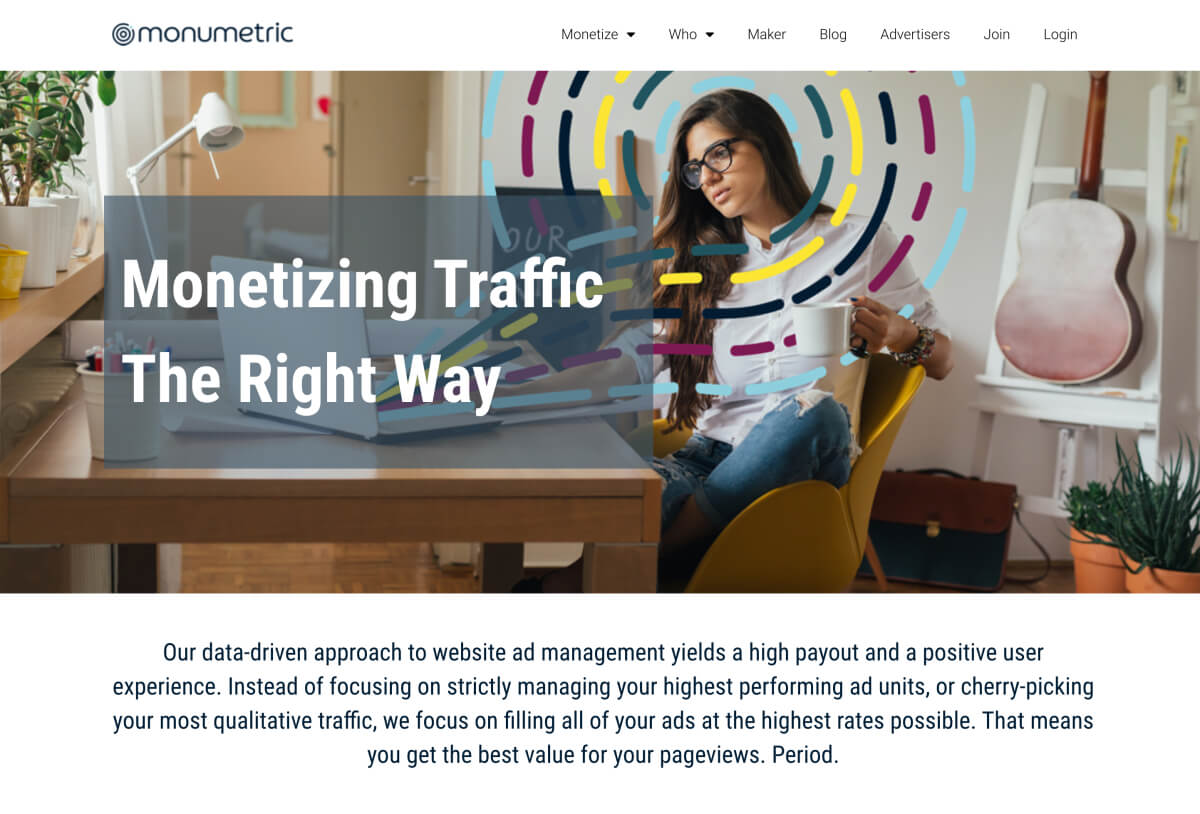
For more details, check out my Monumetric review to see how much you can make with them.
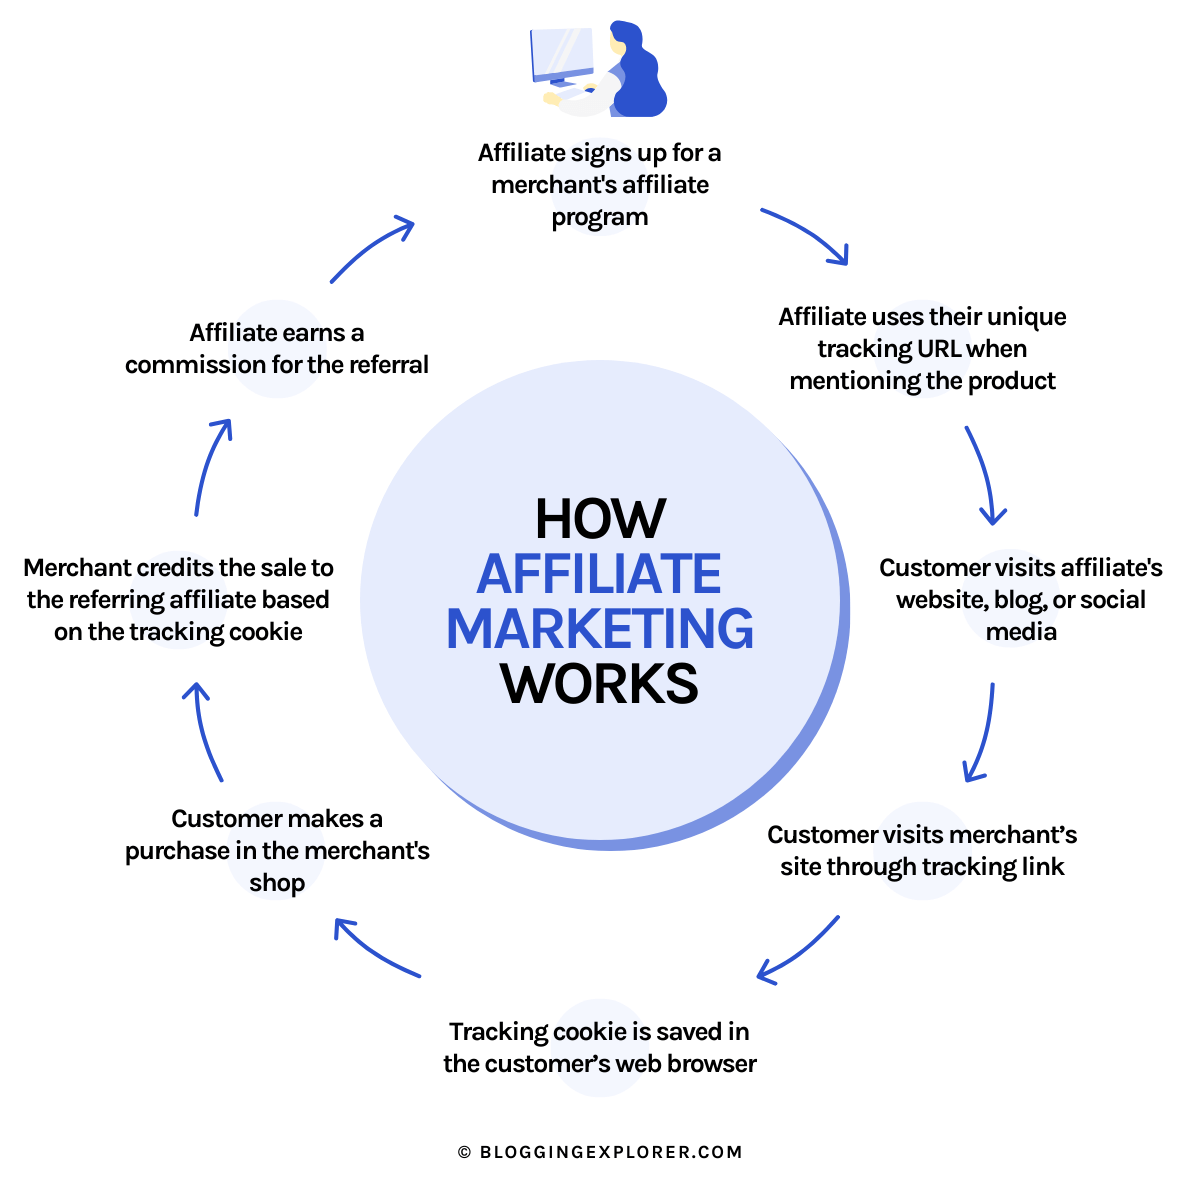
2: Affiliate marketing
Affiliate marketing means you sell someone else’s products or services and make a commission for every purchase.
If cone correctly, it can be a fantastic source of passive income that keeps paying off for months and years to come!
Affiliate marketing is how I earned my very first dollars on my first blog and how I now make a full-time income blogging. About 85% of my total blog income is from affiliate sales.
The steps to successful affiliate marketing are simple:
- Choose a product you use and love
- Join the affiliate program for that product
- Share your success story with the product (create top-notch blog articles)
- Convince your reader why they need the product, too
- Drive traffic to your website
Here’s an example:
I know that most beginner bloggers find it difficult to get their WordPress blog website up and running. WordPress is beginner-friendly, but it takes some time to get comfortable with it.
When you start a blog, one of the biggest hurdles is getting your blog website to look beautiful. Most of us aren’t professional designers, and hiring a freelancer may break the bank when you’re just getting started with blogging.
Luckily, there’s an easy shortcut to creating a stunning, professional-looking WordPress site quickly:
I use the Elementor page builder with the free Hello Elementor WordPress theme for nearly all my WordPress projects, and I love working with it.
Because I know these tools are super intuitive and easy to learn, I joined their affiliate program to promote Elementor and the Hello theme to my readers, too.

First, I tell my readers a little about what a good, beginner-friendly WordPress theme should include before introducing Elementor and Hello.
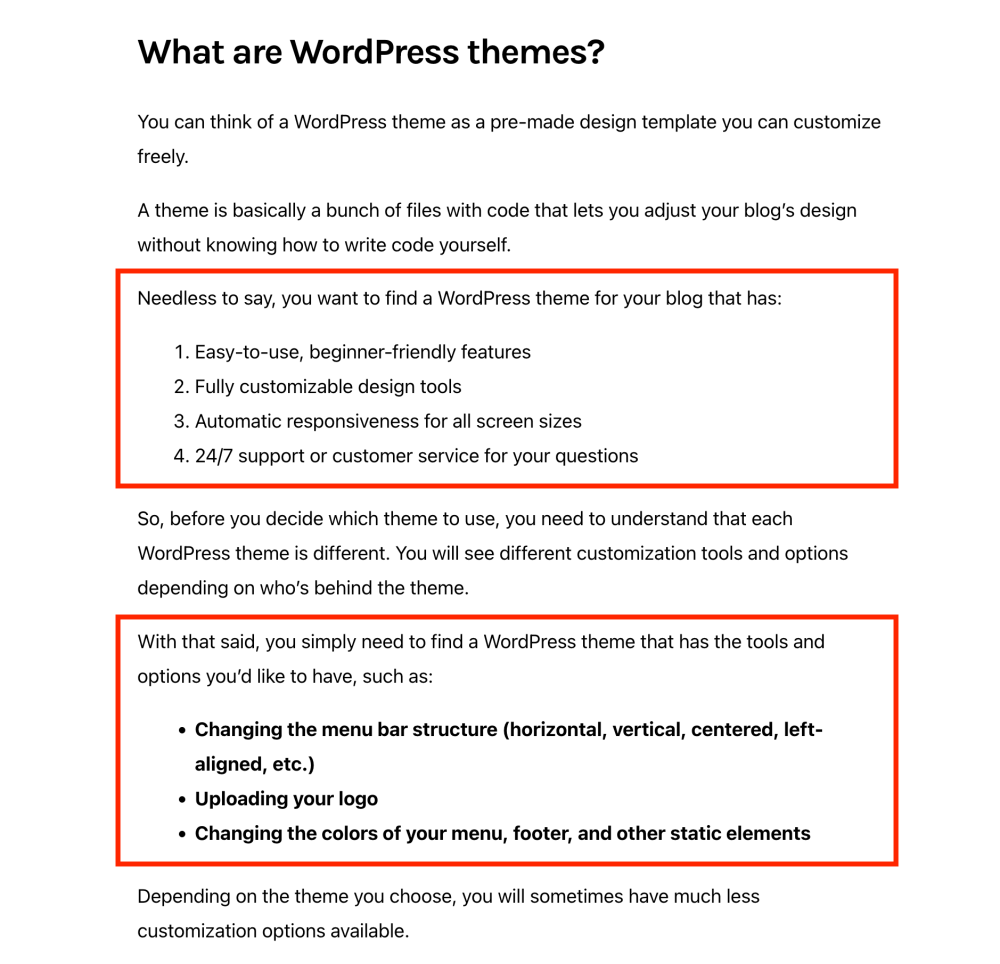
Then, I go on to discuss a few key perks and advantages of using this product and why it’s relevant to my audience:
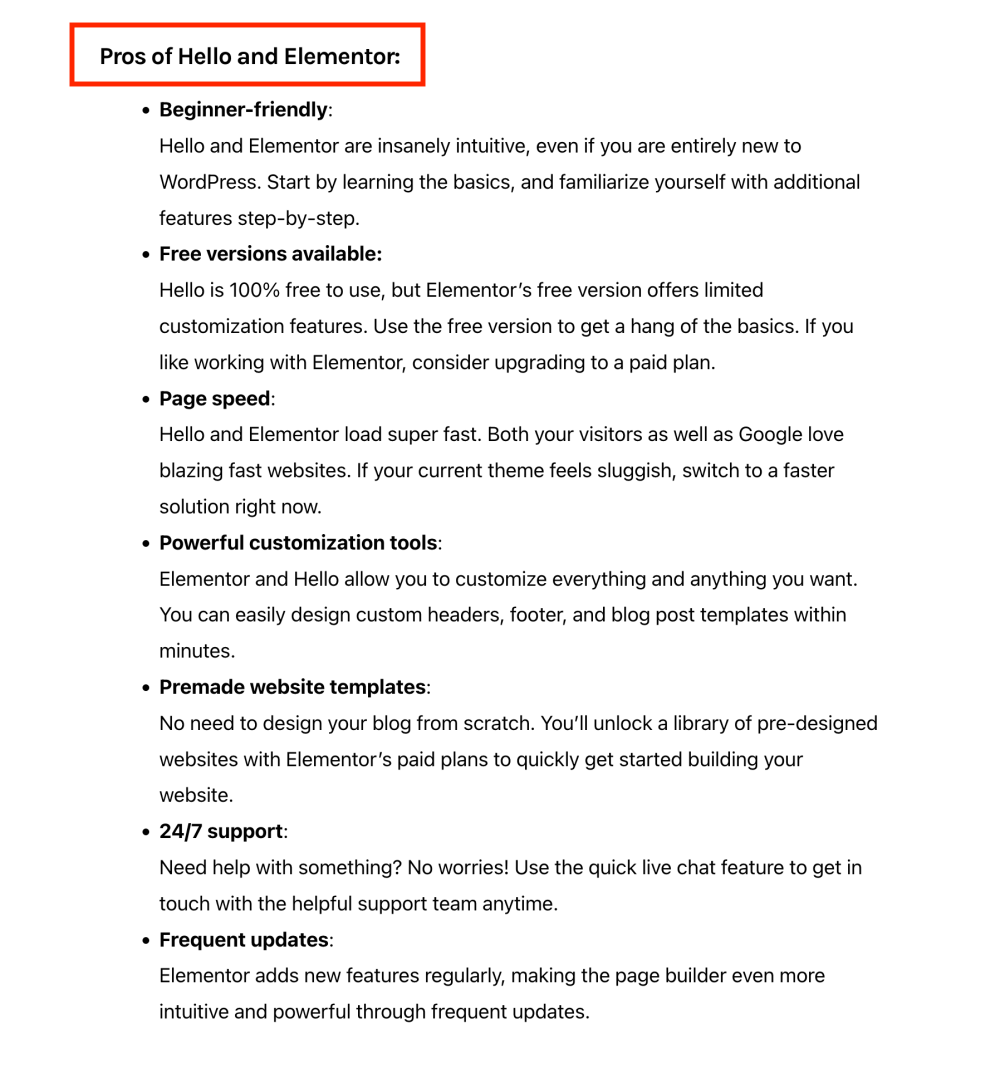
This is my chance to tell my readers why I love it and why I think it’s worth an investment.
In short:
Elementor and Hello have made my life a lot easier, saving me tons of time with the technical part of setting up and running my blog websites. I’m able to build beautiful websites for my clients at lightning speed with them. Therefore, I know that my audience will save heaps of time and build stunning websites with it, too.
To learn more proven strategies, check out my Affiliate Marketing for Dummies guide.
3: Selling your own products
Again, the idea is quite simple:
You listen to your audience, learn what they’re struggling with, and create a product that solves a specific problem.
To learn deeply about your audience, I recommend mastering affiliate marketing before creating your first product. That allows you to learn what types of products your readers need.
Once you know exactly what they want, it’s easier to create the perfect product to sell.
One blog traffic product that I was promoting through affiliate marketing earned me about $2–5 per sale.
Even if I sold 10 products daily, my income would be $60–300/month. That’s a great start, but it wouldn’t even cover my food expenses.
So I thought:
OK, my readers love getting more blog traffic from Pinterest. I just have to find out what they struggle with the most.
This is what I knew:
- My audience loves blog traffic.
- They love using Pinterest to drive free traffic to their websites.
- Almost everyone was using Pinterest the wrong way.
- I have a Pinterest strategy opt-in and a few thousand subscribers on my list.
- A team of Pinterest reps would help me confirm my techniques.
The next step was easy: I needed to craft a product that would help my readers understand what REALLY was important with Pinterest marketing. My insider contacts at Pinterest were more than happy to help me out.
And ta-dah! — My popular Smart Pinterest SEO e-book was born:
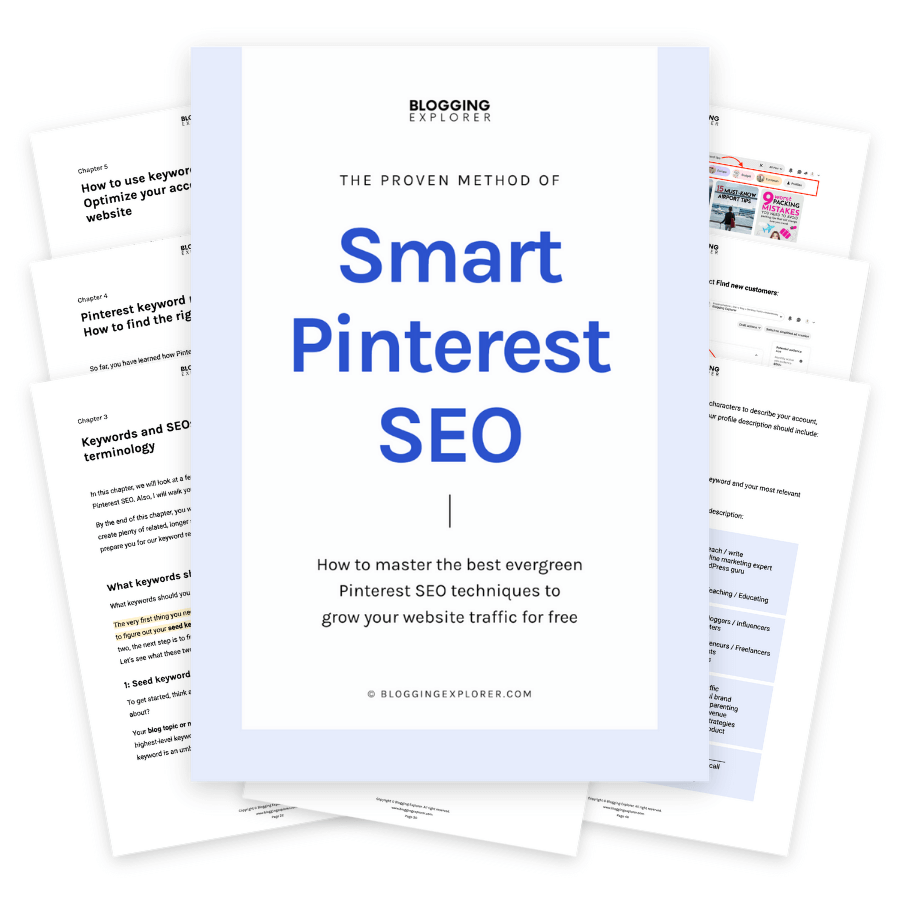
Overnight, my $2/sale commission became $48/sale.
The best part?
With your own products, you get to keep 100% of the revenue. You control the price, the marketing, discounts, everything.
Also, you can gather feedback directly from your customers and improve your product continuously. Make sure you pay attention to what they say. Their feedback can be a goldmine for further product ideas.
As long as you know how to attract the right visitors to your sales page, you can make money blogging and take your business to a whole new level.
My tips for making money with your blog
Every blog is different, and what works for my blogs isn’t necessarily the best way to make money blogging for you.
You need to pick one monetization method and perfect it.
Learn how your audience reacts, see what works, and gain experience step-by-step.
With time, you want to diversify your income sources. You should generate revenue from any and every source possible. You don’t want to put all your eggs in one basket.
And while you learn new tricks and create new income sources, your existing content will continue generating passive income in the background.
To achieve a full-time income with blogging, you need to focus on your audience. All it takes for your blog to churn passive income is that you help them.
Your readers are looking for quick wins and practical information to make their lives easier.
If you know what their pain points are and offer a quick solution, you will be making money quicker than you expect.
Always, always, ALWAYS think of your readers first.
Now you know how to turn your blog into a money-making machine. The next thing you need is visitors!
4: Use Pinterest to grow your blog traffic
Even if you have been blogging for 10 years.
Even if your content is top-notch.
If you don’t have blog traffic, you won’t make a dime.
But how do you get people to visit your blog?
There are tons of powerful strategies to grow your blog traffic and generate more income.
Most successful bloggers use social media to drive traffic to their blogs. But if you are just getting started, you don’t have thousands of followers on Facebook, Twitter, and Instagram.
Search engine optimization or SEO is the best way to generate free, organic traffic from Google.
But getting your blog posts rank well on Google takes a few months. You don’t want to wait for that long to see people visiting your website, right?
So, what’s the quickest way to drive free traffic to your blog, then?
Pinterest!
That’s right! Pinterest is a huge visual search engine people use to find useful information and solutions to their problems.
If you’re thinking, “Pinterest is just about recipes and crafts”, you’re wrong!

Everywhere I look, bloggers are generating massive blog traffic FOR FREE with Pinterest.
And if you’ve read any of my other blog posts, you will know I’m a huge fan of the platform.
Back in early 2019, Pinterest helped me grow my blog traffic AND income by 200% in just 2 months.
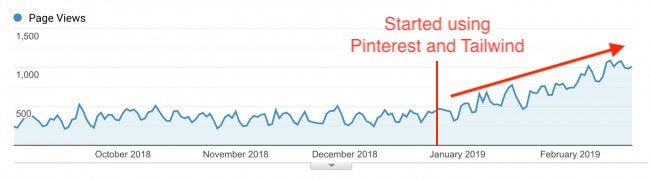
I created my own evergreen Pinterest marketing strategy that still works like a dream. I use it for all my blogs and my clients’ websites, too, in any niche.
Needless to say, I’ve been obsessed with free Pinterest traffic ever since.
How can you drive traffic to your blog using Pinterest?
If you’re not familiar with Pinterest, now is the perfect time to start using it for blog traffic.
And don’t worry, Pinterest is super easy to use, even for absolute beginners. And most importantly, you can see free blog traffic almost instantly.
Let me walk you through a few key steps I use to drive traffic to my blog with Pinterest:
Step 1: Set up a Pinterest business account and profile
Start by signing up for a Pinterest business account. It only takes 2 minutes and it’s 100% free to use.
Click here to create your business account.
Enter your email address and choose a password, and click on Create account.
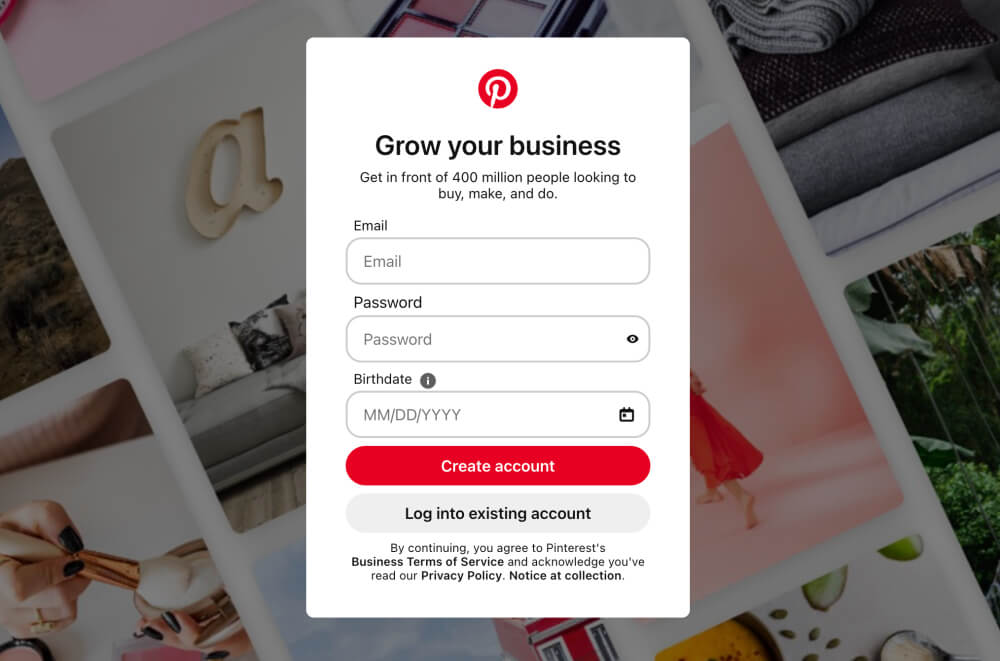
If you already have a normal Pinterest account and want to use it instead, you can upgrade to a business account for free.
Click here to convert a personal account into a business account.
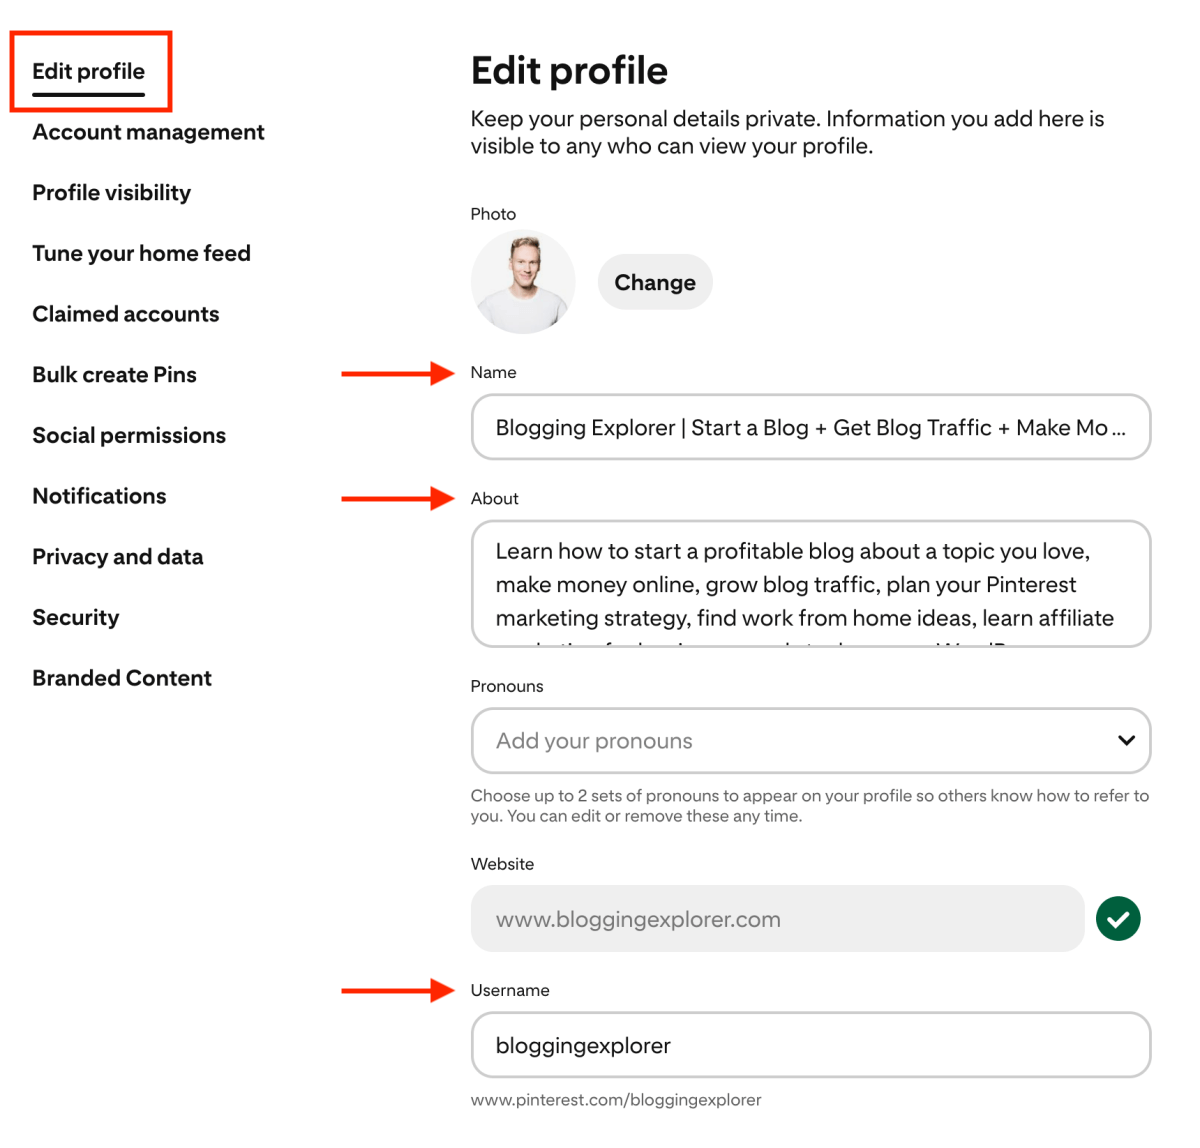
Next, update your Pinterest profile.
Setting up a professional-looking profile helps your target audience find you more easily. Hence, this is the first step to growing your reach and gaining more followers on the platform.
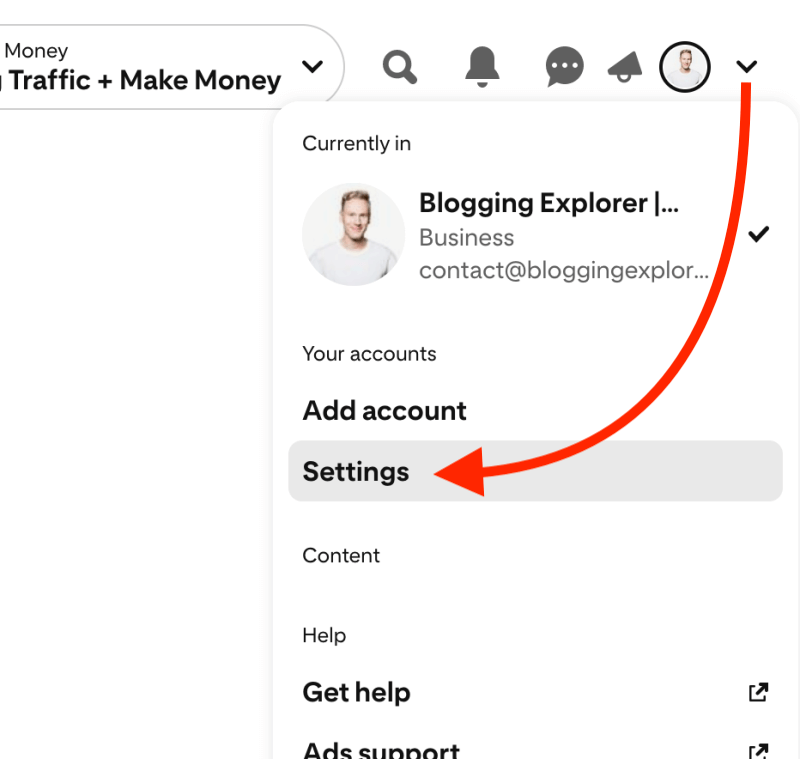
Head over to Settings in the upper right corner menu on Pinterest:
Update the following information:
- Upload a profile photo
- Add a display name
- Write a profile description
- Set your username
Step 2: Find the right Pinterest keywords
Now that your profile is set up, you want to find your first Pinterest keywords.
Here’s how Pinterest works:
When you start pinning content to your Pinterest boards, the algorithm draws conclusions about your profile and interests.
Hence, Pinterest starts expanding on:
- What you’ve pinned so far
- Whose pins they are
- How you found them
And since Pinterest is a search engine, it wants to show you the best possible, most relevant pins on the entire platform.
But how does Pinterest know which pins you want to see?
The search engine uses keywords to categorize and rank content that matches your interest.
Keywords are the only way Pinterest can understand who should see a given pin.
Thus, when you start publishing your own pins, you need to use the right keywords to help Pinterest show your content to the right audience.
Let me walk you through a very basic keyword research session:
Head over to Pinterest and enter your blog topic in the search bar at the top. See how Pinterest automatically suggest related search terms for your main keyword:
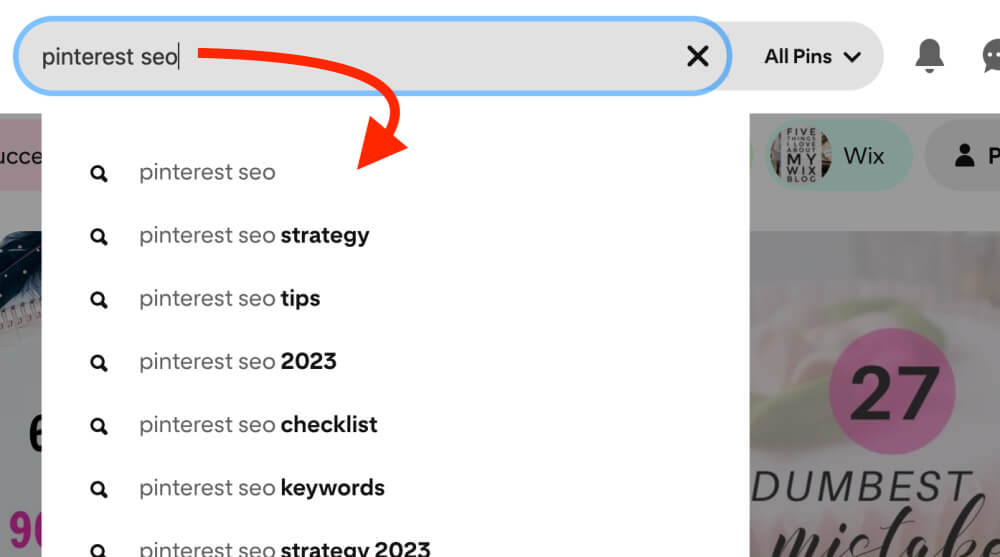
Those are popular Pinterest keywords you should use!
Do a few quick searches for 5–10 keywords relevant to your blog topic.
For example, use your future blog post categories as search phrases and see what keywords Pinterest suggests.
Make a list of the keyword suggestions you see for each search phrase. You want to use them for everything you do on Pinterest, so take a few moments to write them down.
You want to build a clear strategy around your keywords. If you just start spamming them everywhere, your Pinterest game will be all over the place.
Here are a few smart places to use your keywords on Pinterest:
- Board titles and descriptions
- Pin titles and descriptions
- Pin text overlays
- Your blog posts
Step 3: Create 15–30 boards that are relevant to your target audience
Based on the keyword suggestions you discovered, you need to create 15-30 boards of topics related to your blog niche.
Again, think about your target audience:
- What do they want?
- What are they searching for?
Ideally, you want to create a board for each topic you think your potential readers would search to find your blog posts.
If it’s any help, I usually think of the keywords and search phrases I would enter into Google to find my own blog posts.
For example, I write about blogging tips on Blogging Explorer, so my first Pinterest boards were:
- How to Start a Blog
- Blogging Tips
- WordPress Themes for Bloggers
- Blog Traffic Tips
- Make Money Blogging
All of these are also blog post categories on my website.

Remember to use relevant keywords in your board descriptions, too. That way, your boards will be easier to find on Pinterest and you will generate even more traffic to your website.
For a complete guide, check out my blog post on how to optimize your Pinterest boards quickly.
Step 4: Create click-worthy Pinterest images that link to your blog posts
Finally, it’s time to start creating pin images that generate clicks to your website.
The truth is:
If people don’t click on your pins, all the hard work you put into writing your blog posts will be in vain. You won’t get any blog traffic, and your blog income will be non-existent.
Therefore, make sure you follow these best practices for designing beautiful pins that convert into blog traffic:
- Use compelling, high-quality images:
Start with free stock photos, for instance. Check out Unsplash and Pexels for some great ideas. - Use the right size:
Think vertical! The best ratio is 2:3. Pinterest recommends making your pins 1,000 pixels wide and 1,500 pixels tall. - Add a text overlay:
Tell your story and catch people’s attention with a benefit-driven text overlay and headline. Why should they click on your pin and read your article? - Use clear, readable fonts:
Don’t go overboard with fancy script fonts. Remember: your text overlay needs to be easily readable on all screen sizes. - Use a call-to-action (CTA):
Encourage people to click on your pin by using an intriguing, value-based headline in your text overlay. What’s in it for them? - Create multiple pins for each blog post:
The only way to find out what resonates well with your audience is to try different design templates, colors, and layouts.
Use whatever tool you’re familiar with to create your pins. If you haven’t created graphics before, check out Canva to get started fast.
Canva is a free online design tool for non-designers. You’ll find a huge selection of pre-made pin designs you can easily customize to suit your wishes.
If you’re struggling to get started with your designs, do some research on Pinterest. Do a quick search for a keyword and pay attention to the pins in the search results.
However, never plagiarize or copy other users’ ideas on Pinterest.
While it’s perfectly OK to find inspiration and general guidelines in other pinners’ work, you want to develop your own style and feel for your pins.
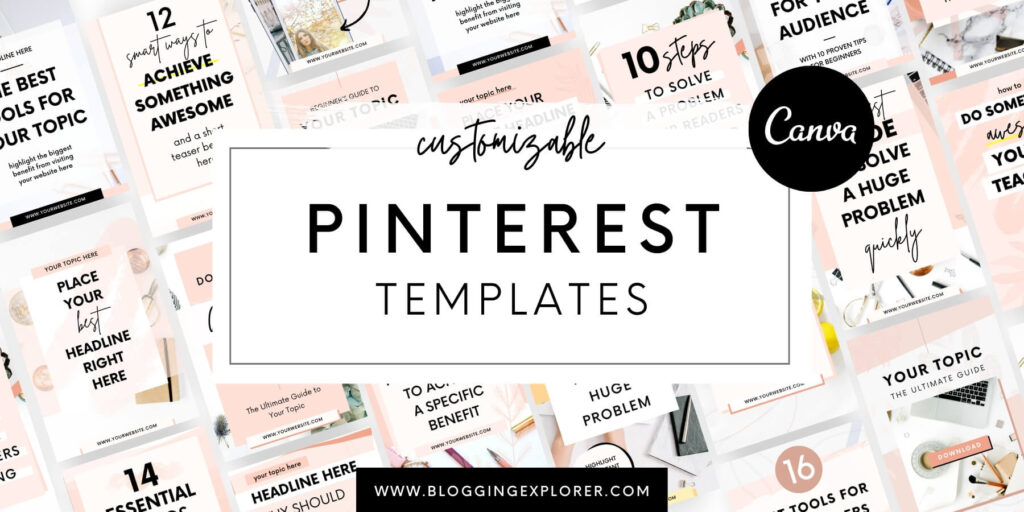
If you want to take a shortcut and design dozens of stunning pins within minutes, you need to check out my Viral Pinterest Template bundle – I can’t recommend it enough.
Step 5: Follow a consistent pinning strategy
When you’re new to blogging and Pinterest, you’re wearing a bunch of different hats. Since you have so much on your plate, you need to figure out a clear, realistic Pinterest strategy to follow.
How much time can you dedicate to Pinterest every week?
Think about the time you need for:
- Designing new pins
- Writing keyworded pin titles and descriptions
- Publishing those pins
- Pinning other people’s content to your boards
Pinterest loves fresh, new pins. Hence, creating and publishing new pin images daily is the best way to see fast results and grow your blog traffic quickly.
With that said, you want to find ways to speed up your work.
The easiest way to create fresh pins faster is to use pin templates. Create a beautiful template in Canva that you can use and re-use for several pins and different blog posts.
Then, simply change the fonts, colors, and background images to create pins at lightning-speed.
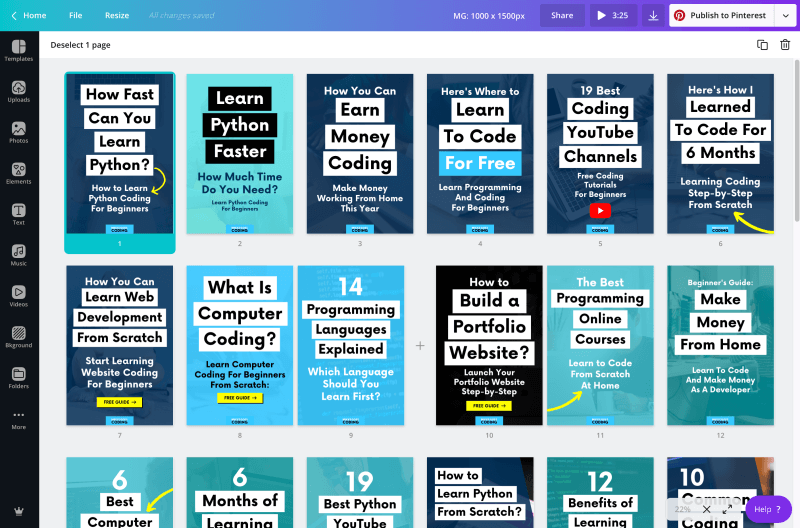
For example, I use my brand color palette and slightly adjust the layouts to create a dozen pins for my coding blog in just 10 minutes:
But what exactly should you be doing on Pinterest daily and weekly?
Here’s my current pinning schedule and strategy:
- I create 2-4 new pins every day and pin them to my most relevant boards first.
- Then I use Tailwind to schedule those pins to all other relevant boards with 6-7 days interval.
- I spend 5 minutes in the morning pinning other people’s content to my boards manually.
- I use Tailwind to schedule 50–150 pins from other people to my most relevant boards every week.
This routine helps me pin new content to all my boards every week so that Pinterest can see that my account is active.
Also, I save a tremendous amount of time using Tailwind to automate most of my pinning.
Speaking of automation…
Step 6: Schedule and automate your pins
I know how much work Pinterest can be.
And I also know how much work other blogging tasks can be. You brainstorm blog post ideas, write your articles, share them on social media, work on your SEO, and manage your email list – all at the same time.
When I started sharing my content on Pinterest, I did all my pinning manually because I didn’t want to invest much money.
But it was a LOT of work and I started feeling overwhelmed in my first week already.
For example, if I wanted to pin 15-30 times daily, I’d be pinning up to 10,000 pins in a single year.
Assuming I’d need 30 seconds to find and post each pin, I’d spend over 90 hours every year just pinning content to my boards.
(And that doesn’t even include the time I’d need to create my pin images in Canva!)
So a few weeks later, I created a free Tailwind account to see how it works.
Yes, they offer a forever free plan, too, so you have nothing to lose.
Tailwind is a scheduling tool that allows you to share and re-share your pins to your boards at regular intervals.
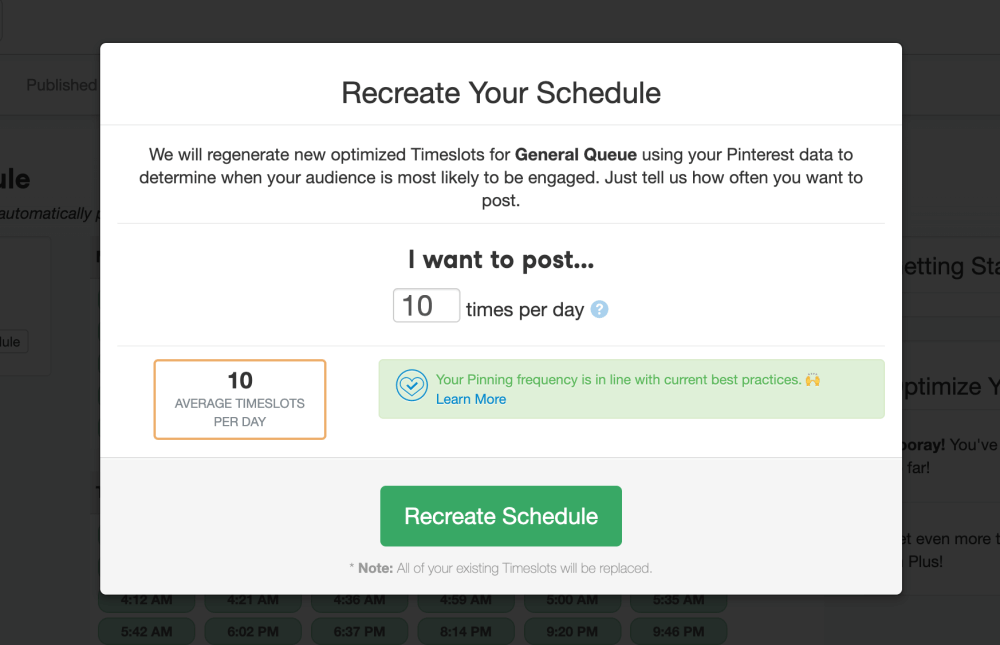
If you’re not familiar, here’s how Tailwind works step-by-step:
- Create your pinning schedule:
First, tell Tailwind how many times a day you want to pin. They’ll find the perfect time slots when your pins will get maximum exposure. - Fill your pinning queue:
Either upload your pin images directly to Tailwind or pick pins directly from Pinterest. - Set it and forget it!
Tailwind will now make sure your scheduled pins get published at the best times, while you go back to doing stuff that a machine can’t do for you.
The best thing about Tailwind is that you can schedule a single image to be pinned to as many boards as you want. You simply select the boards you wish to pin to, set a pinning interval, and Tailwind takes care of the rest.
I can’t say how much I love it, really!
It’s been such a time-saver for me, especially because I run a few different blogs.
I simply don’t have the time every day to pin my content manually. Let alone figure out which boards I’ve already pinned my content to!
Ready to give it a try?
Click here to get started with a 100% free Tailwind plan.
Now, you may fall in love with Tailwind on your first day like I did.
But before you decide to upgrade to a paid plan in the future, make sure you take your time to learn how it works. You want to try out different features and really feel like you know what you are doing before you invest a dime in it.
5: Set up a consistent blog content strategy
My first blog started as a personal learning journal. I didn’t have a clear goal in mind, let alone a monetization strategy thought out.
But over the past few years, it has transformed into a profitable online business.
I didn’t expect to see results that good. But they weren’t a surprise, either.
I have worked my butt off to get where I am right now. My blogging business is the fruit of my dedication and determination to help my readers by sharing my knowledge with them.
My secret sauce?
A solid blog content strategy.
I’ve found easy but insanely powerful techniques for creating value-driven, share-worthy content for my target audience. And I’ve applied those same lessons to Blogging Explorer – adjusting my strategy for a new audience with different needs.
Also, I have learned how to find blog post ideas my readers fall in love with every time.
Why do you need a blog content strategy?
Setting up a blog content strategy may sound more difficult than it actually is. Most beginner bloggers feel overwhelmed with finding one and they forget about it altogether.
But a content strategy is simply the overall direction of your blog. It helps you stay focused on helping your readers with each blog post you publish.
Your content strategy is your go-to resource when you don’t know what to write about. Also, it will help you maintain your motivation when the road gets rocky.
Here’s how to set up a quick blog content strategy today:
Step 1: Define your blogging goals
Why do you want to start blogging? What do you want to achieve with your blog in the long run?
Do you want to:
- Increase blog traffic and make more money with display ads?
- Get more people to buy your affiliate products?
- Convert visitors into email subscribers?
- Build brand awareness and get people to visit your blog regularly?
Now is the perfect time to figure out your purpose. It may change over time, so don’t get hung up on the details here.
The most crucial point is to understand your long-term goal. Once you know what you want to achieve, you can break it down into smaller milestones that are easy to track.
Step 2: Understand your audience
Who are you blogging for? Who is your target audience?
Knowing who will read your blog is essential to your blog content strategy’s success.
If you don’t know who your target audience is, you could waste your precious time creating content nobody wants to read. That could mean months of hard work down the drain.
But when you know who your audience is, you can quickly tailor your content to hit their sweet spot.
Once you understand them, you can write to them. You can easily discuss problems they are struggling with, and help them find answers and solutions.
As a result, your readers will start trusting you, and you can increase your conversion rate to monetize your content more easily.
To get started, think about the demographics and characteristics of your target audience:
- Age and gender
- Location and language
- Education and job title
- Beliefs and values
- Interest and hobbies
Also, be mindful of where your readers hang out online:
- Do they spend time on Facebook, Twitter, or Pinterest?
- Are they active on discussion forums?
- Who are their favorite bloggers right now?
For a full step-by-step guide, check out my article on how to find your blog target audience.
Step 3: Brainstorm content ideas
The quality of your content has never been more important than now. In this day and age, each blog post you write needs to fit into a clear, long-term content strategy.
If you want to outrank everyone else on Google, you need to deliver top-notch value with your content. Your articles must change your readers’ lives for the better!
Before you start planning your content, take some time to brainstorm ideas that can help your audience.
You should find at least 40–50 blog post ideas, so you won’t run out of inspiration when it’s time to start writing.
Remember: each blog post should answer a single question or solve one specific problem for your reader.
Here are a few quick brainstorming techniques you can use:
- Answer the 5 W’s and the H:
Help your readers by answering the most common problems and questions for each blog post category you have: What? Why? Where? When? Who? How? - Check what’s popular and trending:
Connect your blog to the latest events your audience is interested in. Use Google Trends, read the news, browse discussion forums, and look at the top shows on Netflix. - Get inspired by your competition:
Find out what topics get the most shares and comments on your competitors’ blogs. How can you put your own spin on them? Never plagiarize, but create content that’s better and more helpful for your audience. - Mind mapping:
If you’re a visual thinker like me, use Coggle to create as many branches and sub-branches to your topic as you like. Answer the Public can help you find more ideas, too.
Step 4: Do keyword research
Before you start writing your first blog posts, you need to find the right keyword to target.
Most keywords are too difficult for brand new bloggers. Highly competitive, short-tail keywords are almost impossible to rank anywhere near the top on Google.
So, the trick is to target more specific, long-tail keywords – the low-hanging fruit!
Long-tail keywords consist of more than 3–5 words, and they are much easier to rank with.
Why?
People who use a long search phrase are looking for something specific. They may even type an entire question into the search bar. Thus, they have a clear search intent.
For example, if someone types in “curtains” on Google, they could be interested in (1) buying curtains or (2) sewing their own curtains.
But if they searched for “how to sew curtains with lining”, you would know exactly what they want. You could create a detailed step-by-step tutorial and help that person find everything they need in one place.
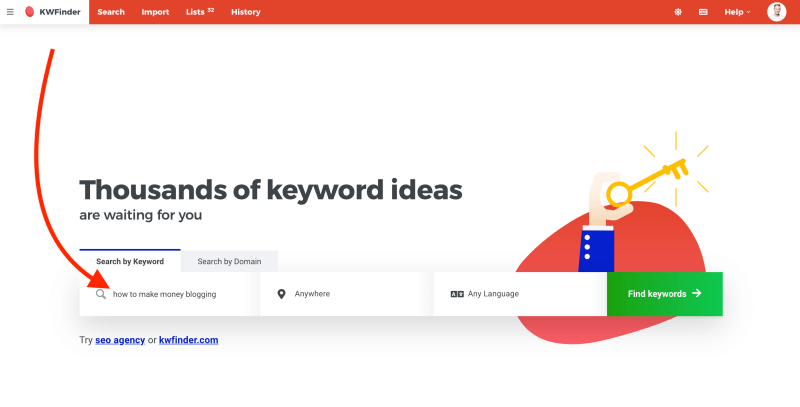
I use KWFinder to find long-tail keywords with high search volume and low SEO difficulty. It’s so easy to use, and I love how clean the interface is.
Also, KWFinder helps me keep track of my keywords so I don’t have to export them to Google Sheets or Excel.
Head over to KWFinder.com and type in your keyword. Let’s search for “how to make money blogging”:
Next, KWFinder shows you a list of related keywords and how difficult they are to rank with:
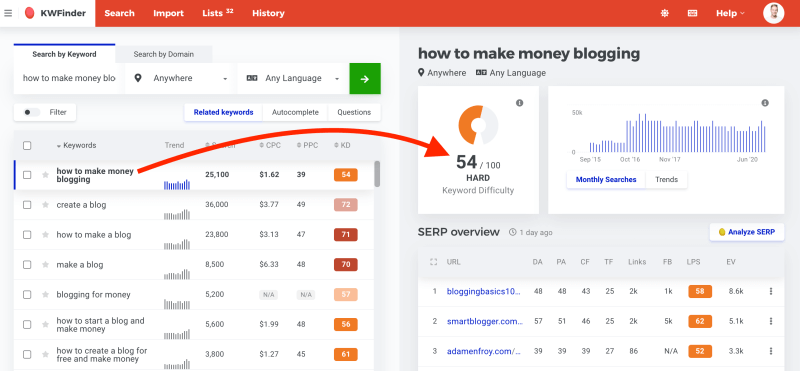
This keyword seems to be hard to rank for. (No surprise there!)
KWFinder calculates the keyword difficulty based on a myriad of factors in the search results data. The values vary between 0–100.
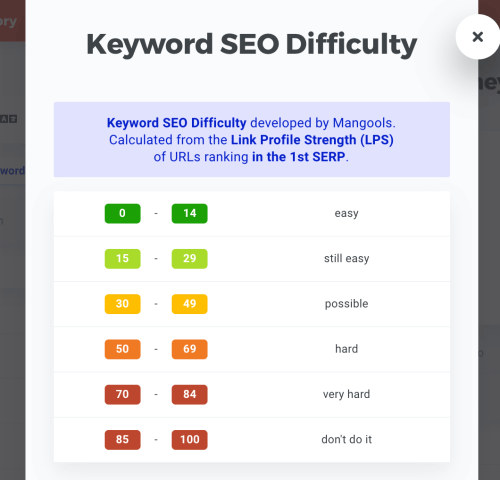
It’s a good idea to find keywords in the 0–20 range when your blog is brand new.
Simply go through the entire list of related keywords on the left side and find the ones that are easy to rank for.
I love this tool for weeding out all high-competition keywords from my content strategy. After all, what’s the point in writing a stellar blog post for a keyword that you can’t generate organic traffic with?
Click here to try KWFinder for FREE
Step 5: Plan out our content calendar
Now that you know what keywords to target, it’s time to plan your blog content calendar.
Ideally, you want to have enough blog post ideas in your content pipeline for 3–6 months.
You don’t have to write 20 blog posts and publish them when you launch. However, it’s a good idea to create at least 3–5 pillar posts before you start driving traffic to your website.
Make sure those first few articles are your pillar posts that you can add new content later.
Pillar posts are long-form blog posts that discuss the most fundamental topics and questions for an individual blog category.
Here are a few points to consider to create a content calendar quickly:
- What tools will you use?
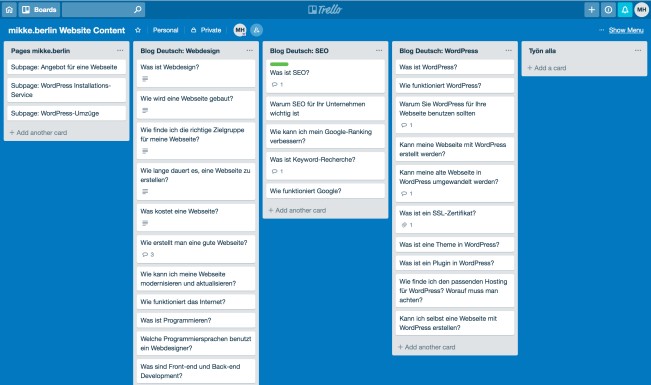
I plan my content with Trello and Google Calendar. They’re easy to use, and I can access them whenever, wherever on all my devices. - How often will you publish a new blog post?
Consistency is key to making money blogging. Ideally, you want to publish at least one new article every week when your blog is brand new. But if that’s not realistic, don’t overwhelm yourself with goals you can’t achieve. - Which categories will you write for first?
When you’ve published your first pillar posts for your primary blog post categories, choose one and create blog posts around that particular topic first. Answering 10–15 most frequent questions in individual articles is a fantastic way to help your readers better and rank for that specific keyword group on Google.
6: Start an email list
Now that your content strategy is set up, it’s time to start an email list for your money-making blog.
Building a list of loyal subscribers can help you leverage your monetization strategy like nothing else, trust me.
Your email list can quickly become your most effective tool for connecting with your readers. Thus, starting a list as early as possible means more blog traffic, more affiliate commissions, and more product sales.
I know you may be thinking:
But I have SO many things to do already! Start an email list? I don’t even know where to start!
That’s exactly how I felt when I started Blogging Explorer. That is why I’ll walk you through a few super easy steps to start your email list for FREE.
Even if you don’t have dozens of blog posts and your blog is brand new, starting an email list is essential to making money with your blog.
Here’s why:
- You can connect with your readers:
Sending out an email to your subscribers allows you to connect with your audience on a personal level. It’s a direct channel to your readers! They trust you with their email address and they want to hear from you. - You get to know your audience:
The only way to make money blogging is to help your audience with value-packed content and products. If you don’t know your audience, you won’t make a dime. But an email list helps you find out what your readers are struggling with. Use their feedback and ideas to create the perfect blog posts! - You own your email list:
Your social media accounts could be shut down anytime without notice. If you rely on Facebook, Twitter, or Instagram for blog traffic, you would lose everything overnight. But your email list is different: you own the contact details of your subscribers. Even if your blog website gets hacked and you lose your content, you will always have your email list.
Here are a few easy steps to start your email list right away:
Step 1: Know your purpose
Earlier in this guide, I asked you to find your blog target audience. Once you know who your ideal readers are, you want to figure out the purpose of starting your email list.
Think about how you intend to monetize your list. This should fit into your overall monetization strategy we discussed above. Do you want to:
- Promote affiliate products to your subscribers?
- Drive traffic to your blog to generate more display ad revenue?
- Launch and sell your own products to your list?
You need to know your end goal for starting your list. It takes time and effort to build a massive list with thousands of subscribers. But when you have a clear purpose in mind, it’s easier to stay focused.
Step 2: Choose an email service provider
You may be thinking: “I’ll just send emails to my subscribers from my Gmail account.”
But the thing is:
You can’t send bulk emails to your list through your free email provider. Not only would you break email marketing opt-in laws, but you’d also have no proper tools to grow and manage your list correctly.
What is the best email marketing tool for your blog?
There are multiple email service providers for bloggers, both free and paid.
So, which one is the best for your blog?
I recommend using MailerLite if you are new to blogging. I use it for this blog, it’s free, and I simply can’t recommend it enough.
Here’s why:
I started Blogging Explorer because I wanted to share my blogging journey with the world. And while doing that, I wanted to monetize this blog.
However, I was already familiar with blogging back then. My first blog is about coding and learning tech skills.
I knew blogging is a ton of work, so I wanted to find an email service provider that was easy enough for me. I know my way around tech, but I hate wasting my time on tools that are too complex.
Speaking of complex tools, I had used MailChimp for my first blog. But I wasn’t happy. There are simply too many bells and whistles, and it’s difficult to know how to get started.
MailerLite is different. I signed up in a few minutes and started my first email list much faster than I expected.
Start an email list with MailerLite for free
You can start an email list with MailerLite for free. They offer a generous free plan for up to 1,000 subscribers.
Also, you will get access to all premium features for 14 days by using my special link.
Head over to MailerLite.com and click on the blue button that says Sign up free:
On the next page, create your free account by filling in your blog name and email address, and choosing your password:
Congratulations, you have a MailerLite account now!
To get familiar with your dashboard, here’s a step-by-step video tutorial you don’t want to miss:
Step 3: Create a content upgrade (an opt-in freebie)
How do you start an email list and get people to sign up?
The best way to encourage your readers to sign up is to offer them something in return, an incentive.
This is called a content upgrade, a lead magnet, or opt-in freebie.
The highest-converting incentives address a specific pain point and solve a particular problem for your readers. It’s usually packed with quick, actionable tips; something the reader can apply right away.
In short: an opt-in freebie should make the reader’s life easier instantly.
How to find a great freebie idea?
Here are a few places you can look for inspiration:
- Find your most-visited posts in Google Analytics. Convert this existing traffic by offering your readers a helpful content upgrade.
- Find the posts with the most shares and comments. Create a freebie to increase the value of reading and sharing those posts even more.
- Research your competition. Find inspiration in other bloggers’ freebies. But never copy their ideas!
- Browse Facebook groups in your niche and find out what types of questions your target audience is asking.
The bottom line is:
Find out what’s the biggest thing your readers are struggling with.
Then, deliver a hands-on solution with your freebie – give your readers a present they really need!
What type of freebie should you create?
When you find a great freebie idea, be mindful of how you want to deliver it. A high-converting freebie could be a:
- Cheatsheet
- Worksheet
- Checklist
- Email course
- Webinar
- PDF guide
- e-book
Choose a format that suits your target audience’s needs.
If you want to deliver a long-form freebie, consider creating an email course. Use MailerLite’s automation tool to send out 3–7 emails, for example.
If your freebie is a PDF, use Canva or Google Docs to create it quickly.
Step 4: Place opt-in forms on your blog
Once your stunning freebie is ready, you need to promote it to as many people as possible.
How can your readers sign up?
You need to know where to place your freebie on your blog to make sure you get people to sign up. To do this, you will need to create an opt-in form with MailerLite.
Where should you place those forms?
- Within your blog posts:
Make sure that your opt-in relates to what your blog post is about. Your freebie should complement your article and offer your readers additional value. - On dedicated landing pages:
A dedicated landing page is an excellent way to keep your readers focused on a single thing: your incentive. Therefore, they usually have a higher conversion rate than opt-in forms within your articles.
Step 5: Grow your email list
Once your email list is set up, you can start driving traffic to your opt-in forms and generate your first subscribers.
Remember: building a list is all about connecting with your audience.
Ultimately, your email list will help you make more money with your blog. That income will be based on the relationship you have with your subscribers.
Therefore, consistently deliver valuable resources and create trust with the people on your list.
Never abandon your subscribers and take long breaks. Cultivate trust, be honest and transparent, and keep things conversational. Deliver high-value emails, exclusive and relevant content, and listen to your audience.
For a full tutorial, check out my guide on how to start an email list to make money blogging.
Final thoughts: How to make money blogging for beginners
Learning how to make money blogging for beginners doesn’t have to be difficult.
Sure, it takes hard work to create a profitable, successful blogging business from scratch. But it’s SO worth your time, trust me!
I started blogging as a fun side project back in 2017. It took me 12 months to even realize I could make money with it.
In late 2018, I launched Blogging Explorer. In my 4th month, I cracked the $1,000 mark, which was a big milestone.
Fast forward 12 months to late 2019, my two blogs made $3,781 a month. And blogging was and still is a side hustle for me!
These results I achieved always exceeded my expectations. I never even thought I could make a full-time income doing something I love so much.
It’s not always easy.
And I wouldn’t have made it without YOU.
I’m so grateful for you visiting my blog and reading this guide about my blogging journey. I really hope you found some helpful tips on how to make money blogging for beginners here.
Having said that, please let me know if you have any questions about launching your first blog! I’m more than happy to help you and I’ll do my best to get back to you in person asap!
Now, if you’re interested in starting your own blog, head over to my step-by-step tutorial for absolute beginners to start your blog. I’ll show you the exact steps I took to start a profitable blog from scratch.
Also, make sure you have a look at all the best blogging resources I use daily. I’m in love with all of them and I know they will help you just as much as they’ve helped me along the way.
If you liked this article on how to make money blogging for beginners, share it with others! Thanks!