

So you want to learn the best Pinterest pin design tips to grow your reach on the platform and drive massive traffic to your blog or website through Pinterest?
You’re in the right place for that!
With the latest Pinterest algorithm changes, creating and designing professional-looking pins and publishing new, fresh pin images consistently is the best way to gain traction on Pinterest.
But I know how time-consuming it can be to come up with new Pinterest pin design ideas. If you want to create a viral pin, you need to know what works on the platform (and what doesn’t).
So is there a way to speed up your pin design workflow and make sure every pin you create actually generate clicks and blog traffic?
Yes, there is.
In this guide, I’ll walk you through 18 proven and up-to-date Pinterest pin design techniques to grow your blog traffic faster through Pinterest.
I’ve been perfecting my Pinterest marketing strategy since 2019, and designing beautiful pin images is absolutely essential for seeing real results on the platform.
I’ve put together these techniques based on what’s worked best for me and my Pinterest clients’ accounts, having created thousands of custom pin designs in the past few years. Also, all the pin design hacks in this guide align with the latest Pinterest best practices.
Even if you’re new to Pinterest and aren’t a professional designer, these tips will help you create beautiful pins more easily.
Let’s go!
- What makes a good Pinterest pin design?
- 18 smart Pinterest pin design tips for beginners
- 1: Have a plan
- 2: Use a graphic design program you feel comfortable with
- 3: Use the right pin file size (1,000 x 1,500 pixels)
- 4: Use a consistent color palette
- 5: Pick the right background type
- 6: Use high-quality photos (free stock photos are 100% OK)
- 7: Leave enough space around the edges
- 8: Pick readable, clear fonts
- 9: Use a maximum of 2-3 different fonts
- 10: Write a clear, compelling headline
- 11: Make your text large enough
- 12: Use script fonts correctly
- 13: Use spacing between elements
- 14: Utilize visual hierarchy
- 15: Align all items properly
- 16: Include a call-to-action (CTA)
- 17: Create visually consistent pins
- 18: Use a template set to save time
- How to design and create Pinterest pins?
- Summing it up: Pinterest pin design tips (and how to create your own Pinterest pin graphics)
Please note: This post contains affiliate links to products I use, trust, and recommend. If you choose to purchase a helpful product using these links, I may receive a small commission for referring you – at no extra cost to you. These funds help me keep this blog up and running.
What makes a good Pinterest pin design?
Now, how to create beautiful Pinterest pins?
Because Pinterest is a visual search engine, your pin design is absolutely crucial for your success on the platform.
When users scroll through hundreds of pins, your pin has to stand out to stop that scroll, right?

Even if your blog content is the best in the world, people won’t find their way there unless your pin images make them want to click and visit your website.
And when they do visit, your content needs to match your pin design, too. Misleading pin designs only frustrate your potential audience. If your pin links to a blog post, your design should look like a blog post pin. If your pin links to a product page, your pin design should be all about the product.
Summing it up, a good Pinterest pin design will:
- Stop the scroll
- Make the user want to click and visit your website
- Align with the content it promotes
It all boils down to giving the user a reason to click through to your website. Remember: they’re asking: “What’s in it for me?”
Your job with each pin design is to answer that question. And that’s what this guide is about!
18 smart Pinterest pin design tips for beginners
Here are 18 Pinterest pin design tips to stop the scroll and grab your audience’s attention.
But before we jump in, please save this pin to one of your Pinterest boards!

1: Have a plan
Before you start designing your pin, make sure you have a plan for it.
If you jump into designing it without a plan, you may end up with a nice-looking pin. But you’ll spend much more time on it than you need. Plus, your pin most likely won’t have a clear message.
Take a minute to answer these questions:
- Who’s interested in this pin?
- What’s their biggest struggle right now?
- How does my pin and website content solve that problem for them?
- What will they get from clicking it and visiting my website?
You want to come up with a clear and concise message for your pin.
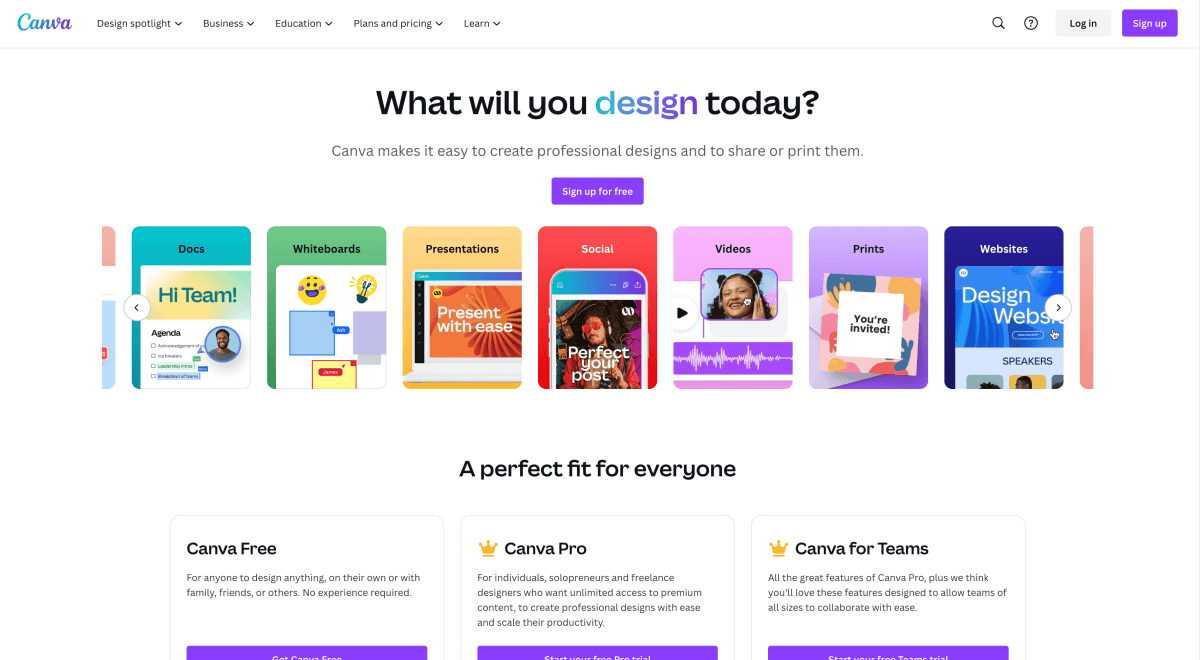
2: Use a graphic design program you feel comfortable with
To design your Pinterest pin, you need to find a graphic design tool that’s easy to use.
I use Canva, the best free Pinterest graphic maker out there. It’s very intuitive even if you have zero graphic design experience.
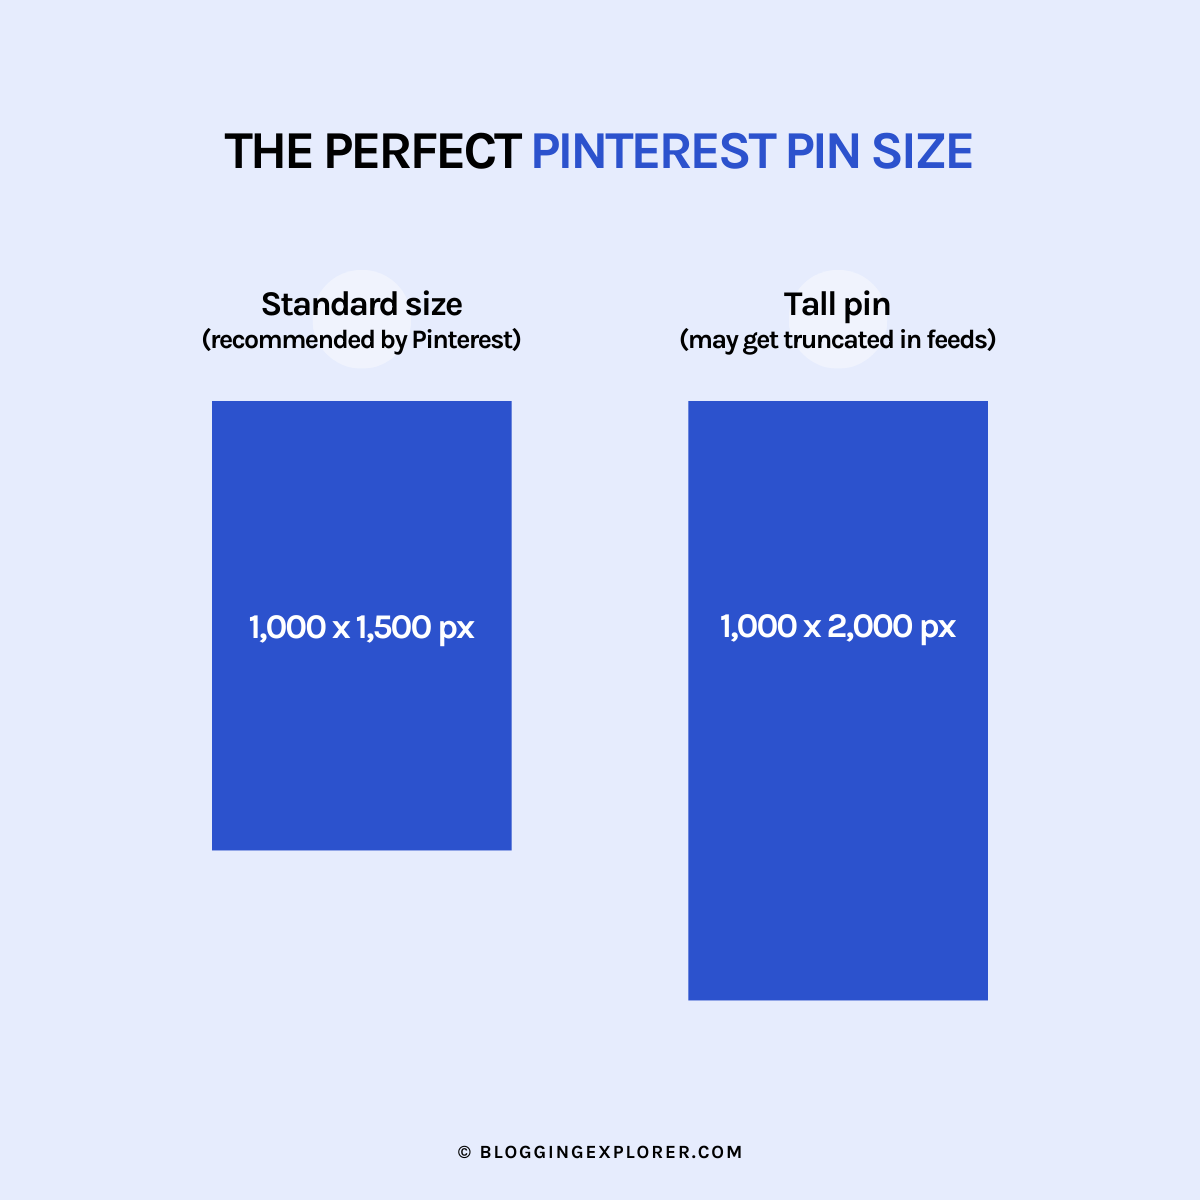
3: Use the right pin file size (1,000 x 1,500 pixels)
Pinterest pins are tall and vertical.
Pinterest recommends a pin size of 1,000 x 1,500 pixels — that’s a 2:3 aspect ratio, width to height.
You can create taller pins in you like, but stick to the recommended size if you’re just getting started with Pinterest. You can experiment with taller pins later on.
4: Use a consistent color palette
When you scroll through search results on Pinterest, you’ll soon start identifying certain brands and creators by their brand colors.
Since Pinterest is all about visuals, colors are a critical factor for your pin design.
But what colors should you use then?
If you’re not a designer, finding the perfect color palette can be tricky. But don’t panic — you can totally do this.
Here are my tips for finding the right colors for your pin design:
- Know your audience — Remember, you’re designing for your target audience. What colors resonate with them?
- Find inspiration within your niche — Research other creators in your niche. What types of colors are they using? Do you see warm or cool colors, low or high contrasts, dark or light colors? (But: never copy someone else’s ideas — do your own thing!)
- Pick a strong brand color — This will be your main color for your logo and text overlays, for example. It needs to be dark enough to be readable on a light background.
- Choose 1–2 complementary colors — These should support your main brand color. Use them as secondary font colors, backgrounds, and graphic elements like icons.
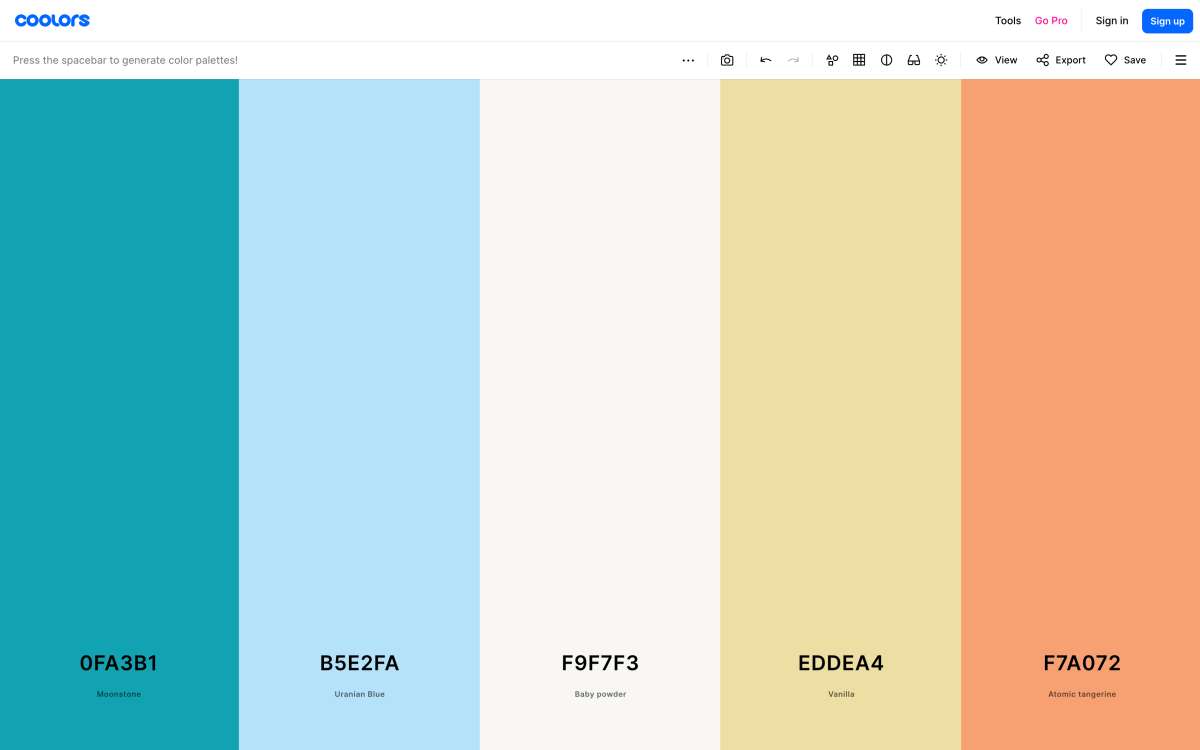
- Use a color palette tool — Use Coolors to generate a stunning color palette for your brand.
5: Pick the right background type
To make your pins stand out, choose the right type of background for them.
You can:
- Leave it white
- Use a solid background color
- Use a gradient background with multiple colors
- Use a pattern
- Use a photo
It all boils down to what your audience prefers. Your background should support the main message you want to convey with your pin.
6: Use high-quality photos (free stock photos are 100% OK)
Whether you use photos as standalone elements or backgrounds, only use the best photos you can find.
Using photos isn’t a must, but it can add a nice touch to your pin designs.
If you decide to use photos, consider taking your own. For example, if you run a travel blog or publish recipes on your website, using original photos is a fantastic idea.
But you can also use stock photos. You can find free stock photos online. Before you use them, double-check that you’re allowed to use them — read and understand the licensing conditions.
You must have the rights to use a photo in your pin designs. You can’t just download any ol’ photo from Google’s image results and think you can use it. That’s only going to get you in trouble.
Here are a few tips for finding the perfect stock photos:
- Use bright photos with good lighting — Light, bright photos are easier to work with, especially if you want to use them as backgrounds.
- Pick crisp, high-definition photos — You don’t want blurry or pixelated photos in your pin designs.
- Use relevant photos — Your photos should match your niche and your pin topic. If your pin is about travel tips for Paris, make sure your photo reflects that.
- Avoid photos with faces — Stock photos with people and faces can easily look cheap. However, if pins with faces resonate well with your audience, go for it — I do it sometimes, too! But if your boards are filled with cheesy stock models smiling away for no reason, it can get monotonous very quickly.
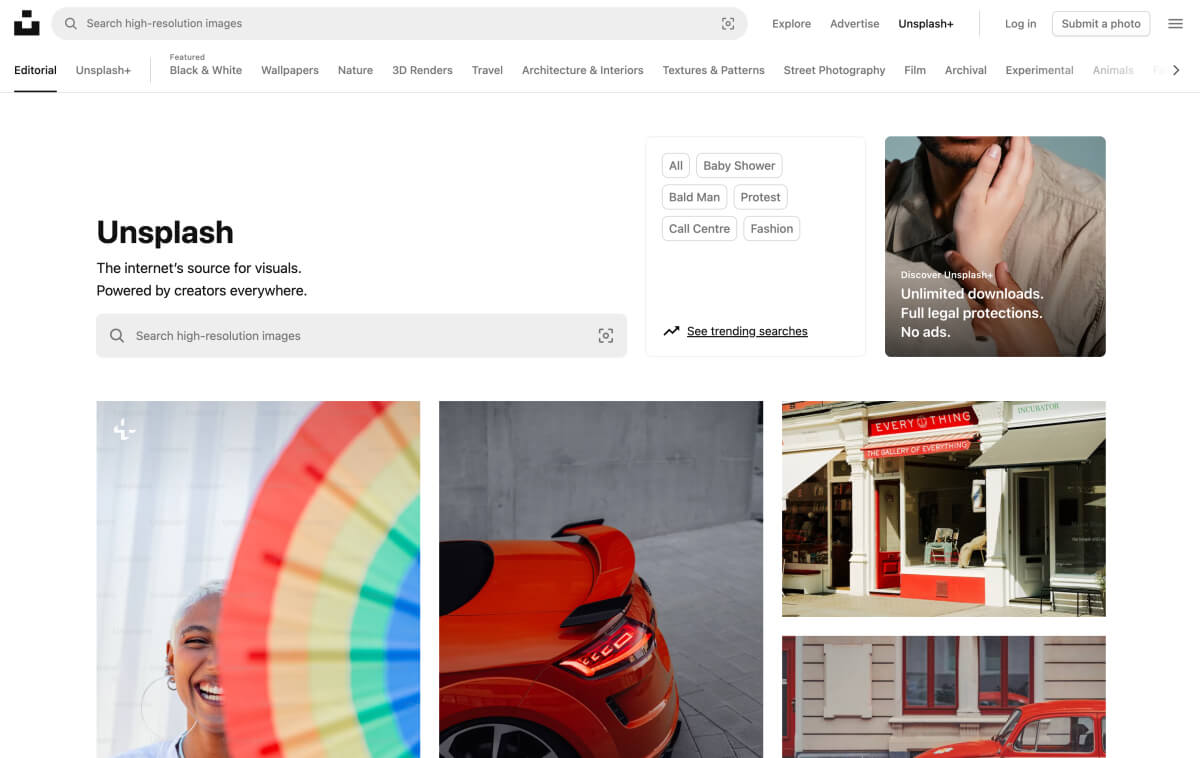
Use free stock photo platforms such as Pexels or Unsplash. Or design your pins in Canva to get access to their massive stock photo library.
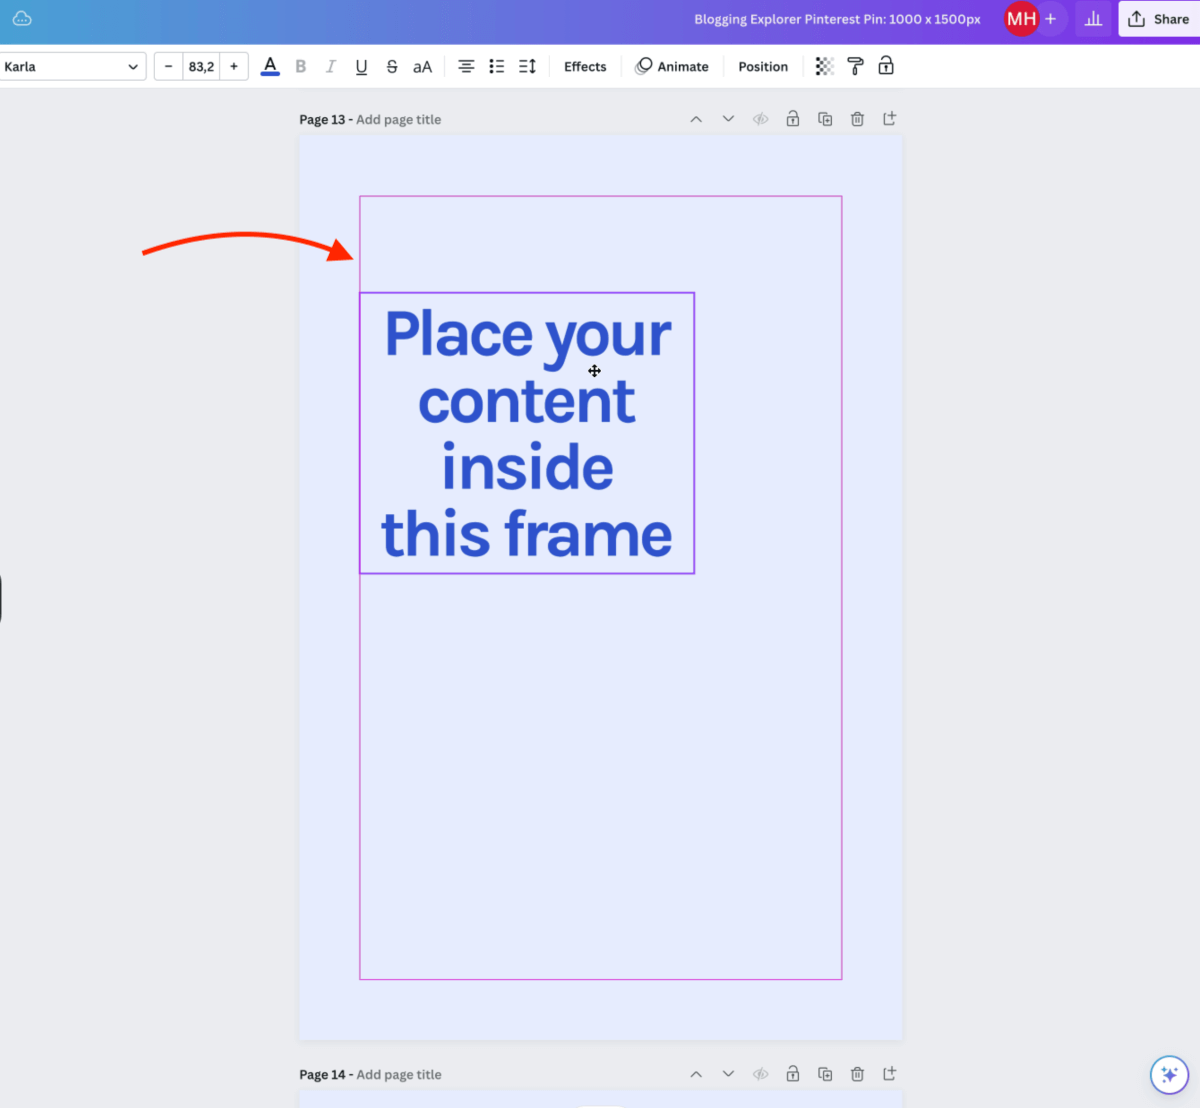
7: Leave enough space around the edges
You don’t want to place text or other elements too close to the edges of your pin.
If you do, it makes your pin look unstable. It’s going to feel like stuff is about to fall off the edges.
Leaving enough breathing room around the edges makes your pin look cleaner and more professional.
How much space should you leave around the edges, then?
Keep the margin between 1/4″ and 1/2″.
If you use Canva, you can stick to the built-in margin. When you drag elements towards the edges of your design, they will snap to the margin. Place your elements inside this margin frame:
8: Pick readable, clear fonts
If people can’t read your text overlays, you won’t generate any clicks or website traffic with your pin designs.
Therefore, make sure to use clear, readable fonts in your pins.
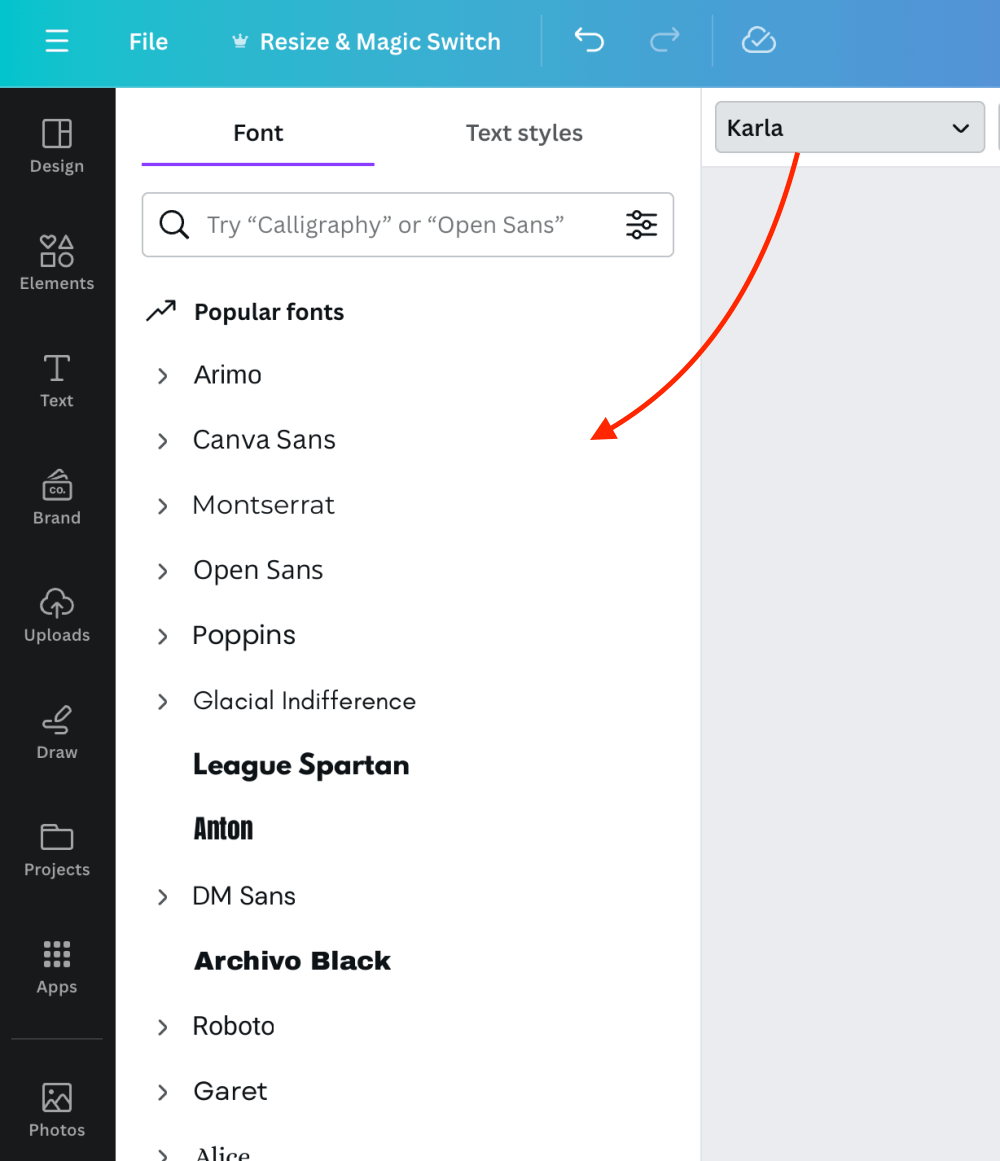
Most of us aren’t typography experts. If that sounds familiar, I suggest you stick to very basic fonts.
If you design your pins in Canva, you can easily try out different fonts for your pins.
Here are a few of my favorite Canva fonts that are 100% easy to read:
- Arial
- Helvetica
- Jost
- Karla
- Lovelo
- Montserrat
- Now
- Poppins
- Work Sans
9: Use a maximum of 2-3 different fonts
Because there are so many fonts to choose from, it’s easy to go overboard and use a dozen different ones for your Pinterest pin design.
But using more than 2-3 fonts can easily make your pin design look messy.
More importantly, if you change your fonts every week, your Pinterest boards will look messy, too.
Therefore, I recommend using a maximum of 2 fonts in a single pin design.
Through all your pins, it’s best to stick to two fonts. If you’re absolutely sure that you can handle more than that, using 3 fonts is OK.
Again, less is more when it comes to designing beautiful, professional-looking Pinterest pins.
10: Write a clear, compelling headline
Once you’ve picked your colors, photos, and fonts, it’s time to craft the perfect text overlay for your pin.
Your main text overlay contains your most important message. In other words, it’s your pin headline.
Your pin headline should:
- Be clear and specific
- Address a problem or question your audience struggles with
- Promise a benefit (from visiting your website)
- Include keywords
- Include a number (if possible)
- Encourage visiting your website
Summing it up: your headline must tell your audience what’s in it for them. People aren’t going to click your pin just for the fun of it. They need a reason to do so. This is basic marketing psychology.
11: Make your text large enough
Font size is everything when it comes to readability for your pin design.
When designing your pin, your design often covers your entire computer screen.
But when people scroll through their Pinterest feed on their phones, your pin is teeny-tiny.
Your text overlays need to be readable on small screens. Therefore, use a large enough font size for your text overlays.
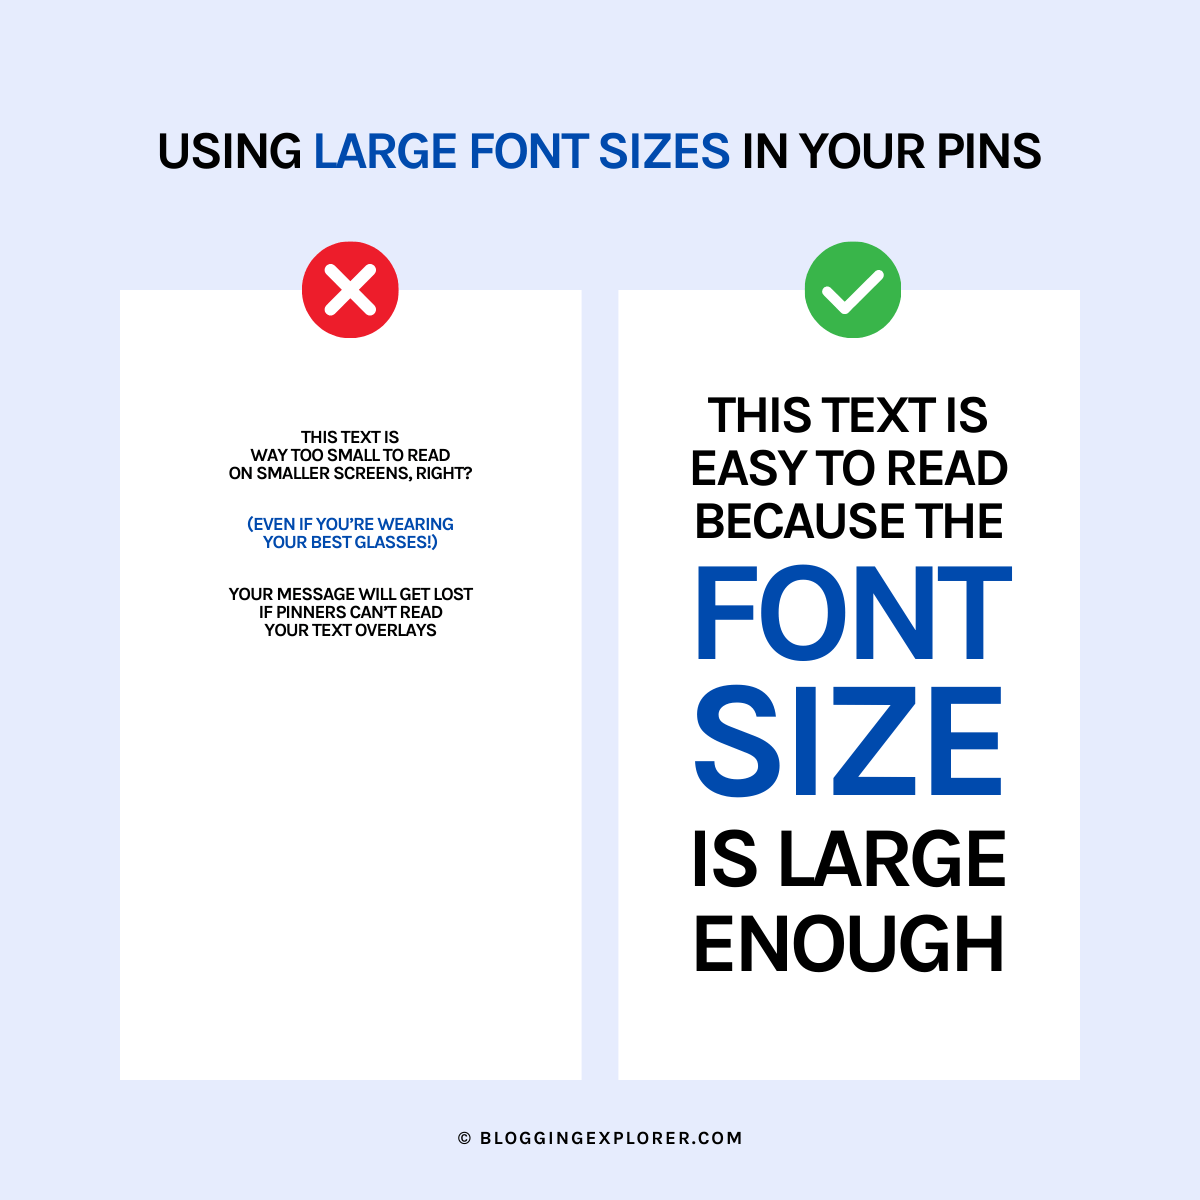
If you’re not sure what font size to use, use pre-made Pinterest templates. Alternatively, publish your pin to a secret board and take a look at it on your phone.
12: Use script fonts correctly
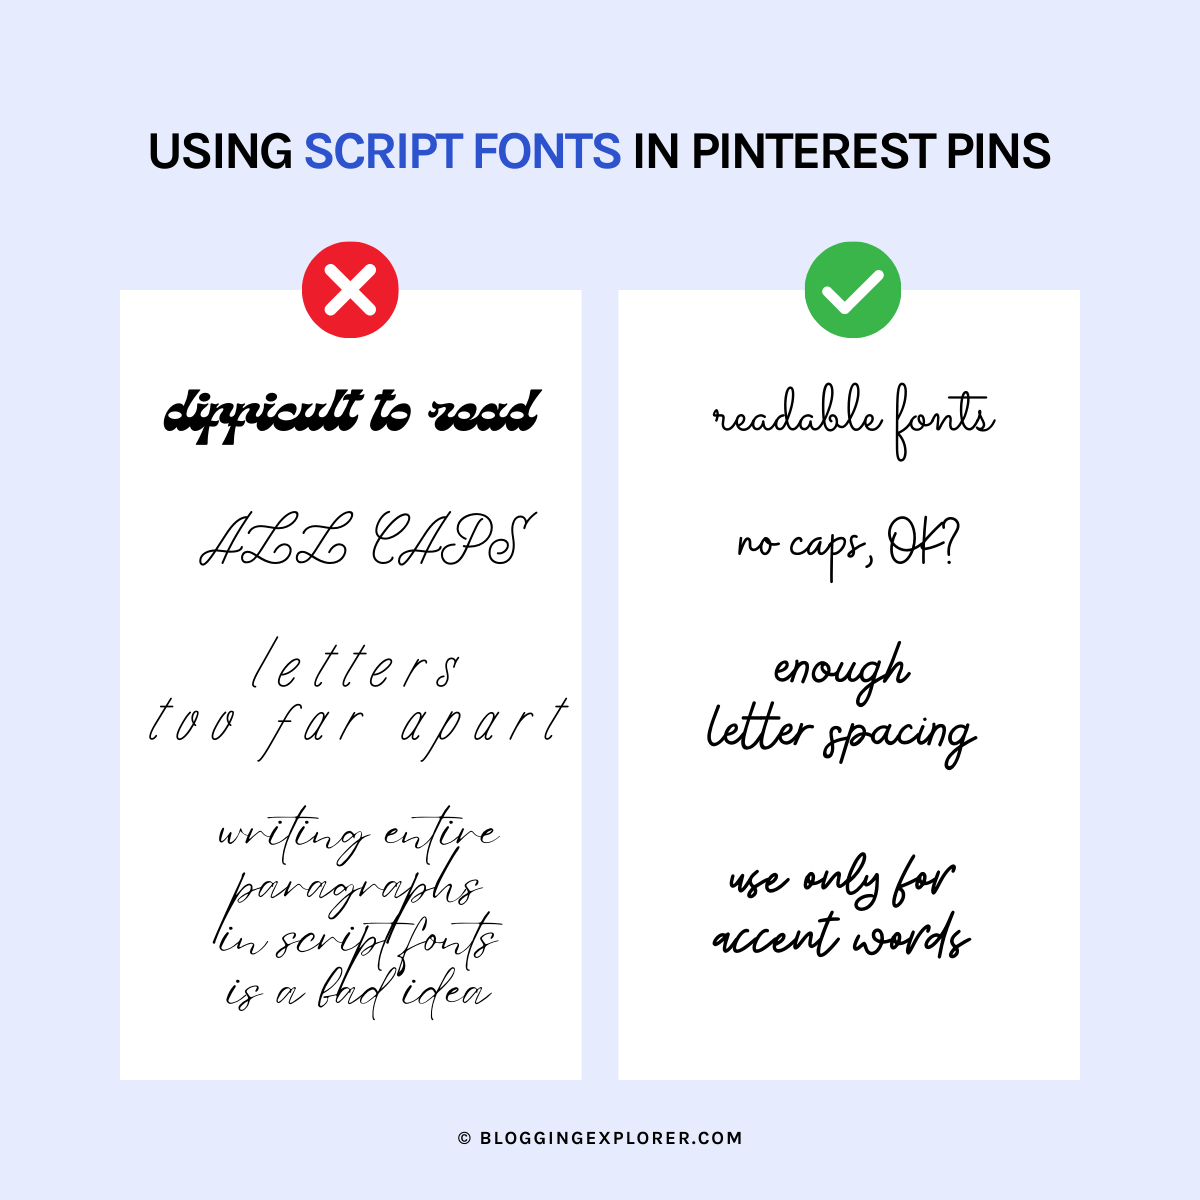
Script fonts (or hand-lettering fonts) can look beautiful.
But they can also destroy your pin design if you’re not using them correctly.
The thing with script fonts is: they can be very difficult to read.
Plus, remember that Pinterest “scans” your text overlays for keywords. If your script fonts are barely readable to the human eye, the algorithm can’t do its job.
Not sure why keywords are important on Pinterest? Then read my full Pinterest keyword research guide asap.
Here’s how to use script fonts correctly in your pin designs:
- Pick a script font that’s easy to read
- Use script fonts as an accent — don’t try to convey your main message with them
- Use lower-case letters (never all-caps)
- Adjust the letter spacing to improve readability
13: Use spacing between elements
Lately, I’ve been seeing a lot of pins where the elements are either too close or too far apart from each other.
For example, if two text elements complement each other, you don’t want one at the very top and the other at the bottom of your pin. They need to be visually connected.
But you also don’t want to jam them too close to each other. Give them some room to breathe. This makes them easier to read and understand.
14: Utilize visual hierarchy
Visual hierarchy means making some elements more important than others through design and layout.
This helps people know where to look first, second, and third.
So rather than having a single, uniform text overlay, you want to use different elements to guide the eye.
You can achieve visual hierarchy through:
- Font type — Use a different font for the most important keyword (but stick to a maximum of 2 fonts in your pin design)
- Font size — Use a larger size for the most important element
- Font weight — Use bolding for your main keywords
- Contrast — Higher contrast draws attention
- Color — Use color to make your important keywords pop
- Shape
- Spacing
- Supporting graphic elements (e.g. arrows)
Of course, you want people to see your main keyword first, right? Since people are actively searching for specific answers and solutions on Pinterest, making that #1 keyword pop is an easy way to stop the scroll.
That said, take a few seconds to figure out the most important part of your pin:
- What’s the main message you’re trying to get across?
- What’s the reason people should click on your pin?
- What’s your promise?
15: Align all items properly
When it comes to Pinterest pin design, the devil is the detail!
If you want your text elements centered, make sure they actually are centered. This is my pet peeve — I can’t stand it when people spend hours designing absolutely stunning pins with elements that are just off.
Trust me, properly aligning your elements will make your pins look much more professional and visually appealing. After all, you want users to pay attention to what your pin is about. If a slight design mishap steals that attention, you’re doomed.
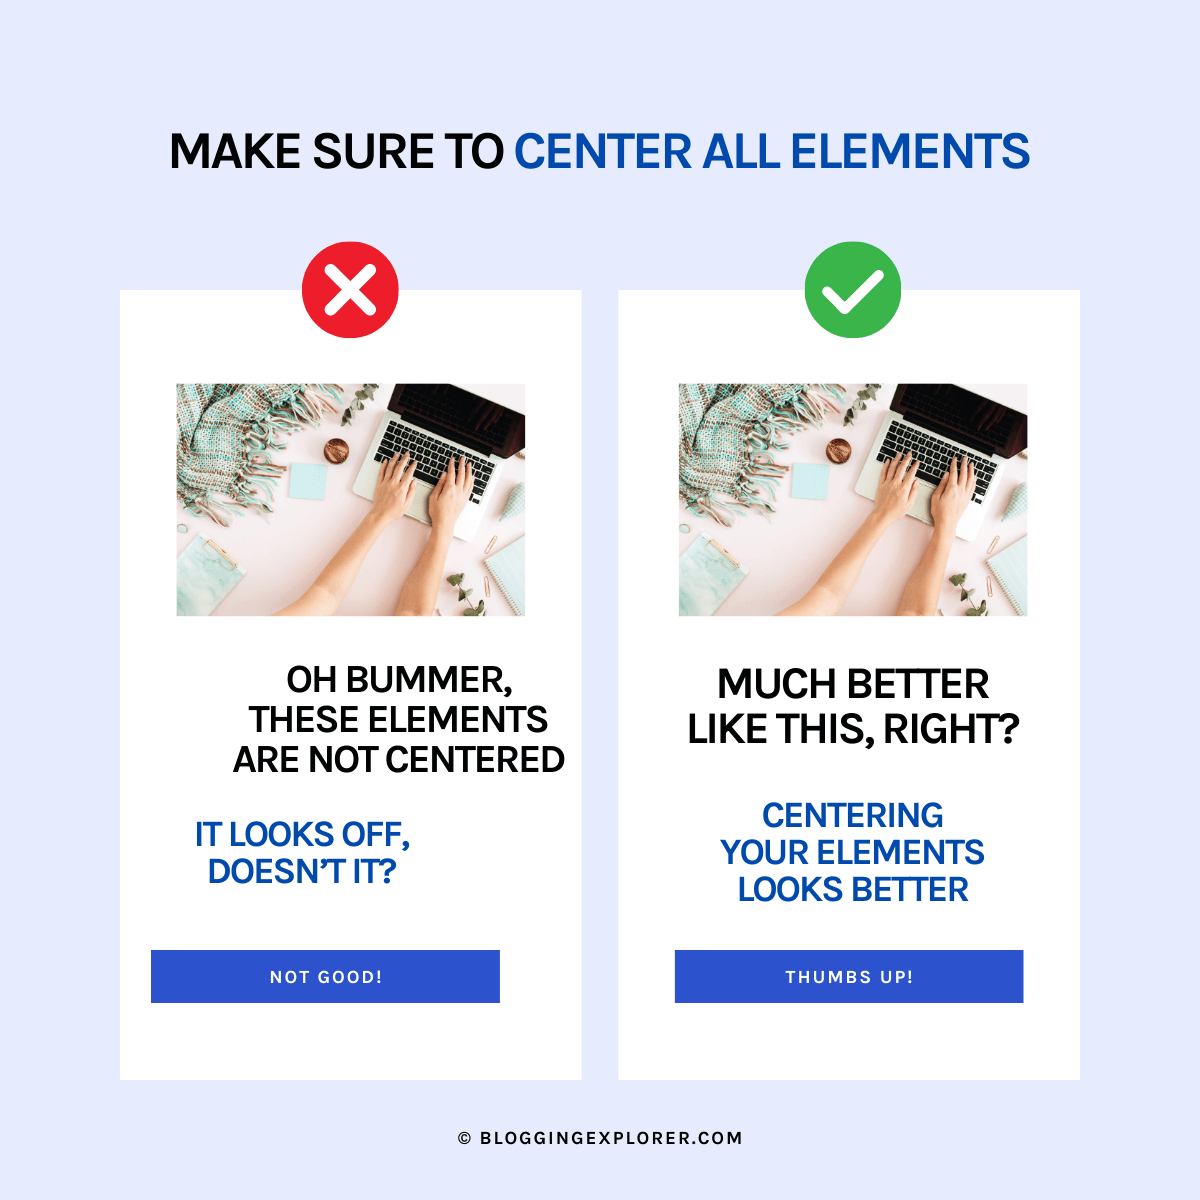
So, before you save your design to Pinterest, take a few seconds to double-check the alignment of all elements.
Again, Canva helps you center your elements easily. Drag them to the center of your design and they will snap to the vertical center line automatically.
16: Include a call-to-action (CTA)
Even though it might seem obvious to you that people should click your pin and visit your website, it’s not necessarily that clear to your audience.
Your viewers don’t know what you want them to do unless you tell them.
An effective call-to-action encourages people to engage with your pin. Use action words like “read more now”, “click to read more”, or “download now”.
For example, if your blog post includes a free downloadable, make sure to highlight that in your CTA.
If you want the user to engage, give them reason to do so! Why should they click on your pin and visit your website?
What’s in it for them? How does your pin and blog post make their life easier?
Make a promise, add a clear call-to-action, and then deliver what you promised.
17: Create visually consistent pins
If you want people to recognize your pins in their feeds, they need to have a consistent look and feel.
It takes some time for people to start recognizing your brand and pins. To speed things up, having a strong brand color palette, font selection, and overall design aesthetic is critical.
Here are a few tips for designing consistent Pinterest pins:
- Stick to your brand color palette
- Use the same fonts throughout your pins
- Use similar backgrounds, contrasts, and visual hierarchy
- Include your logo, brand name, or website URL on every pin
If you’re new to Pinterest, it’s perfectly OK to experiment with a few different designs. That’s the best way to figure out what types of pins resonate the best with your audience.
However, when experimenting with different designs, you still want to stick to your brand colors and fonts. Switch things up with contrasts, backgrounds, and the use of color for highlighting important keywords.
18: Use a template set to save time
If you’re somewhat familiar with Pinterest marketing, you know that consistency is the best way to grow your website traffic through Pinterest.
But consistent pinning doesn’t mean re-pinning your old pins to new boards.
Instead, the Pinterest algorithm wants you to share as many new pin images and pin designs as possible.
And the reason is obvious: people use Pinterest to find new ideas and inspiration. Seeing the same old designs over and over again isn’t exactly inspirational, right?
Obviously, designing fresh, new pins takes time.
To speed things up, I recommend creating 5 to 10 different pin templates for yourself. You can then use those templates for all your blog posts. You simply have to replace any photos, write a new headline, and adjust your text overlays.
This way, you don’t have to start from scratch with every pin. You will save time and your pins will automatically look consistent and cohesive.
For an instant template set, grab my Viral Template Pack or Minimalistic Template Pack. Both are easy to customize in Canva. Plus, I’ve included nifty free bonuses to make designing pins a breeze.
How to design and create Pinterest pins?
Now that you know how to design the perfect Pinterest pin, let’s roll up pour sleeves!
If you’re new to Pinterest and haven’t created pin images before, you’ll love this part of the guide.
Here’s how to create a Pinterest pin online:
Step 1: Log in to Canva
First, you need a graphic design tool for creating your pins.
I use Canva. It’s free and very beginner-friendly. Moreover, you can use Canva to create other graphics for your website, too. I use it for:
- Pinterest pins
- Blog post featured images
- Infographics
- Digital product mockup
- and more
Step 2: Set up your Pinterest pin
Next, let’s set up your Pinterest pin template in the right size.
Pinterest recommends using 1,000 x 1,500 pixels — width to height. That’s a 2:3 aspect ratio.
Start with the standard size first.
Also, you can create taller pins with 1,000 x 2,000 pixels. Sometimes taller pins get truncated in the feed, though.
You can experiment with taller pins once you feel familiar with Canva.
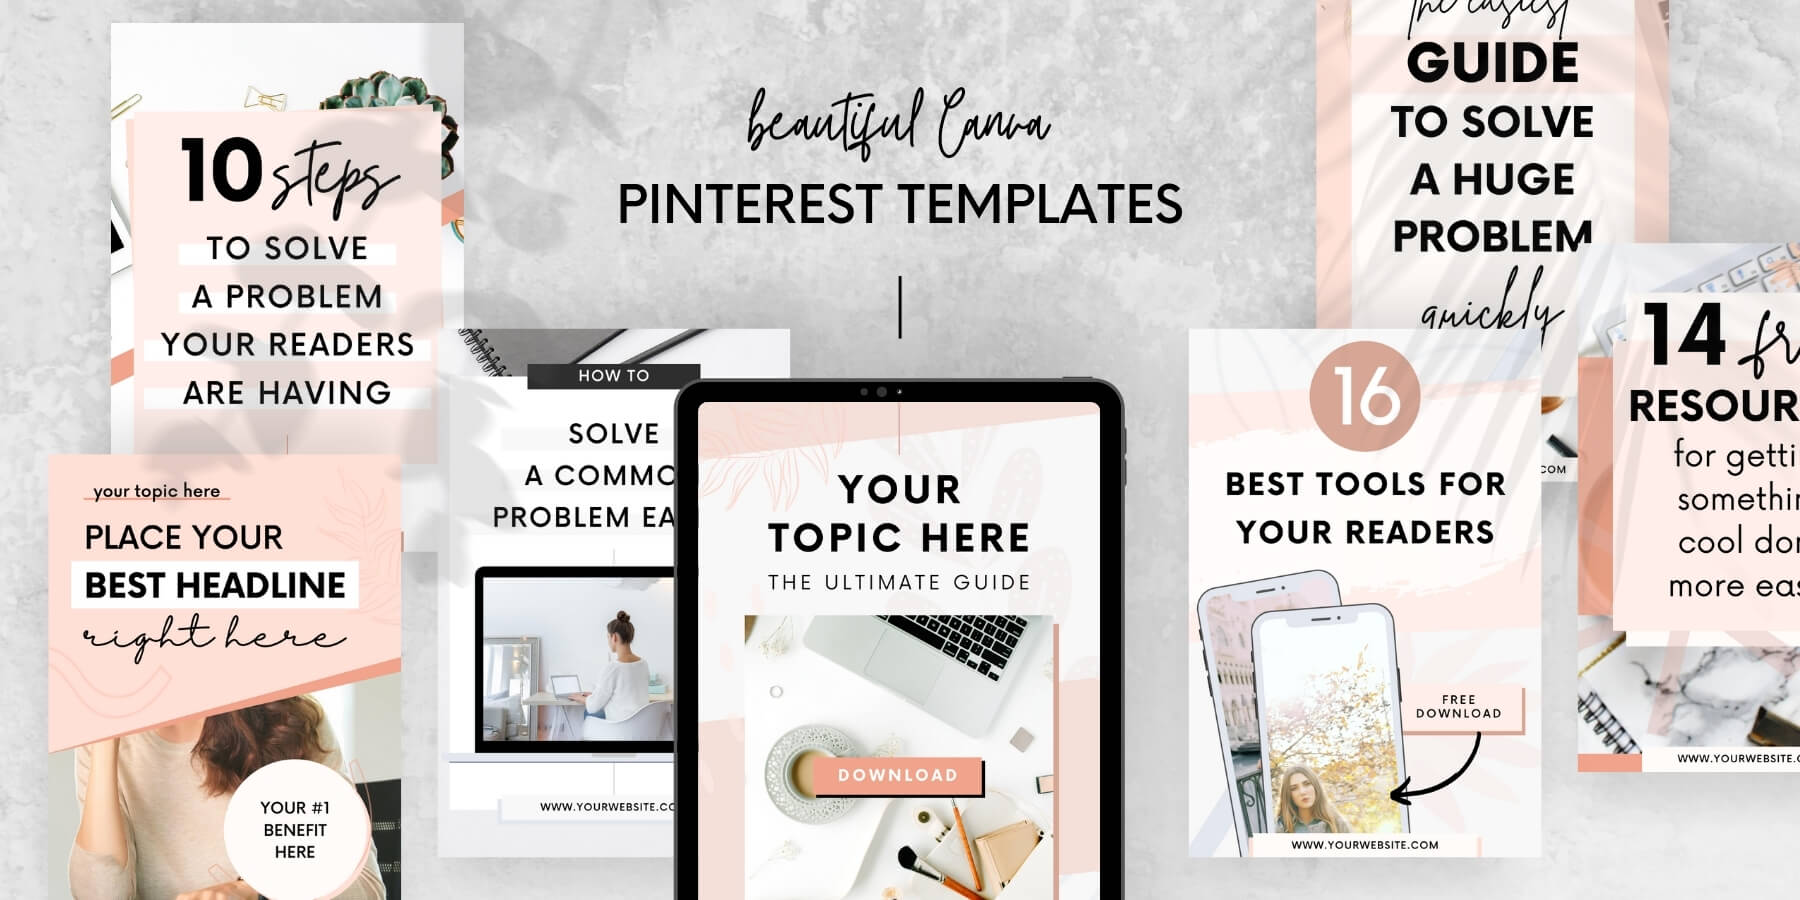
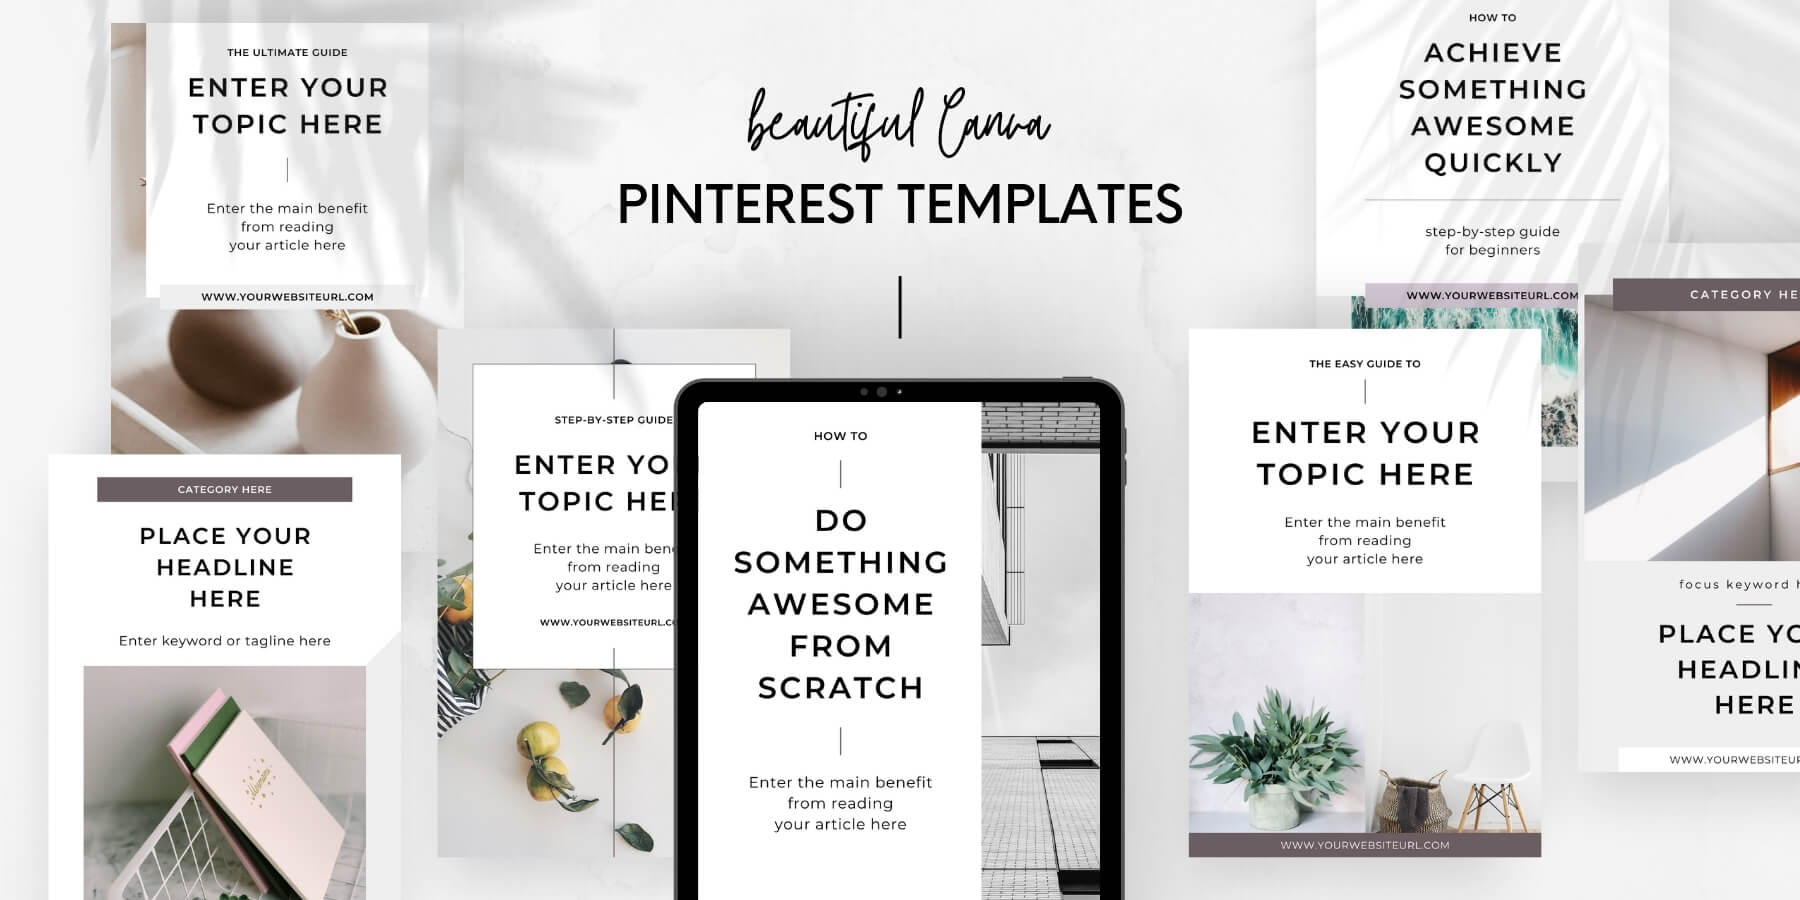
You’ll find a ton of pre-made Pinterest pin templates to use with Canva out there. My Viral Pin Template Pack and Minimalistic Pin Template Pack both include 20 stunning Pinterest pin templates you can customize with Canva within minutes.
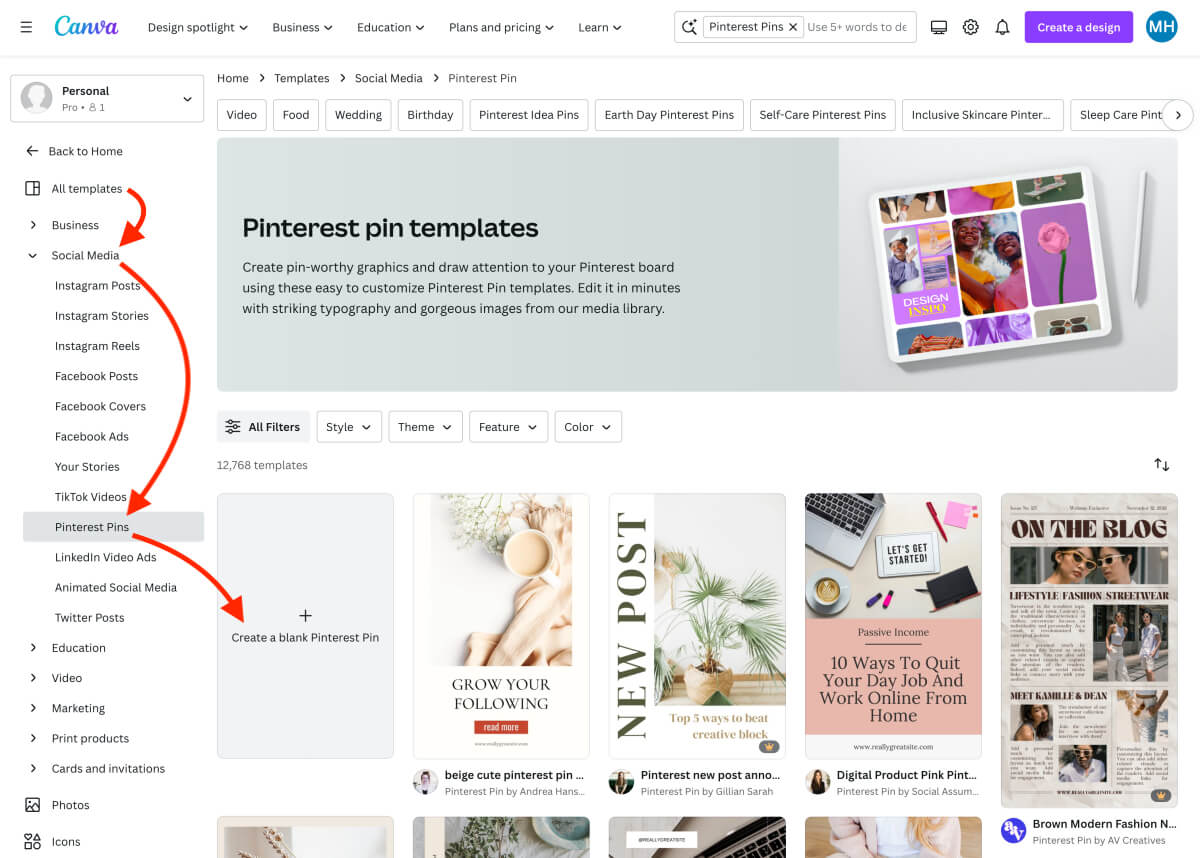
You can also start with the basic, free Pinterest templates in Canva. You’ll find them in Templates > Social Media > Pinterest Pins. You can create a blank Pinterest pin or choose from the pre-made templates:
Step 3: Customize your pin design
This is the fun part!
Once you’ve picked your pin template, it’s time to customize your design.
Let’s recap a few design guidelines from above:
- Use a consistent color palette
- Use clear, easily readable fonts
- Make your font size big enough (it has to be readable on small screens, too)
- Make sure there’s enough contrast between your text color and its background
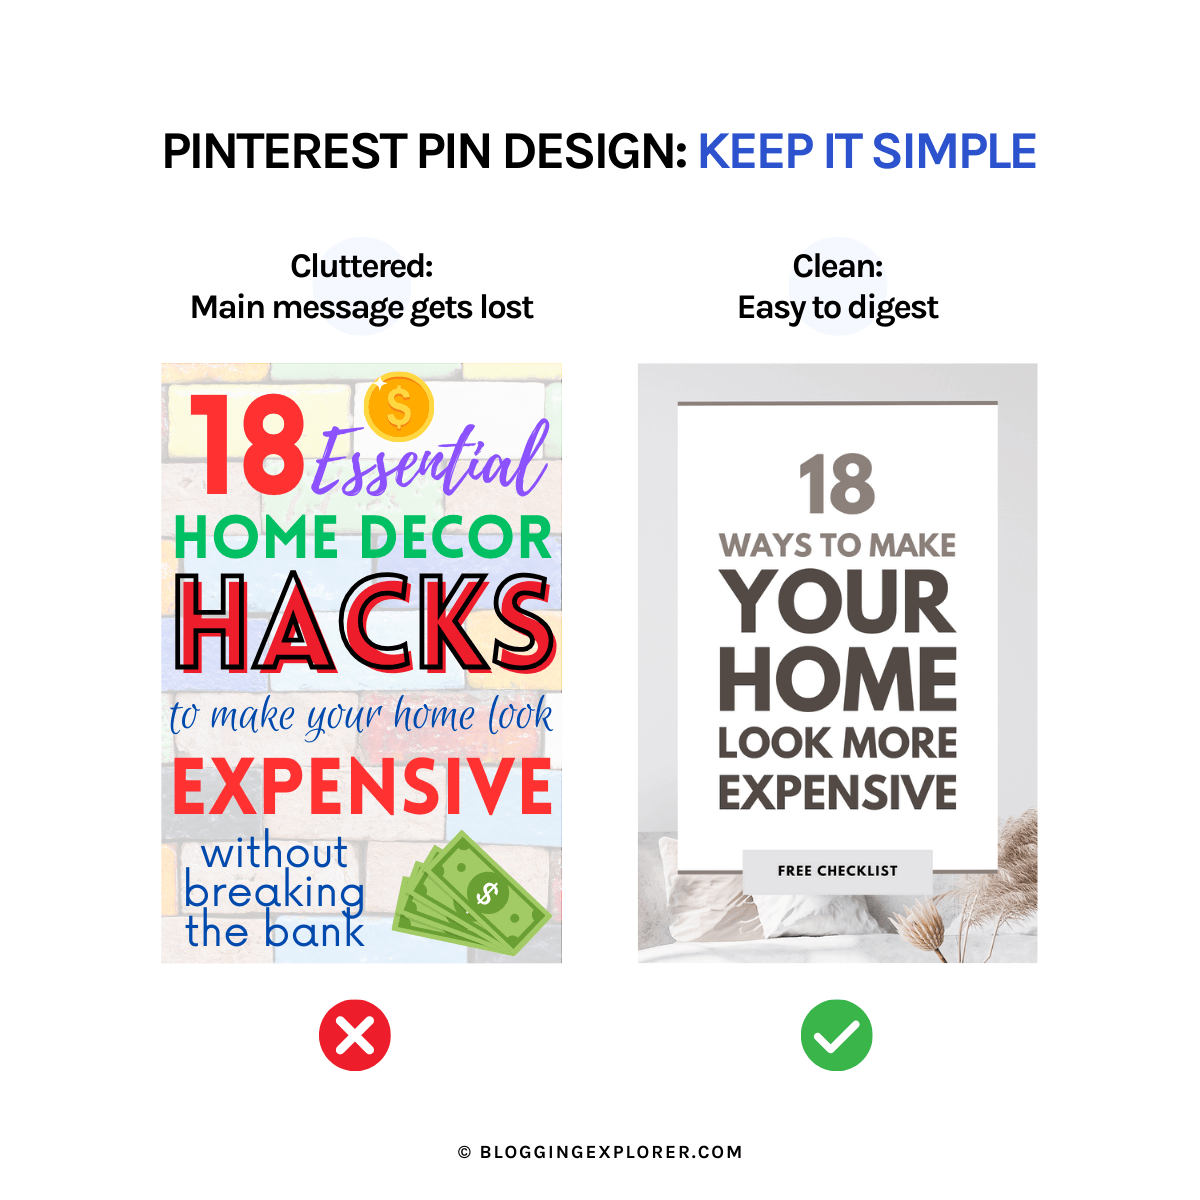
All in all, less is more when designing a pin. It’s all about keeping it simple.
Make sure to customize and adjust these parts of your pin:
- Text overlay (font, size, content)
- Background (color, image, or pattern)
- Logo or brand name
- Photos and graphics
Step 4: Export your pin image file
Once you’re happy with your design, it’s time to export the image file from Canva.
In the top right corner in Canva, select Share > Download:
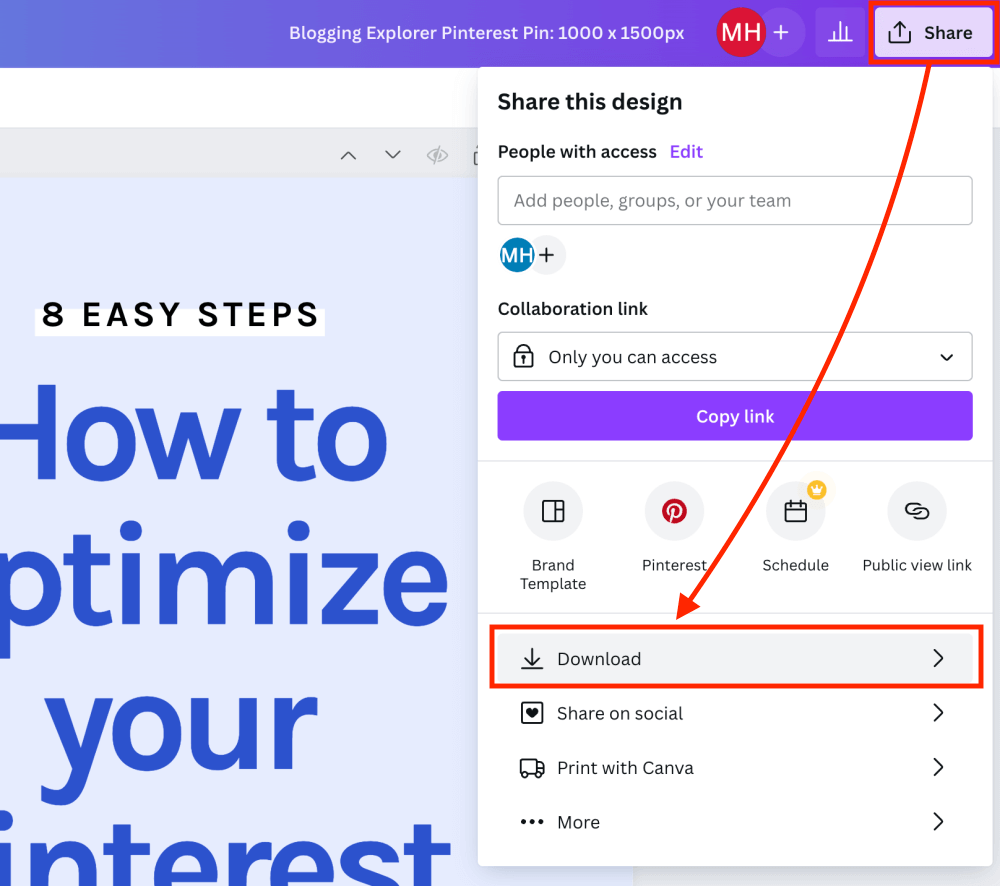
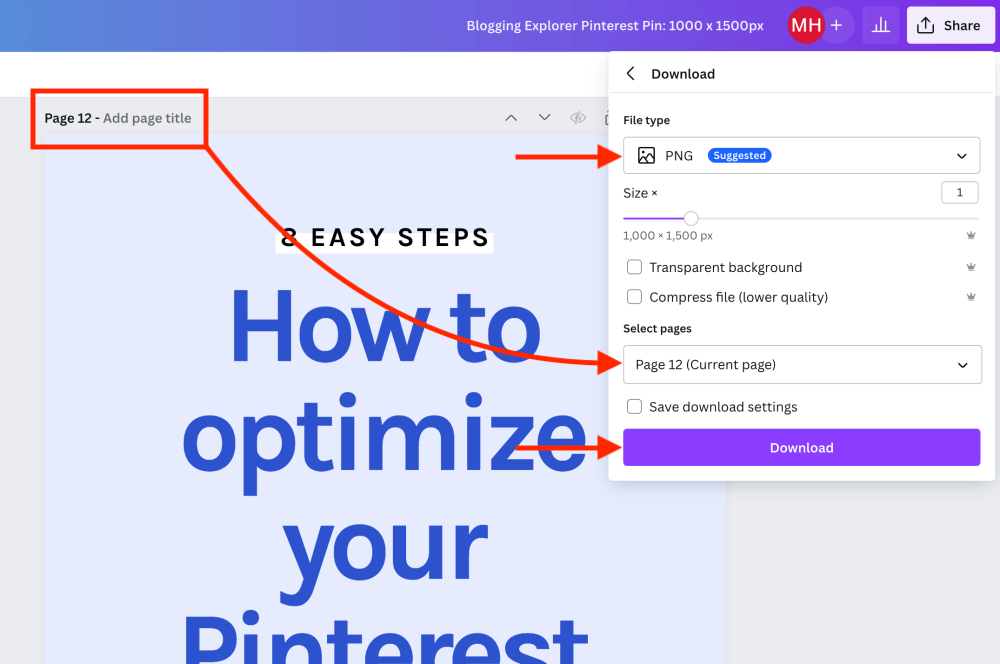
Next, choose your download settings:
- File type: Use JPG if your design includes photographs either as standalone elements or as a background.
- Select pages: Choose to download either an individual page or multiple pages.
When you’re all set, click Download:
You can let Canva compress your file for you, or use a third-party compression tool.
Step 5: Publish your pin on Pinterest
Once you’ve exported your pin file to your computer, it’s time to share it to your Pinterest boards.
Here’s my workflow for exporting my pins and publishing them to my Pinterest boards:
- Compress the file with TinyPNG (better quality than the built-in compression tool in Canva)
- Upload it to my WordPress Media Library
- Add a pin description to the file using the Social Warfare plugin
- Embed the pin into my blog post
- Save to the most relevant Pinterest board from the blog post
Sure, that’s quite a few steps, but it works for me.
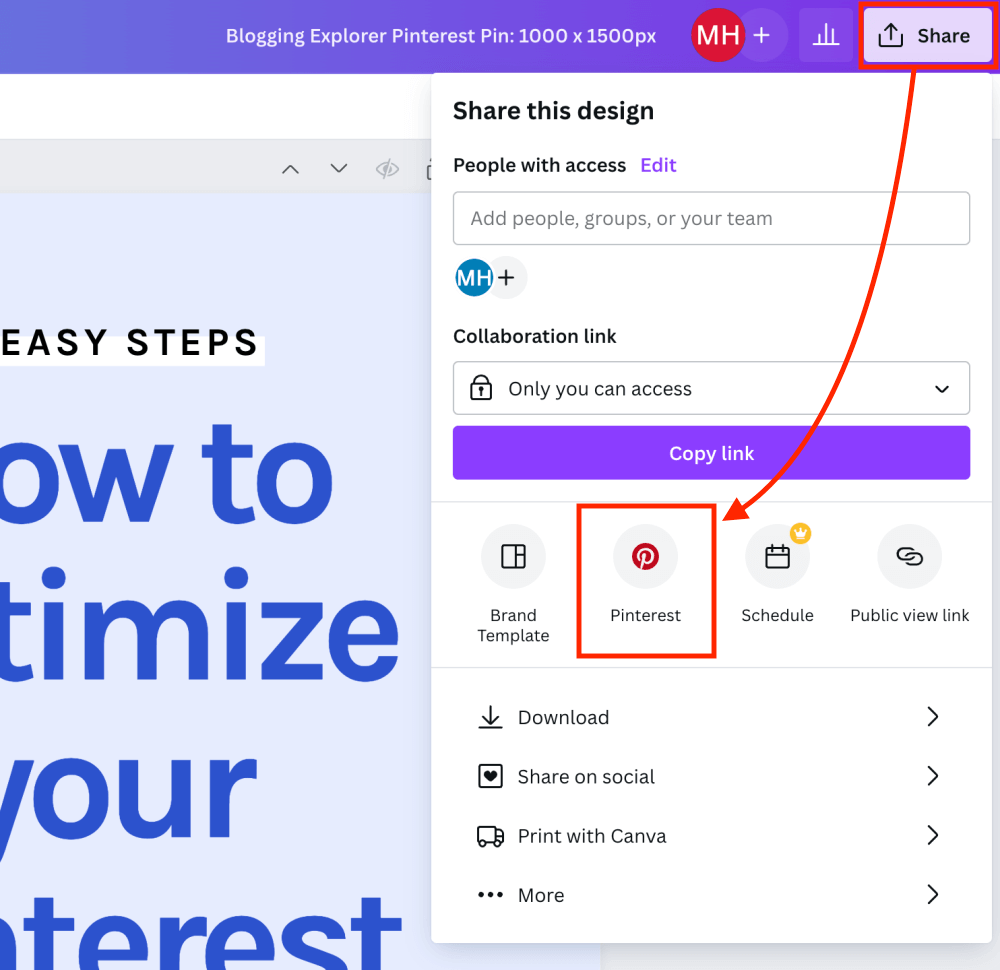
To speed things up, you can publish pins to your Pinterest boards directly through Canva, too. To connect Canva with your Pinterest account, select Share > Pinterest in the top right corner on Canva and follow the instructions:
Summing it up: Pinterest pin design tips (and how to create your own Pinterest pin graphics)
Now that you know all my best Pinterest pin design tips, it’s time to get started!
Head over to Canva to set up your free account. Browse their templates for inspiration and create a set of 5 to 10 pin templates your can use over and over again for your blog posts.
For a little shortcut, grab my viral Pinterest templates or my minimalistic Pinterest templates.
If you’re new to Pinterest, head over to my full Pinterest marketing strategy guide to learn everything you need to know to drive massive traffic to your website from Pinterest for free. I’ll see you there!
