So you are looking for a thorough, complete WP Rocket review to figure out whether this WordPress caching plugin is worth it? You’re in the right place!
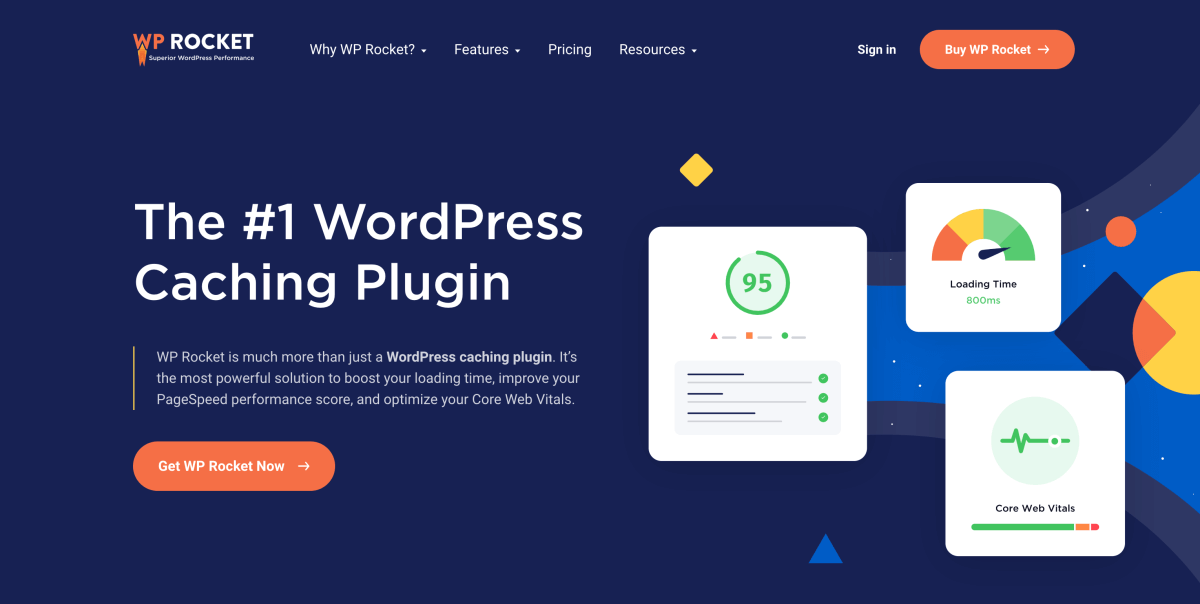
WP Rocket is one of the most popular and powerful WordPress caching plugins for speeding up your site.
It’s easy to use, beginner-friendly, and it offers a wide range of tools and settings for optimizing your WordPress performance.
When you install and activate WP Rocket, it instantly improves your page speed. The initial configuration is already caching your WordPress site to make it load faster.
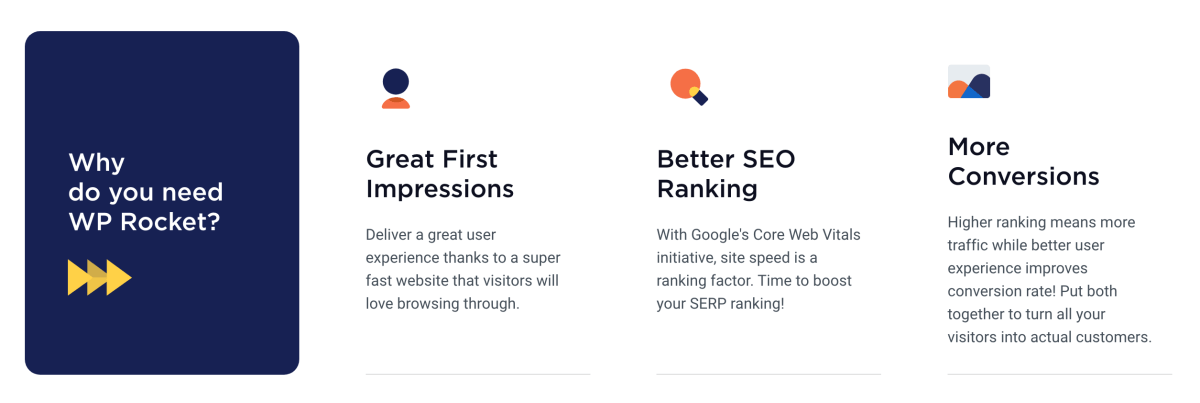
But why should you worry about your page speed in the first place? Do you really need a caching plugin?
According to a study by Google, 47% of users abandon websites that take more than three seconds to load. Studies show that faster websites lead to increased conversions and improved business outcomes.
Moreover, Google considers page speed as a ranking factor in search engine results, emphasizing its importance for SEO.
Summing it up: speeding up your WordPress site helps you generate more traffic and leads, grow your online business, and increase your earnings.
So the question is: How much can WP Rocket improve your WordPress site performance?
In this full WP Rocket review, I will cover everything you should know about this WordPress caching plugin. I’ll show you what WP Rocket can do, discuss its pros and cons, and more.
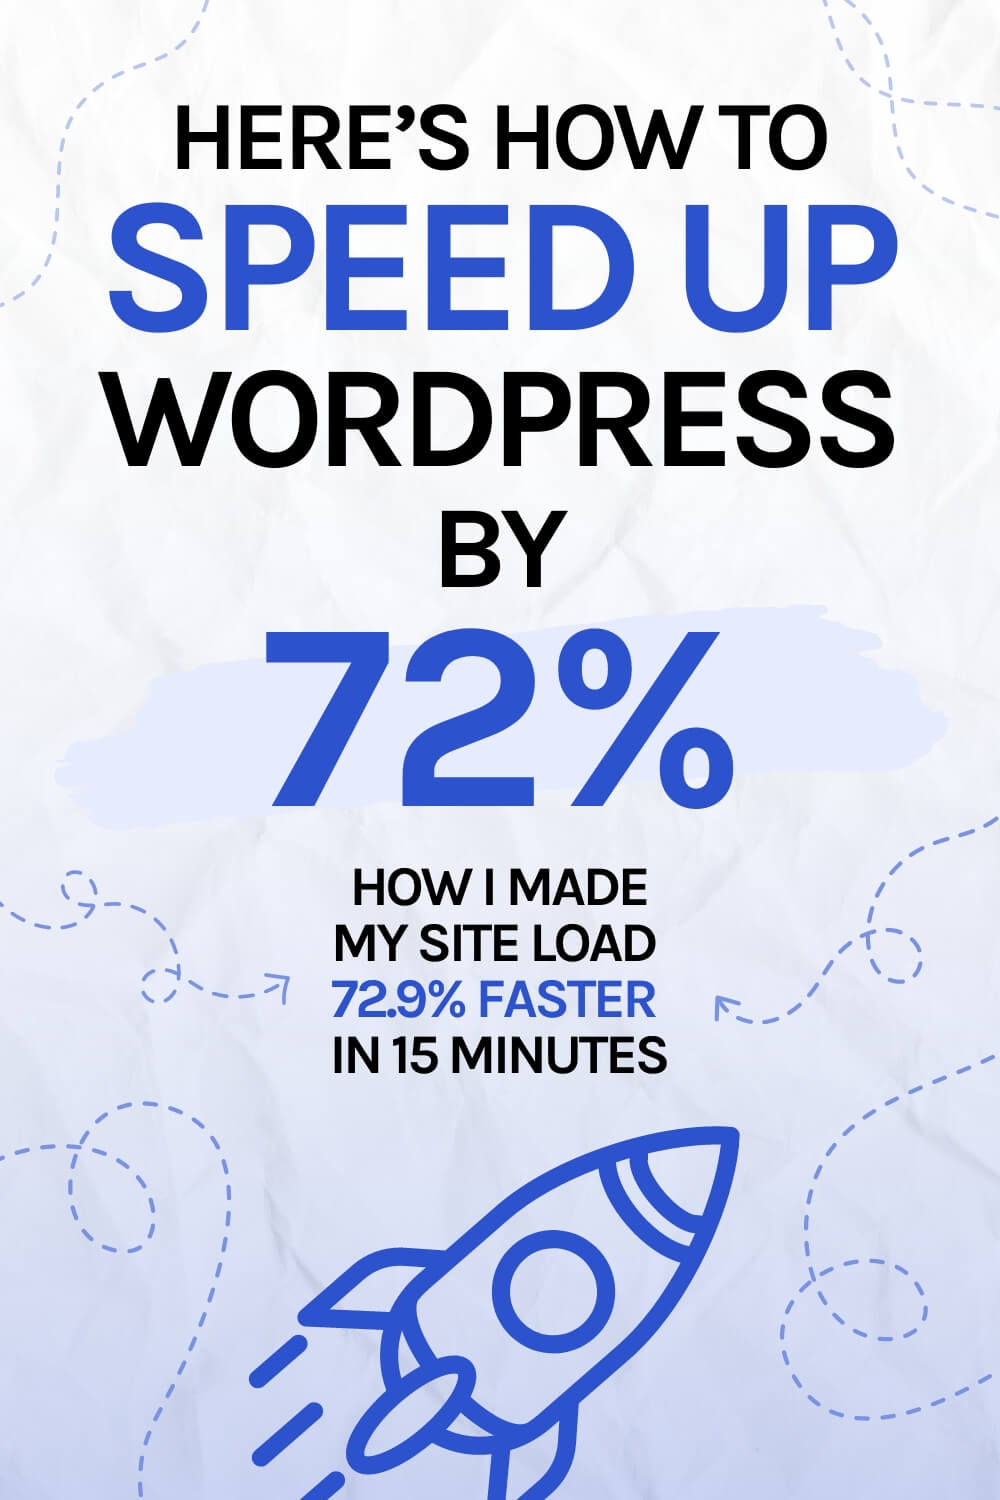
Most importantly, I’ll show some benchmark speed test results to see if WP Rocket really does what it promises. You’ll see the before and after results I achieved and the exact settings I used. (Spoiler alert: WP Rocket improves all Core Web Vitals by 50% to 100%.)
I’ve been building and optimizing WordPress websites for myself and my website clients since 2017, ranging from small blogs and homepages to large-scale business websites and online shops. So I know a thing or two about how WordPress works under the hood, and how you can prevent and fix sluggish websites. Whether you’re new to WordPress or have some experience under your belt, you’re going to walk away with valuable insights and cold-hard numbers on whether WP Rocket is worth trying.
Let’s go!
- What are caching plugins?
- What is WP Rocket?
- What can WP Rocket do for you?
- Pricing options
- WP Rocket Pros and Cons
- Speed and performance testing: Does WP Rocket really work?
- How to speed up your WordPress website with WP Rocket
- WP Rocket Settings and Features
- Can WP Rocket break your website and cause problems?
- Is WP Rocket better than free caching plugins?
- Final thoughts: Is WP Rocket worth it?
Please note: This post contains affiliate links to products I use, trust, and recommend. If you choose to purchase a helpful product using these links, I may receive a small commission for referring you – at no extra cost to you. These funds help me keep this blog up and running.
What are caching plugins?
WordPress caching involves creating static copies of frequently accessed website pages, reducing server load and improving loading times. This process is crucial for optimizing WordPress sites and ensuring a faster, more responsive user experience.
WordPress caching offers a plethora of benefits, including:
- Faster page loading times: Static cached pages load faster, delivering a smoother and more responsive experience for visitors.
- Improved SEO performance: Faster loading times can positively impact search engine rankings, boosting visibility in search results.
- Reduced server load: Caching eliminates the need for servers to generate new page content for each request, decreasing the load on the web server and improving overall performance.
- Reduced server costs: By minimizing the web server load, caching can help lower hosting costs, especially for high-traffic websites.
Caching plugins optimize your WordPress website by improving the user experience (UX). With a fast-loading site, your visitors are more likely to stick around.
But not all caching plugins are equal. All of them offer slightly different features and options.
While some plugins can speed up your website immediately after activation, others require more manual testing and optimization – which requires at least some experience with website optimization techniques.
What is WP Rocket?
WP Rocket is a popular WordPress caching plugin that makes big promises. They claim to deliver:
- Easy and quick setup
- Top-notch results out of the box
- Beginner-friendly settings and interface
- Seamless, quick integration for CDN
- A plethora of settings to further optimize your page speed
WP Rocket was launched in 2013 and was created by web developers Jonathan Buttigieg and Jean-Baptiste Marchand-Arvier. The biggest reason for them creating their own caching plugin was simple: they didn’t feel any of the WordPress caching plugins available at the time were doing much for their site’s performance and loading times.
Moreover, they felt that most plugins at the time weren’t user-friendly or intuitive. So they made WP Rocket different: it’s easy to navigate and the settings are explained clearly. Even if you’re new to caching altogether, WP Rocket simplifies the entire workflow of speeding up your site from start to finish.
You can read more about WP Rocket’s story and early stages in their 1-year report.
What can WP Rocket do for you?
WP Rocket is different than most other caching plugins. You simply have to install and activate it, and you’ll already see a significant improvement in page speed.
Hence, if you are new to WordPress and the topic of caching feels overwhelming and technical, WP Rocket is the easiest caching plugin out there that really works.
Here’s an overview of WP Rocket’s key features and functionalities:
- Comprehensive caching mechanisms:
WP Rocket’s caching mechanisms encompass page caching, database caching, and object caching, ensuring optimal performance. Also, you have the option to generate a separate cache for mobile devices. - Advanced file optimization techniques:
WP Rocket offers advanced optimization techniques like file minification, delivery optimization, lazy loading, and Gzip compression, further enhancing website speed. - Loading JavaScript deferred:
Still seeing the Eliminate render-blocking resources audit in PageSpeed Insights? With WP Rocket, you can load JavaScript files either in the footer of your site, or deferred so that they don’t block the downloading of other assets on your site, slowing things down. - Preloading cache:
With preloading, WP Rocket detects your sitemaps, saves all URLs to the database, and preloads the cache for all URLs. - Database cleanup:
WP Rocket provides database cleanup features, removing post revisions, trashed items, comments, transients, and any unnecessary data from your WordPress database to speed up your website. - CDN integration:
WP Rocket seamlessly integrates with their own Rocket CDN and other popular Content Delivery Network providers, allowing you to speed up your site even further globally. - Image optimization (with Imagify):
WP Rocket integrates perfectly with their own image optimization plugin Imagify. This will reduce image file sizes without compromising quality, improving your site’s loading speed.
All in all, WP Rocket offers a wide selection of features to speed up your site. What I love about their caching settings is that you can easily fine-tune your configuration to exclude individual files and scripts. If your site looks strange after activating a specific setting, most often you can solve the issue by excluding individual assets from caching.
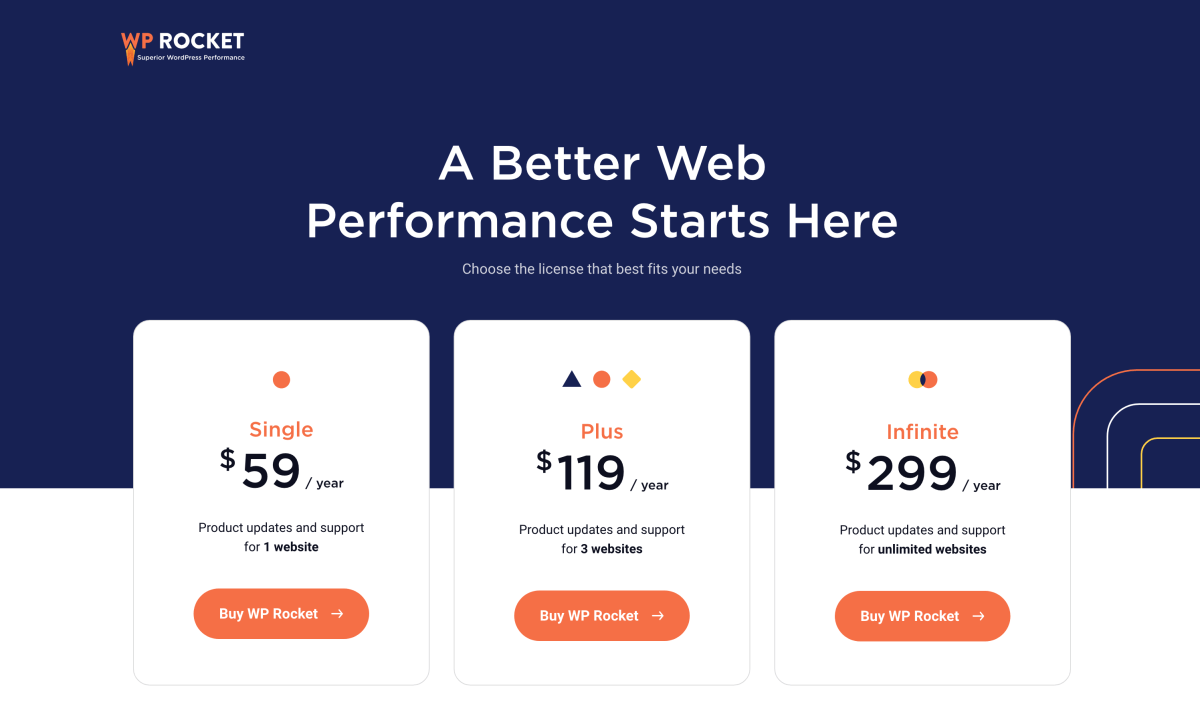
Pricing options
WP Rocket offers a simple pricing structure with three licence options based on the number of sites you want to install the plugin on:
| License type | How many sites? | Price |
|---|---|---|
| Single | 1 site | $59/year |
| Plus | 3 sites | $119/year |
| Infinite | unlimited sites | $299/year |
All licence tiers unlock all features of the plugin.
Hence, there’s no free version available and no free trials. However, you get a full 14-day money-back guarantee on all plans.
WP Rocket Pros and Cons
1: Pros
Real results
Most importantly, WP Rocket works and users are extremely satisfied with the results. I’ll show you the results I achieved in a minute.
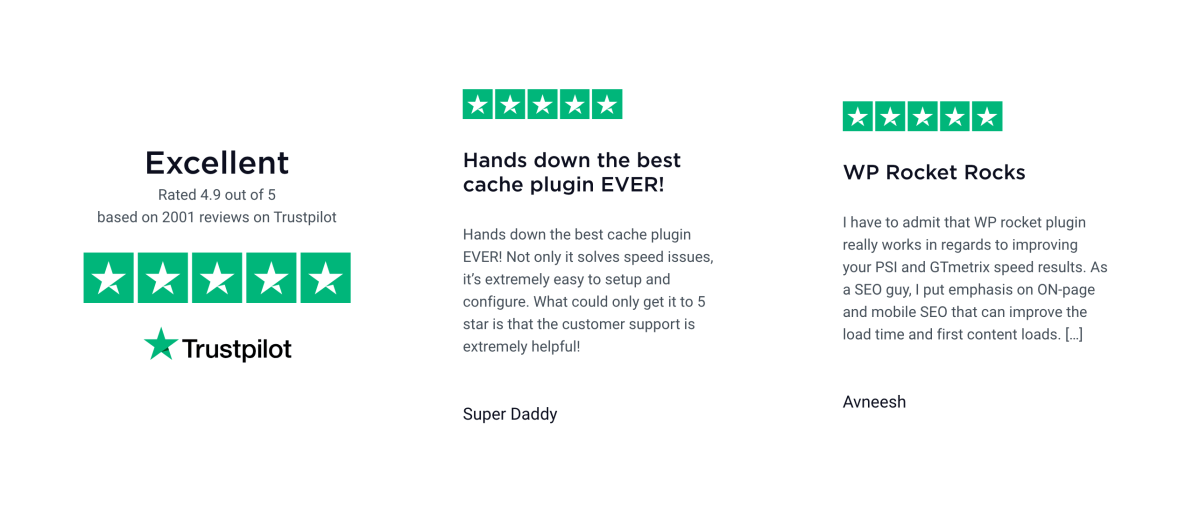
In fact, WP Rocket is one of the best-rated WordPress caching plugins out there, with 4.9 stars rewarded by users on Trustpilot.
Intuitive user interface
After installing WP Rocket, you will see a clear, user-friendly dashboard. Here you can configure the plugin with just a few clicks.
Ease of use
You can get great results with WP Rocket without advanced technical experience.
Quick to install and configure
WP Rocket works pretty well out of the box, i.e. just by installing and activating the plugin, your website speed will improve.
I’ll walk you through the dashboard in a minute.
Helpful support
The friendly support team has never left a question unanswered. I’ve had the most professional reps help me optimize my configuration and overall website performance.
Based on customer ratings, WP Rocket boasts a 92% happiness score with their support.

Thorough, detailed documentation
This is one of my favorites: directly within the plugin, you’ll see a blue Help bubble. Click on it to browser the documentation and all help articles without leaving WordPress. (Neat!)
Extensive features to improve WordPress performance
WP Rocket comes with an entire toolkit for speeding up your site:
- Caching
- Minification for HTML, CSS, JS
- Image optimization (with Imagify)
- CDN integration
- and more
We’ll go through all the settings below.
CDN compatibility
Using a Content Delivery Network (CDN) for your site further increases its loading times globally.
Separate caching for mobile devices
WP Rocket speeds up your website for mobile visitors, too. The plugin allows you to generate separate cache files for mobile devices.
Ecommerce compatibility
If you run a WooCommerce shop, you can speed up your store with WP Rocket. The plugin automatically excludes dynamic shop pages from the cache, such as Cart and Checkout.
Web hosting compatibility
How WP Rocket will work on your website depends on your web host. Since many hosting providers have their own in-house caching systems in place, some WP Rocket features may be automatically disabled to ensure compatibility.
What’s interesting is that WP Rocket is now the only caching plugin allowed with both Kinsta and WP Engine. These high-performance hosting providers already offer top-notch loading times, but they now encourage using WP Rocket, too.
2: Cons
No free version
WP Rocket has no free version available, and doesn’t offer a free trial period.
However, you get a 100% money back guarantee for 14 days. You can test WP Rocket for two weeks and request a refund if you’re not happy with the results.

Pricing structure
Compared to other WordPress caching plugins, WP Rocket is on the pricier side.
No chat support
The only way you can contact support is by creating a ticket. Unfortunately, explaining technical topics and exchanging feedback via support tickets can be very time-consuming. I’d love to get support through a live chat or have a phone number to call.
Technical skills required for best results
As with all caching plugins, you can’t achieve the best possible optimization results simply by installing and activating them. However, with its initial configuration delivering real results out of the box, WP Rocket is one of the best caching plugins for non-techies.
Speed and performance testing: Does WP Rocket really work?
Any caching plugin has one job:
It has to make your website load faster.
So does WP Rocket really improve loading times like it promises?
In this section, I’ll walk you through performance testing of WP Rocket on this website, Blogging Explorer. I’ll test the speed and performance of my popular step-by-step guide on how to start a blog. The article is massive and it includes tons of screenshots and images, so it’s perfect for testing.
I will use two popular sites for speed testing: GTmetrix and PageSpeed Insights. Both tools are free, but you need to sign up for a free account with GTmetrix to generate a test report.
Technical details for the test URL
Here are the technical details of the site being tested:
- WordPress version: 6.3.2
- WordPress Theme: Astra Theme
- Page builder: Elementor
- WP Rocket version: 3.15.4
- Web hosting: shared hosting
- PHP version: 8.1.26
- URL tested: https://bloggingexplorer.com/how-to-start-a-blog/
- Site content: long-form WordPress blog post; no e-commerce plugins;
- Prior performance optimizations: images resized and compressed;
Round 1: Results without WP Rocket
Let’s start with our page speed test results without WP Rocket.
Results from PageSpeed Insights (without WP Rocket)
Here are the results from Google PageSpeed Insights for mobile devices:
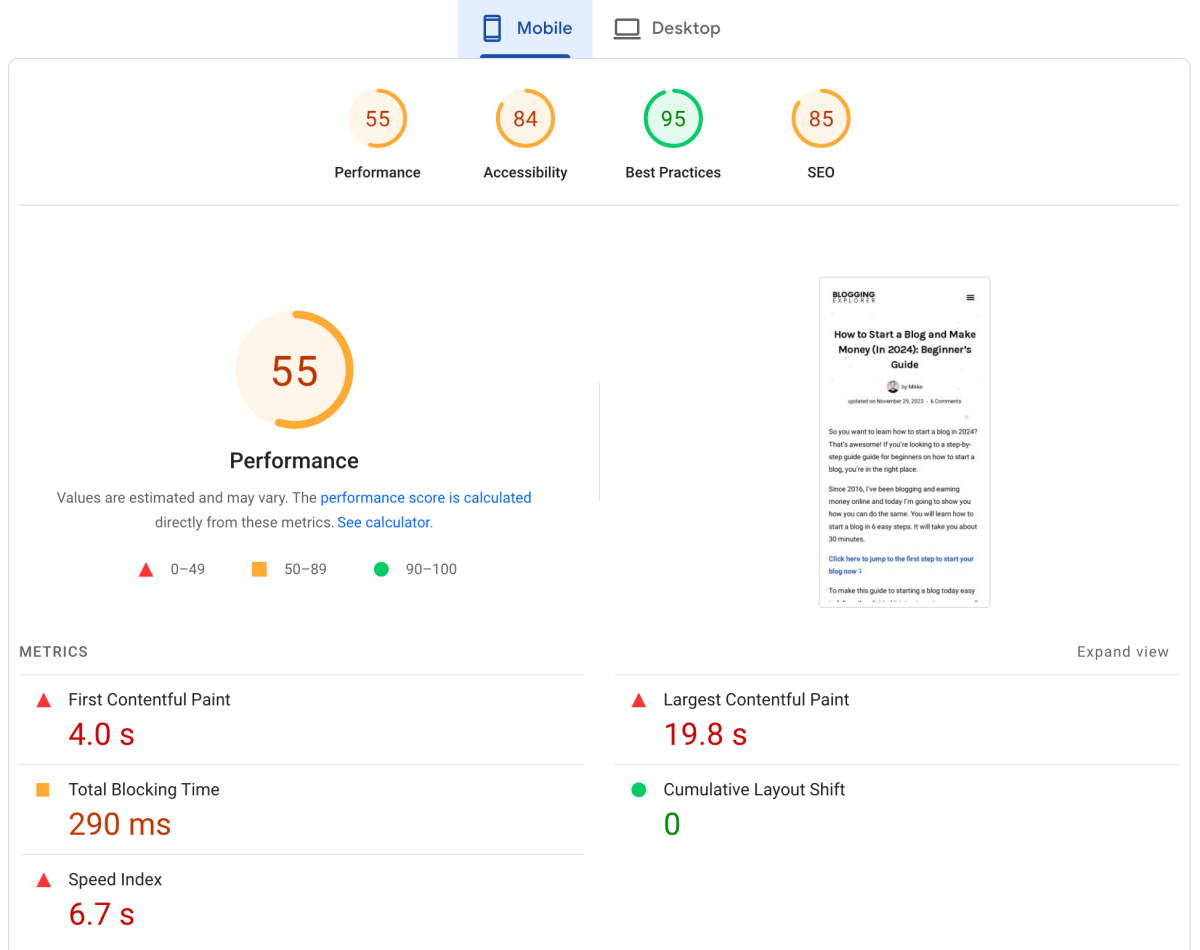
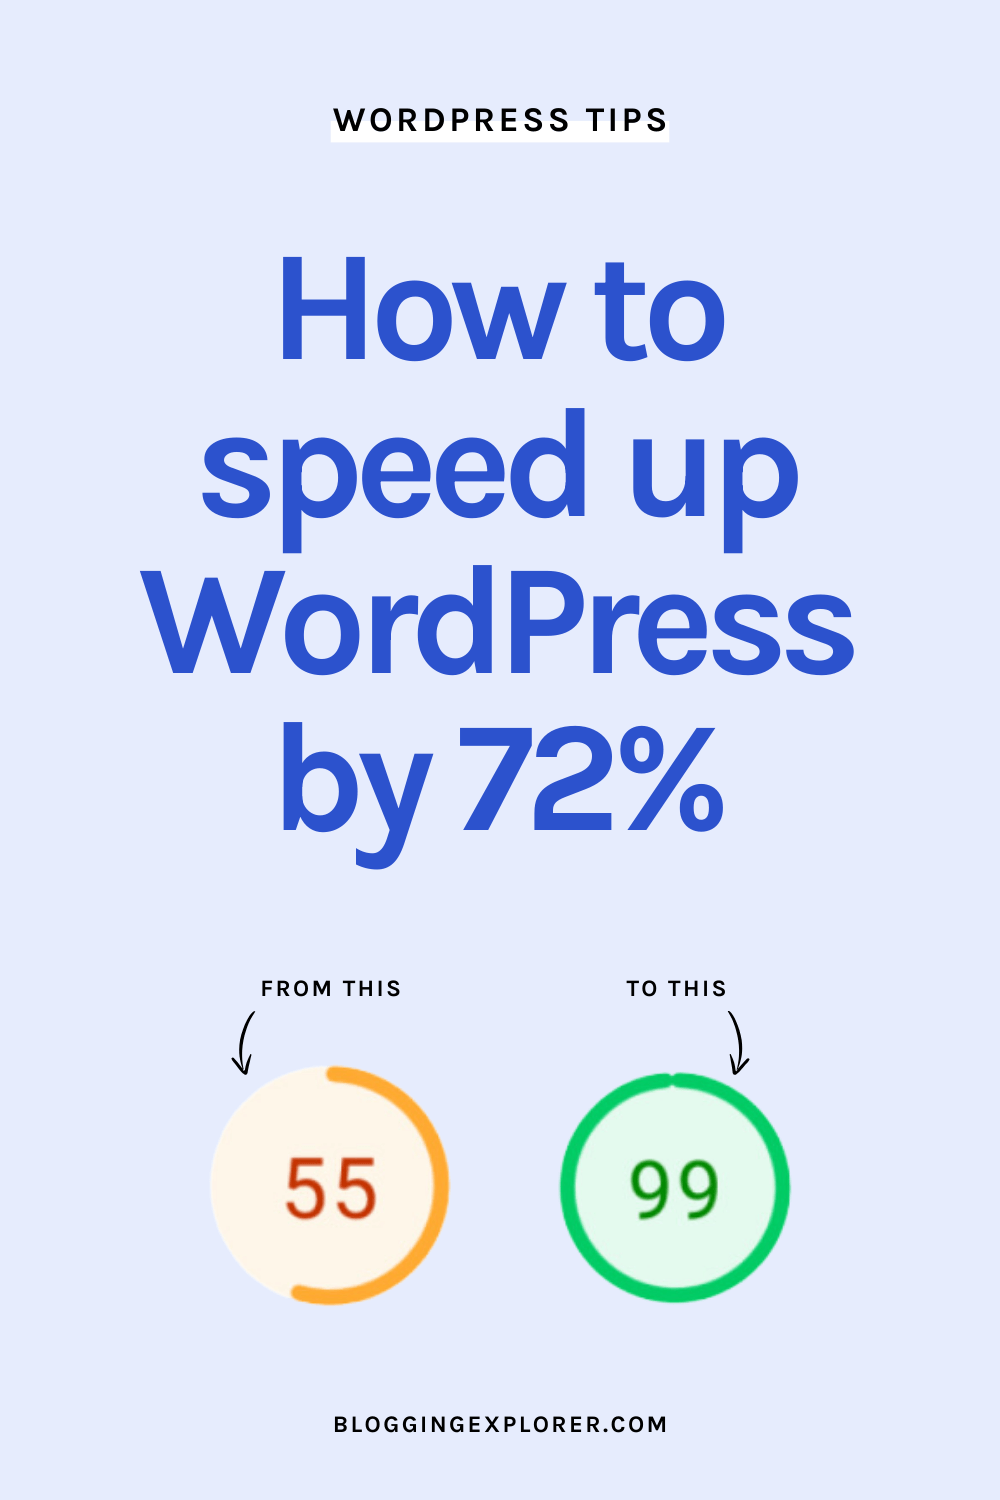
With an overall score of 55 means an average score, but in the lower range. Because there are so many images embedded into the article, the score for Largest Contentful Paint (LCP) is 19.8 seconds, which is absolutely terrible.
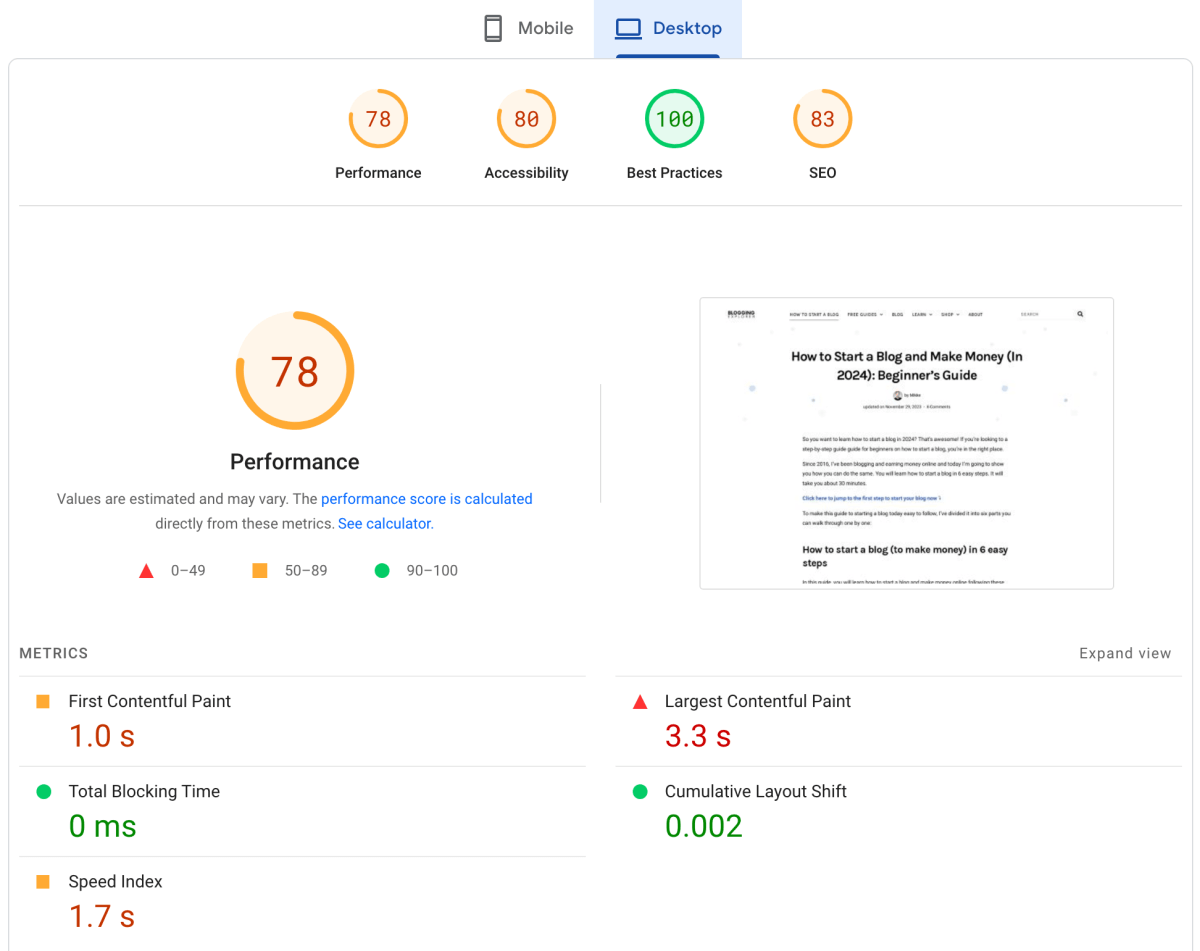
Here are the test results for desktop:
Results from GTmetrix (without WP Rocket)
And finally, here are the results from GTmetrix:
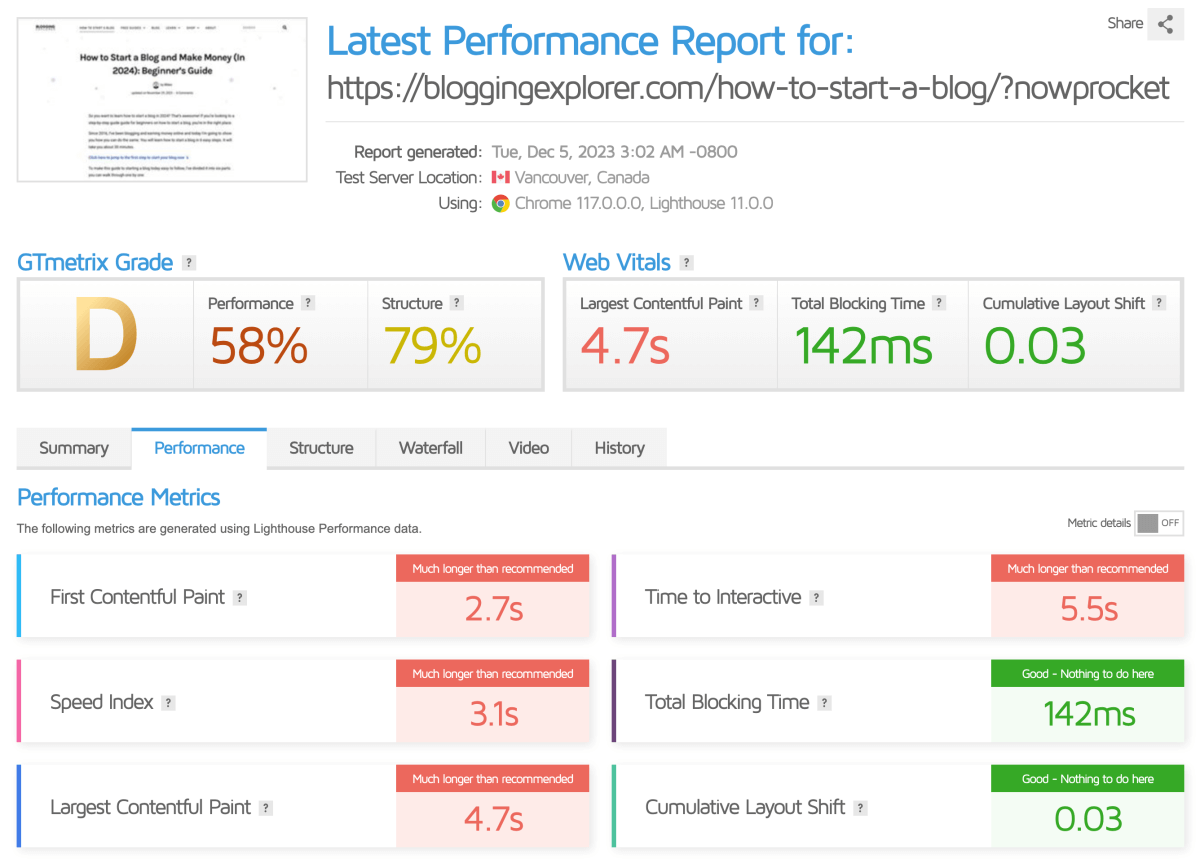
Again, the overall score D is an average score in the lower range. We see that there’s a lot we can improve. For example, Time to Interactive (TTI) indicates the amount of time it takes from when a visitor first opens your site to when they can start interacting with it. At 5.5 seconds, these results are far from good.
Round 2: Results with WP Rocket
Now, let’s see what happens when we turn on WP Rocket.
I have to admit, I was skeptical of whether WP Rocket could make a real difference in my website speed. I’ve tried all of the most popular WordPress caching plugins out there with subtle performance improvement.
However, after installing and activating WP Rocket, I can sum up the results in one word: Promising!
For testing, I enabled the following settings in WP Rocket:
- Enable caching for mobile devices
- Minify CSS files
- Optimize CSS delivery (Remove unused CSS)
- Minify JavaScript files
- Load JavaScript deferred
- Delay JavaScript execution
- LazyLoad: all options active
- Add missing image dimensions
- Activate preloading
- Enable link preloading
Here’s what happened:
Results from PageSpeed Insights (with WP Rocket)
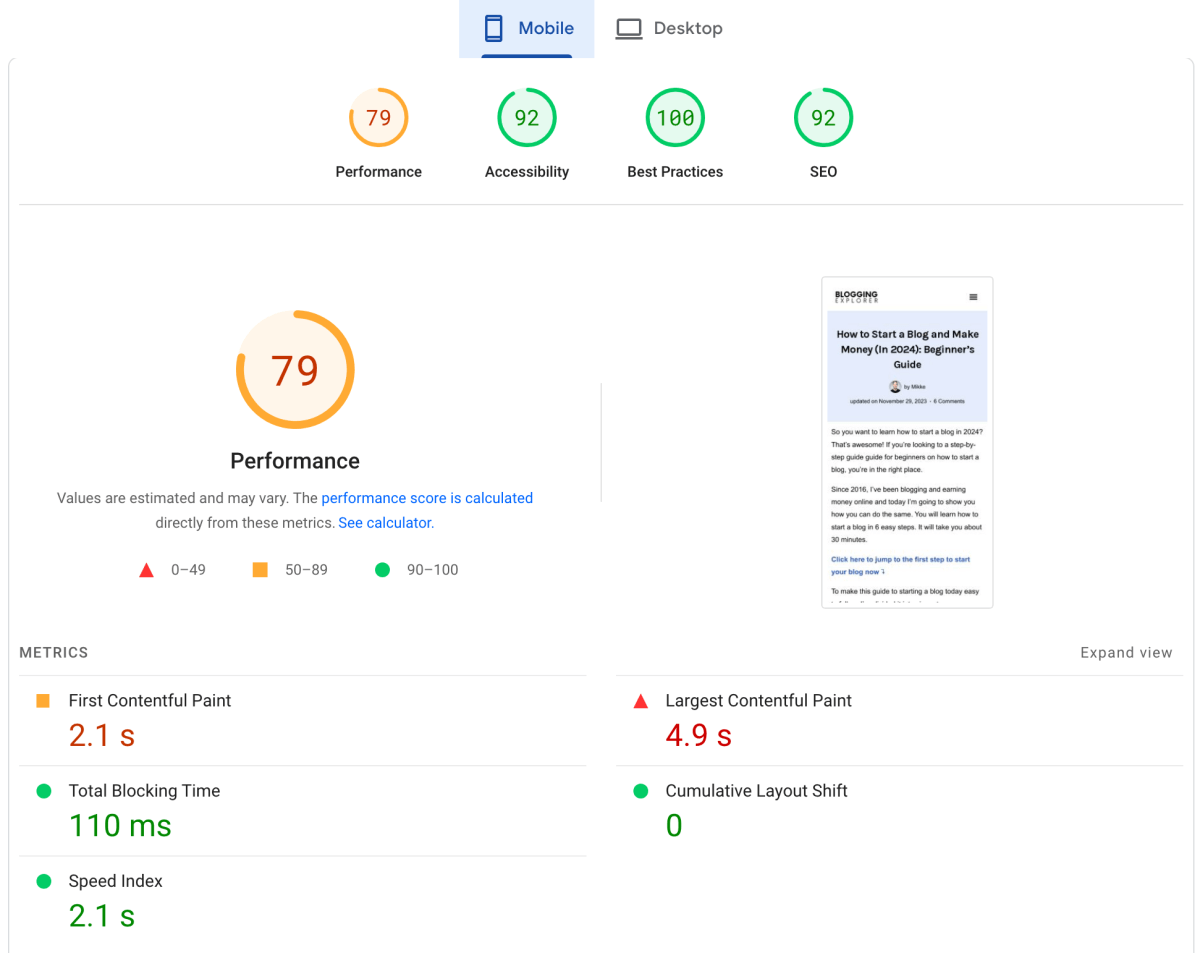
With WP Rocket activated, here are the results from PageSpeed Insights for mobile:
And here are the results for desktop:
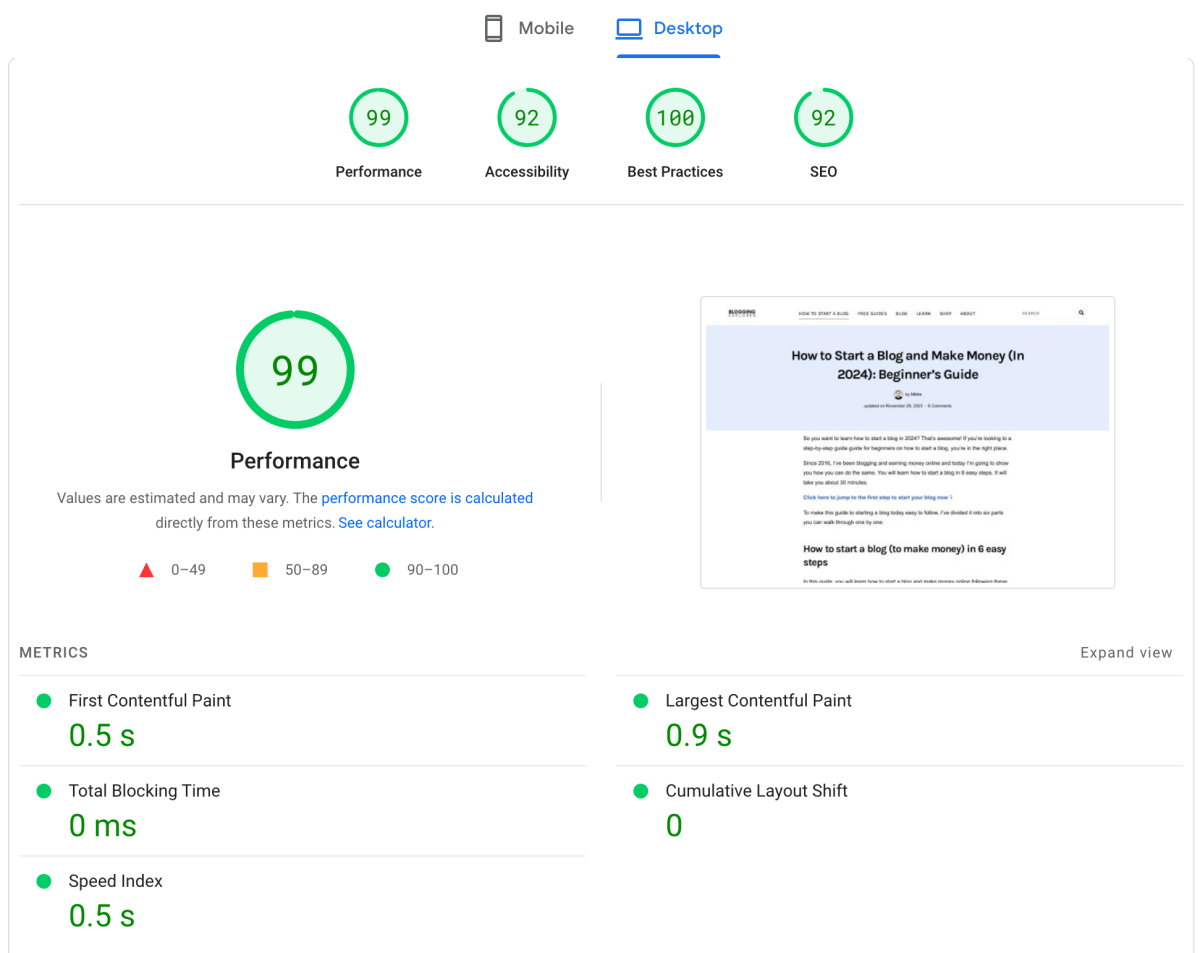
For both mobile and desktop, we see massive improvements in the overall score and the individual metrics.
Here’s a detailed summary for mobile and desktop, with the performance differences highlighted in green:
| Mobile: No WP Rocket | Mobile: WP Rocket | Mobile: Difference | Desktop: No WP Rocket | Desktop: WP Rocket | Desktop: Difference | |
|---|---|---|---|---|---|---|
| Performance | 55 | 83 | +22 (+50.9%) | 78 | 99 | +21 (+26.9%) |
| Accessibility | 84 | 92 | +8 (+9.5%) | 80 | 92 | +12 (+15.0%) |
| Best Practices | 95 | 100 | +5 (+5.3%) | 100 | 100 | 0 |
| SEO | 85 | 92 | +7 (+8.2%) | 83 | 92 | +9 (+10.8%) |
| First Contentful Paint (FCP) | 4.0 s | 1.9 s | -2.1 s (-52.5%) | 1.0 s | 0.5 s | -0.5 s (-50.0%) |
| Largest Contentful Paint (LCP) | 19.8 s | 4.4 s | -15.4 s (-77.8%) | 3.3 s | 0.9 s | -2.4 s (-72.7%) |
| Total Blocking Time (TBT) | 290 ms | 100 ms | -190 ms (-65.5%) | 0 ms | 0 ms | 0 |
| Cumulative Layout Shift (CLS) | 0 | 0 | 0 | 0.002 | 0 | -0.002 (-100.0%) |
| Speed Index | 6.7 s | 1.9 s | -4.8 s (-71.6%) | 1.7 s | 0.5 s | -1.2 s (-70.6%) |
We see that WP Rocket has improved all metrics across the board.
For Google’s Core Web Vitals, we see improvements between 50% to 100%. This is a fantastic result considering it took me 5 minutes to activate WP Rocket and the settings I listed earlier.
Of course, there’s still room for improvement. But all in all, I’ve never seen any WordPress caching plugin deliver results this good so easily.
Results from GTmetrix (with WP Rocket)
Here are the results from GTmetrix with WP Rocket activated:
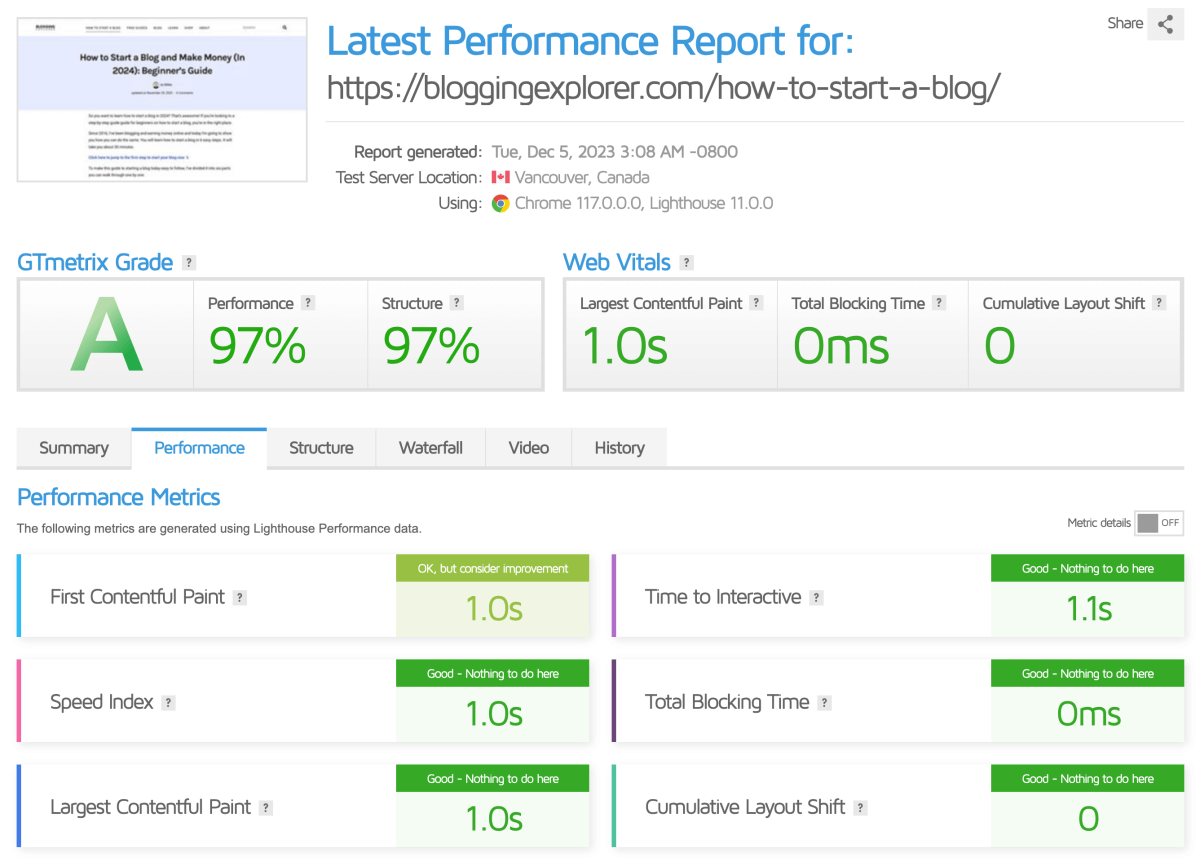
Here’s a detailed overview of the key metrics:
| No WP Rocket | WP Rocket | Difference | |
|---|---|---|---|
| GTmetrix Grade | D | A | +3 grades |
| Performance | 58% | 97% | +39% |
| Structure | 79% | 97% | +18% |
| First Contentful Paint (FCP) | 2.7 s | 1.0 s | -1.7 s (-63.0%) |
| Speed Index | 3.1 s | 1.0 s | -2.1 s (-67.7%) |
| Largest Contentful Paint (LCP) | 4.7 s | 1.0 s | -3.7 s (-78.7%) |
| Time to Interactive (TTI) | 5.5 s | 1.1 s | -4.4 s (-80.0%) |
| Total Blocking Time (TBT) | 142 ms | 0 ms | -142 ms (-100.0%) |
| Cumulative Layout Shift (CLS) | 0.03 | 0 | -0.03 (-100.0%) |
| Time to First Byte (TTFB) | 1.6 s | 641 ms | -959 ms (-59.9%) |
| Onload Time | 4.8 s | 1.4 s | -3.4 s (-70.8%) |
| Fully Loaded Time | 5.9 s | 1.6 s | -4.3 s (-72.9%) |
| Total Page Size | 3.43 MB | 627 KB | -2.80 MB (-81.7%) |
| Total Page Requests | 144 | 14 | -130 (-90.2%) |
Again, we see significant improvements in all metrics. Simply by activating WP Rocket, we achieve the best overall score A.
What strikes me the most is the massive reduction of 81.7% in Total Page Size and 90.2% in Total Page Requests. These results are just superb.
Performance test recap
All in all, we saw WP Rocket improve all metrics and scorings for PageSpeed Insights and GTmetrix.
Most importantly, WP Rocket improved crucial user experience metrics such as:
- Largest Contentful Paint – down by 72.7% to 78.7%
- Time to Interactive – down by 80.0%
- Fully Loaded Time – down by 72.9%
- Total Page Size – down by 81.7%
- Total Page Requests – down by 90.2%
Clearly, WP Rocket does what it’s supposed to. It speeds up WordPress sites and addresses the most relevant metrics when it comes to overall WordPress performance.
The best part?
These results are absolutely massive. For example, reducing the number of requests to the web server by over 90% is seriously good.
In this particular case, we saw improvements for a long-form article with dozens of images embedded. Hence, if you publish long-form articles on your WordPress site and want to speed it up easily, this plugin will do the job for you.
With that said, every WordPress site is unique. Thus, your results will most likely be different than mine. But all in all, you will see improvements in page speed with WP Rocket.
How to speed up your WordPress website with WP Rocket
Now that you’ve seen the results WP Rocket delivered, I bet you want to give it go.
Remember: WP Rocket offers a full 14-day refund policy in case you’re not happy with the results.
Here’s a step-by-step tutorial to start speeding up your WordPress website with WP Rocket:
Step 1: Purchase a licence
If you haven’t already, choose your WP Rocket package here:
On the following page, fill in your details and complete your order:
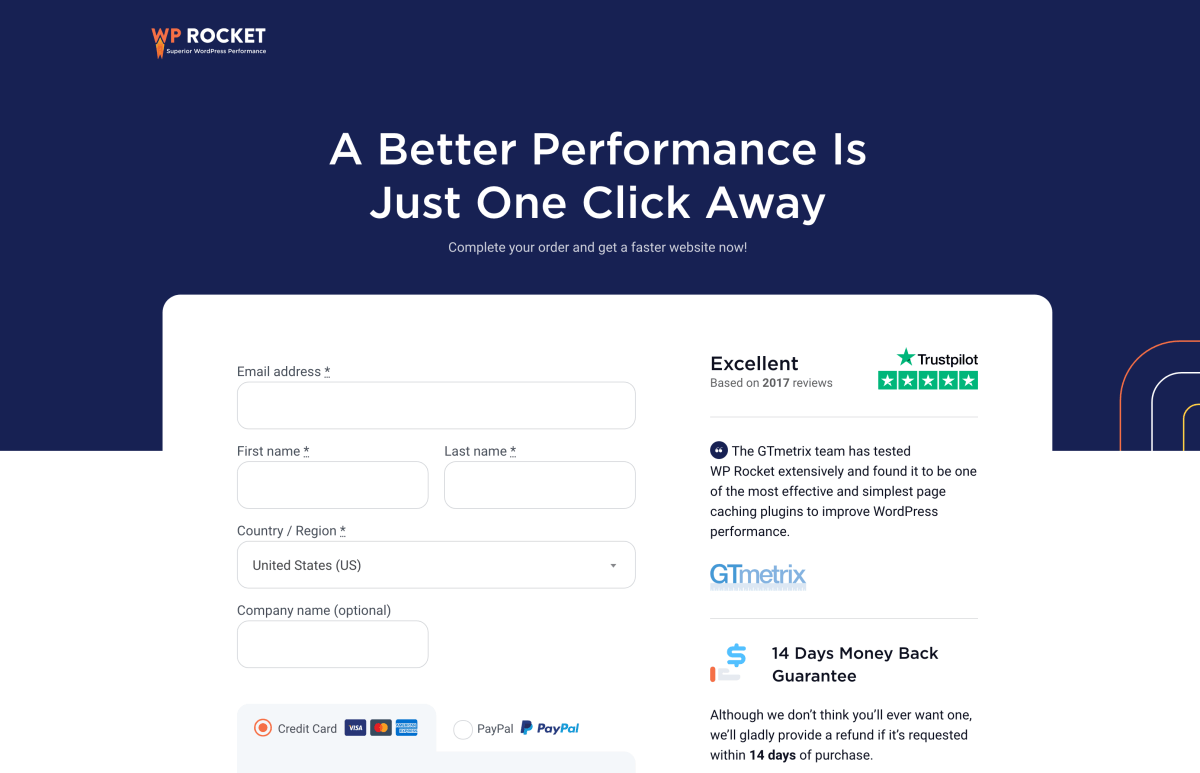
Once you’ve purchased your licence, you will be taken to your WP Rocket dashboard.
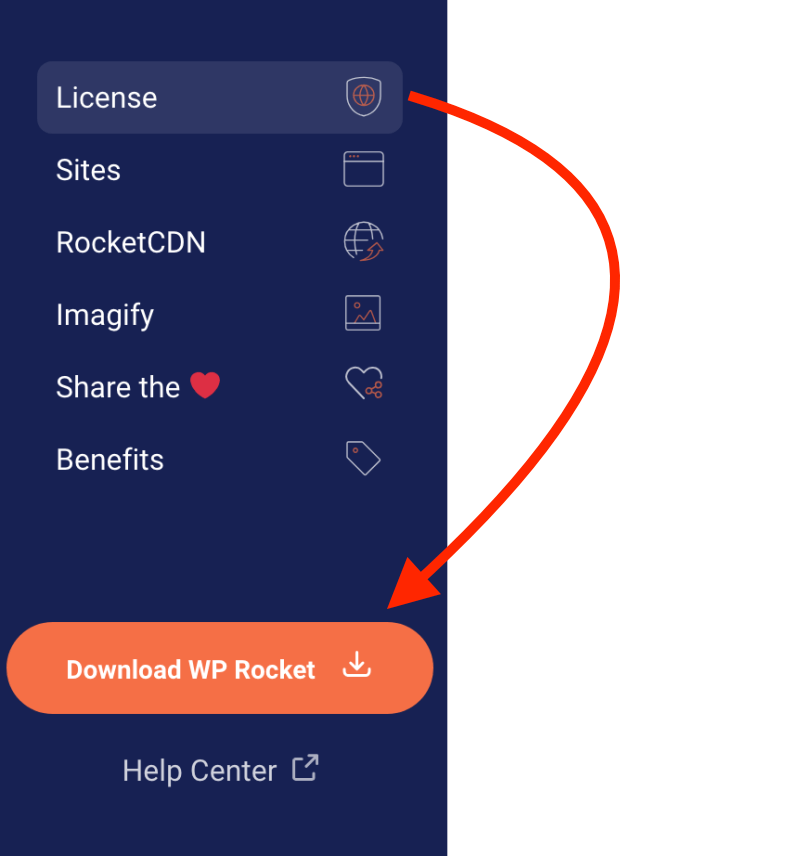
Step 2: Download the WP Rocket ZIP file
Next, download the WP Rocket ZIP file through your WP Rocket dashboard:
Step 2: Install the plugin
Head over to your WordPress admin panel.
On the left, select Plugins > Add New Plugin.
Click Upload Plugin, and then Choose File to select the ZIP file from your computer:
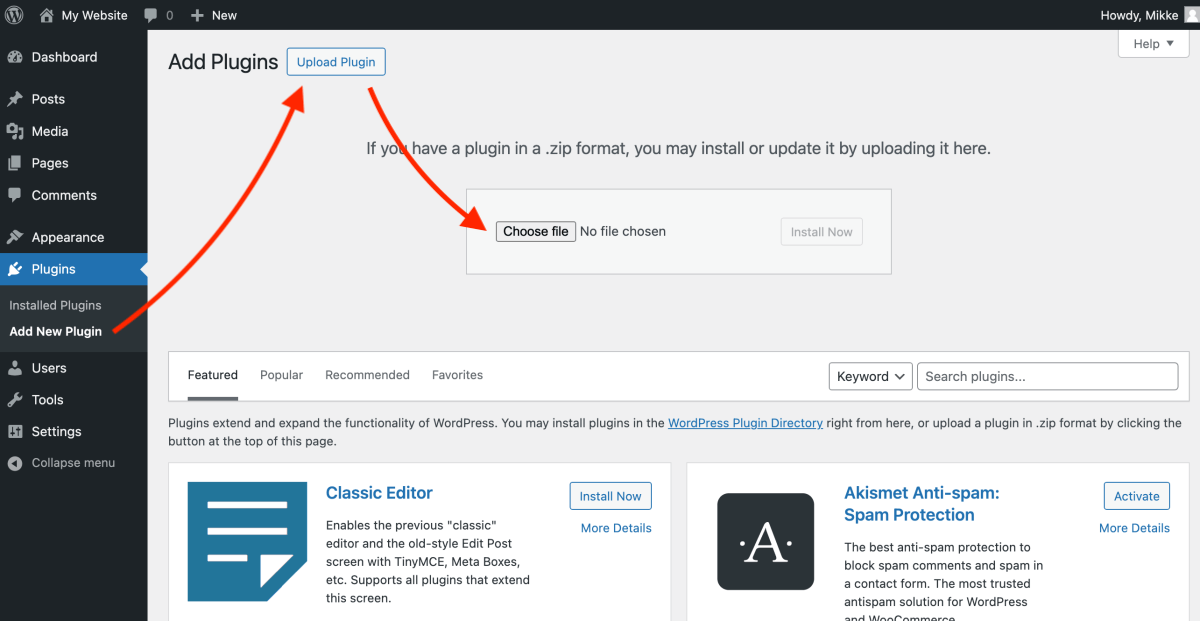
Once you’ve selected the ZIP file, click Install Now.
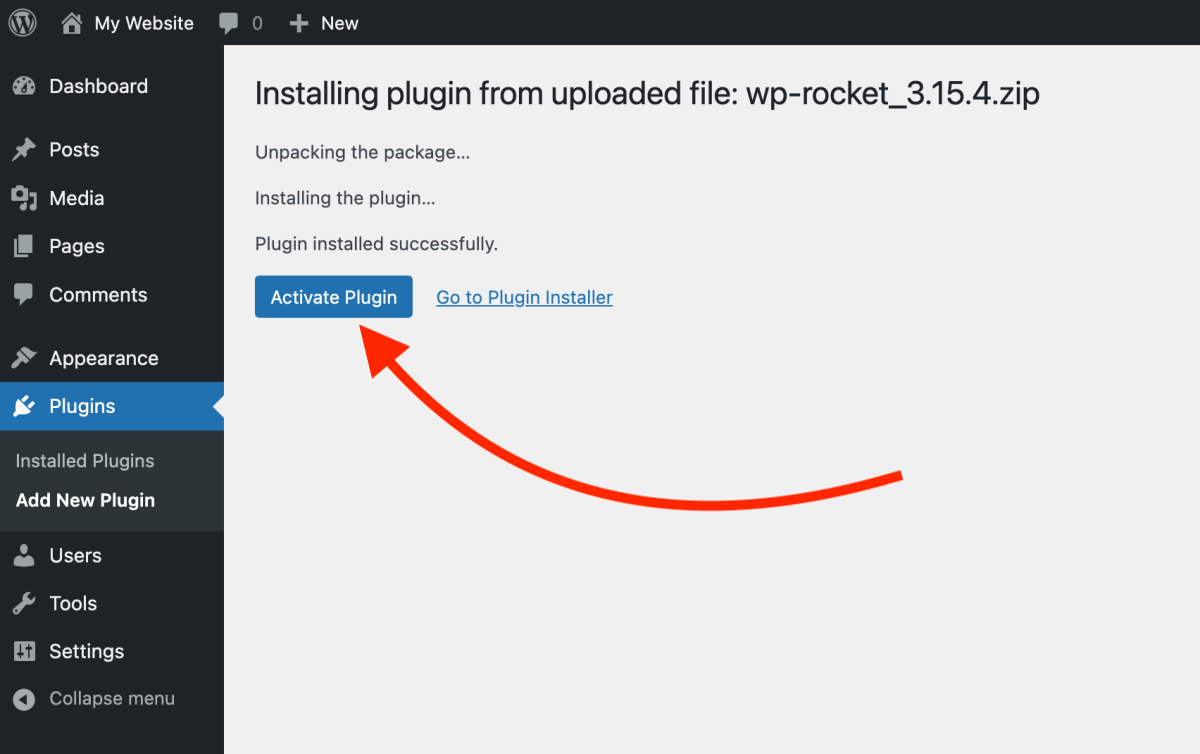
Step 3: Activate WP Rocket
After the installation finishes, click Activate Plugin:
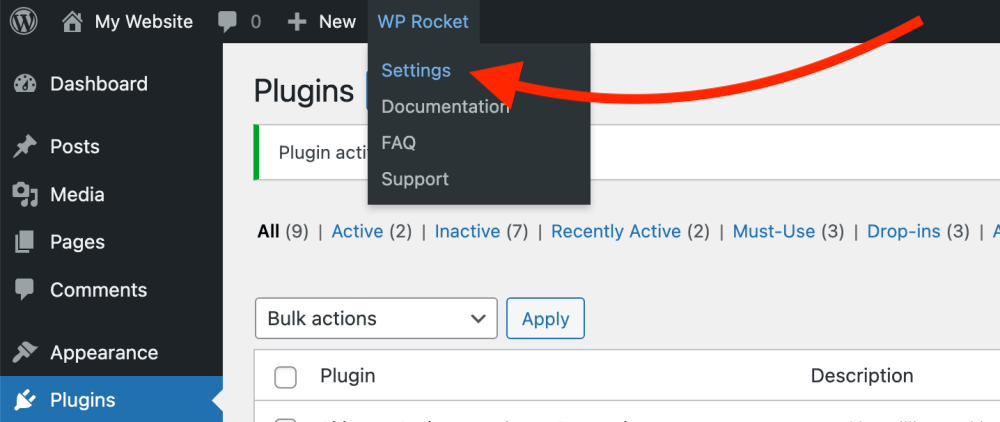
Step 4: Navigate to your WP Rocket settings
After activating the plugin, you will see a new WP Rocket menu in your top navigation bar. Head over to WP Rocket > Settings to open your dashboard:
Let’s move on to exploring the plugin settings next.
WP Rocket Settings and Features
Now that we’ve installed the plugin, let’s explore the different tabs and settings you can adjust:
1: Dashboard
You’ll find your WP Rocket dashboard in WordPress via Settings > WP Rocket:
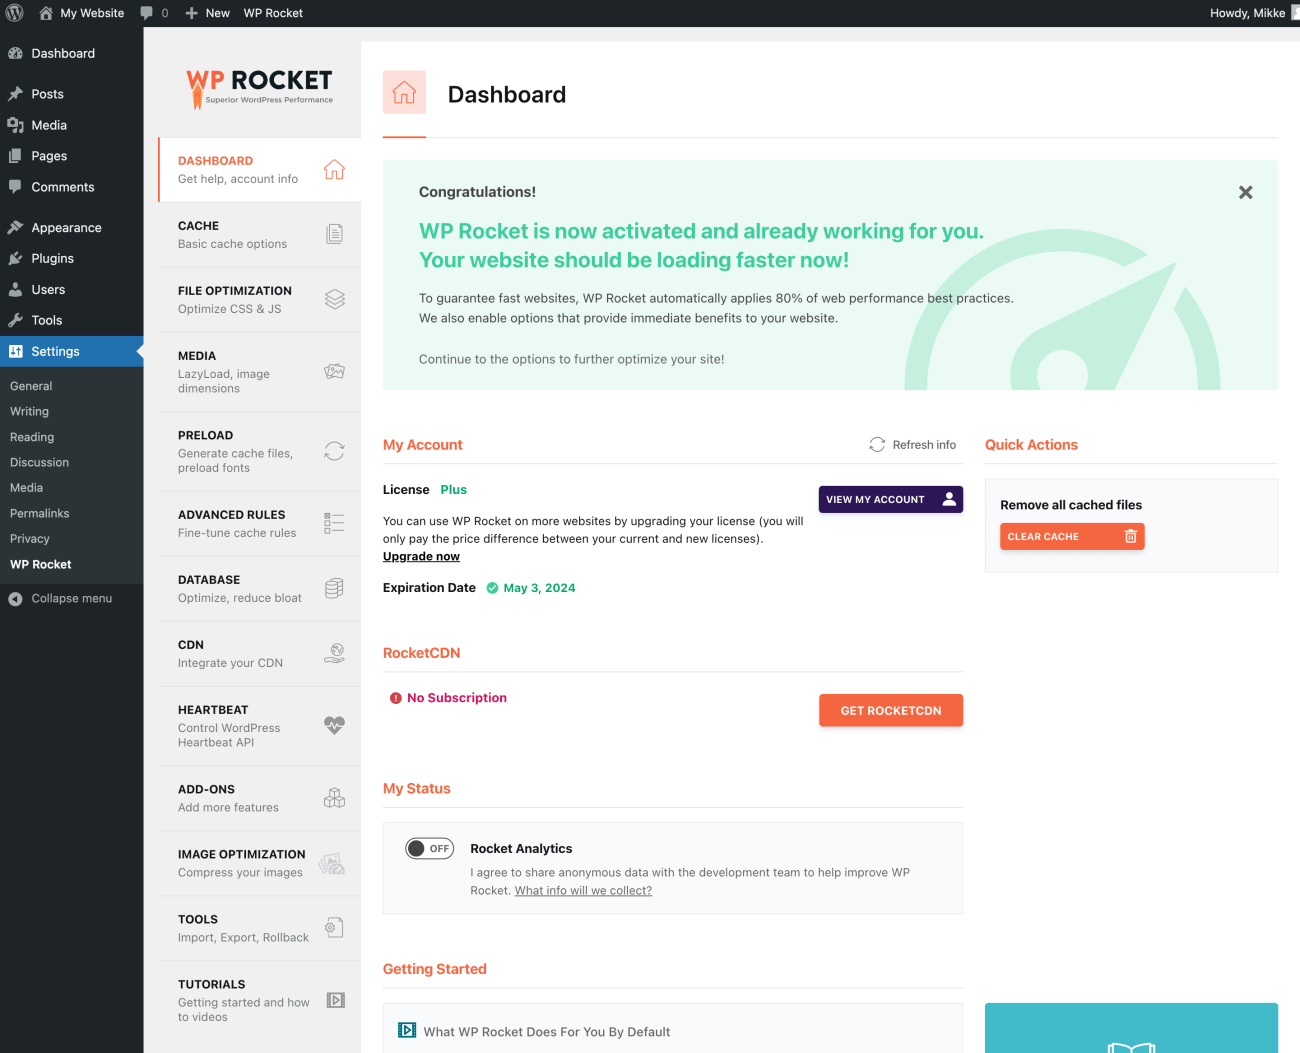
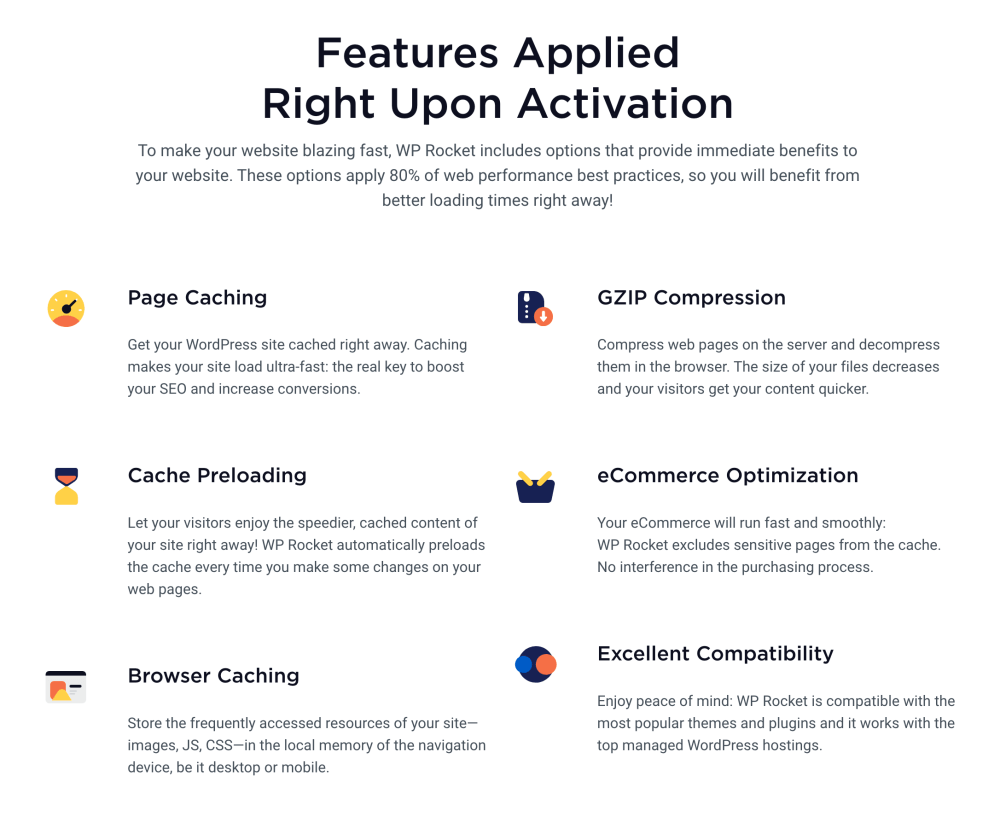
At this point, the default settings are active. You will see a massive green announcement telling you how the plugin is “now activated and already working for you”. WP Rocket automatically applies 80% of performance best practices right away. Hence, your website should be loading faster already.
Your main dashboard contains a few basic settings and options:
- My Account: Manage and upgrade your licence and access your account.
- RocketCDN: Get a RocketCDN subscription (more on this in a minute).
- My Status: Choose whether you want to share analytics data with WP Rocket to improve the plugin.
- Getting Started: Find helpful tutorials and guides to learn how to best use WP Rocket. The Help Center is packed with helpful articles to make using the plugin as easy as possible.
- Frequently Asked Questions: Browse common questions and answers or open a support ticket.
- Quick Actions: Clear your entire cache and remove all cached files.
Now let’s look at each of the tabs you’ll find within WP Rocket:
2: Cache
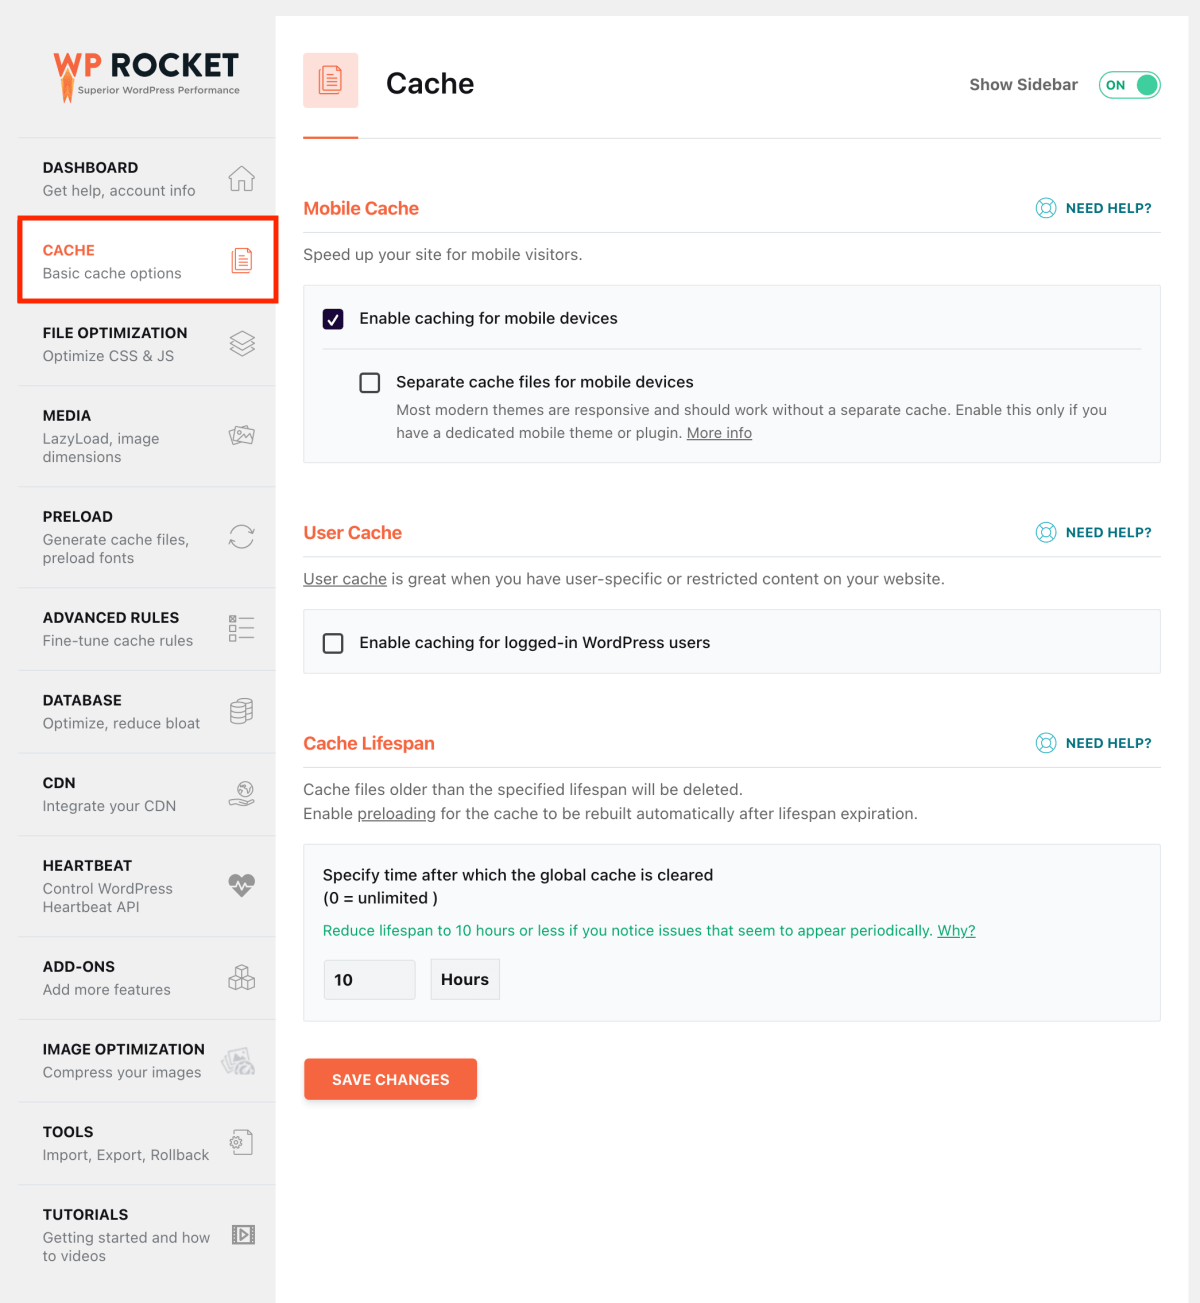
Basic caching is enabled as soon as you active WP Rocket. This includes mobile caching, which speed up your site on mobile devices.
On the Cache tab, you can adjust the following settings and options:
- Mobile cache: Enable caching for mobile devices, with an additional option to generate separate cache files for mobile devices. Activating these settings will fully optimize your site for mobile visitors.
- User cache: Activate caching for logged-in WordPress users. Use this option if your site has user-specific or restricted content.
- Cache lifespan: Define how long WP Rocket should store cached files. Files that are older than the lifespan will be deleted. If your site is mostly static with infrequent updates, you can increase the lifespan.
3: File optimization
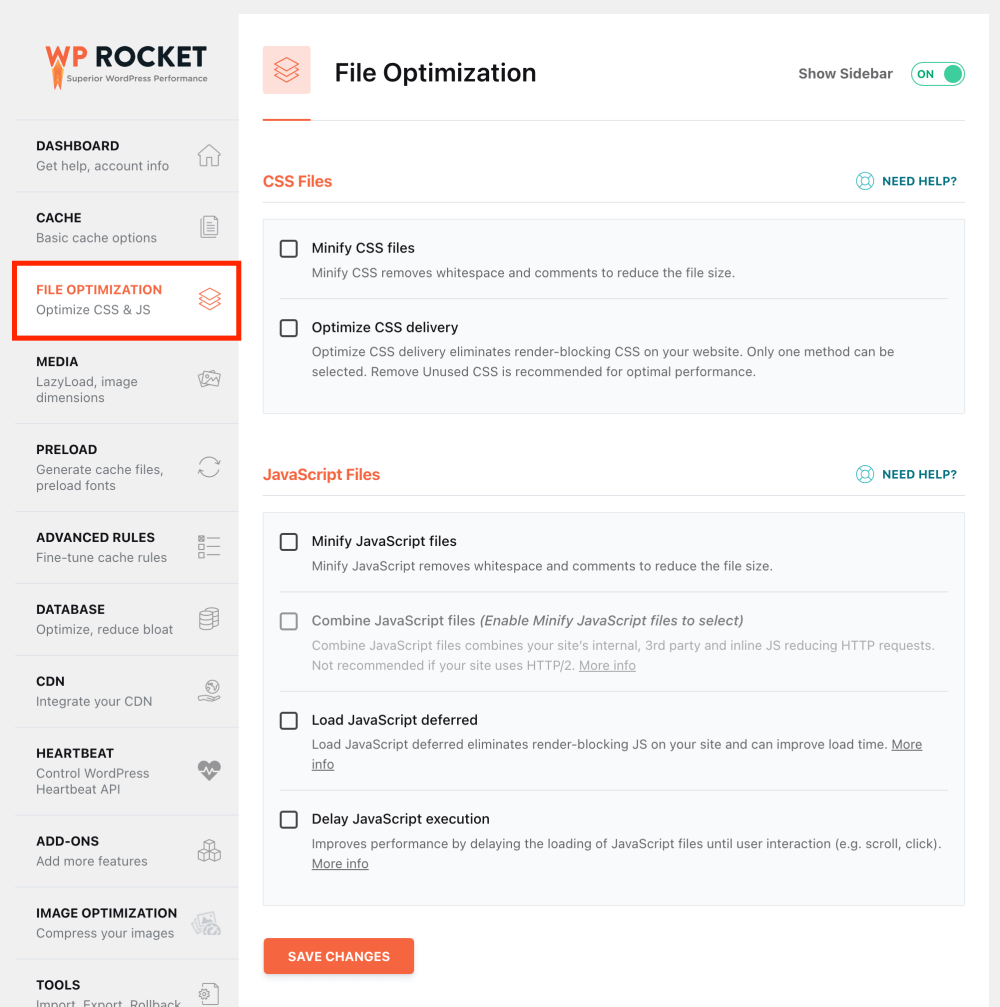
File optimization is one of the most powerful ways to speed up your WordPress site with a caching plugin.
However, it’s also one of the most error-prone areas that can make some parts of your website look strange or even break specific functionalities for your visitors.
Therefore, when adjusting your file optimization settings, do it one step at a time. Adjust, test, test again. Then move on to the next setting.
Here you can adjust the following settings for CSS files:
- Minify CSS files: Reduce file size.
- Combine CSS files: Merge CSS files (WP Rocket recommends activating this only if your web host uses HTTP/2).
- Optimize CSS delivery: Choose between “Remove Unused CSS” and “Load CSS asynchronously”.
Also, you have the option to exclude specific CSS files and items from being minimized, combined, or removed.
You can also adjust the following settings for JavaScript files:
- Minify JavaScript files: Remove whitespace and comments from JavaScript files to reduce file size.
- Combine JavaScript files: Combine your site’s internal, 3rd party, and inline JavaScript files, thereby reducing HTTP requests.
- Load JavaScript deferred: Eliminate render-blocking JavaScript on your site to improve page speed.
- Delay JavaScript execution: Delay the loading of JavaScript files until the user interacts with your site (e.g. scrolling or clicking).
Moreover, you can exclude JavaScript files from being minified, combined, loaded deferred, or delayed. Should a part of your website not work properly after activating these settings, excluding certain files will most often fix the problem.
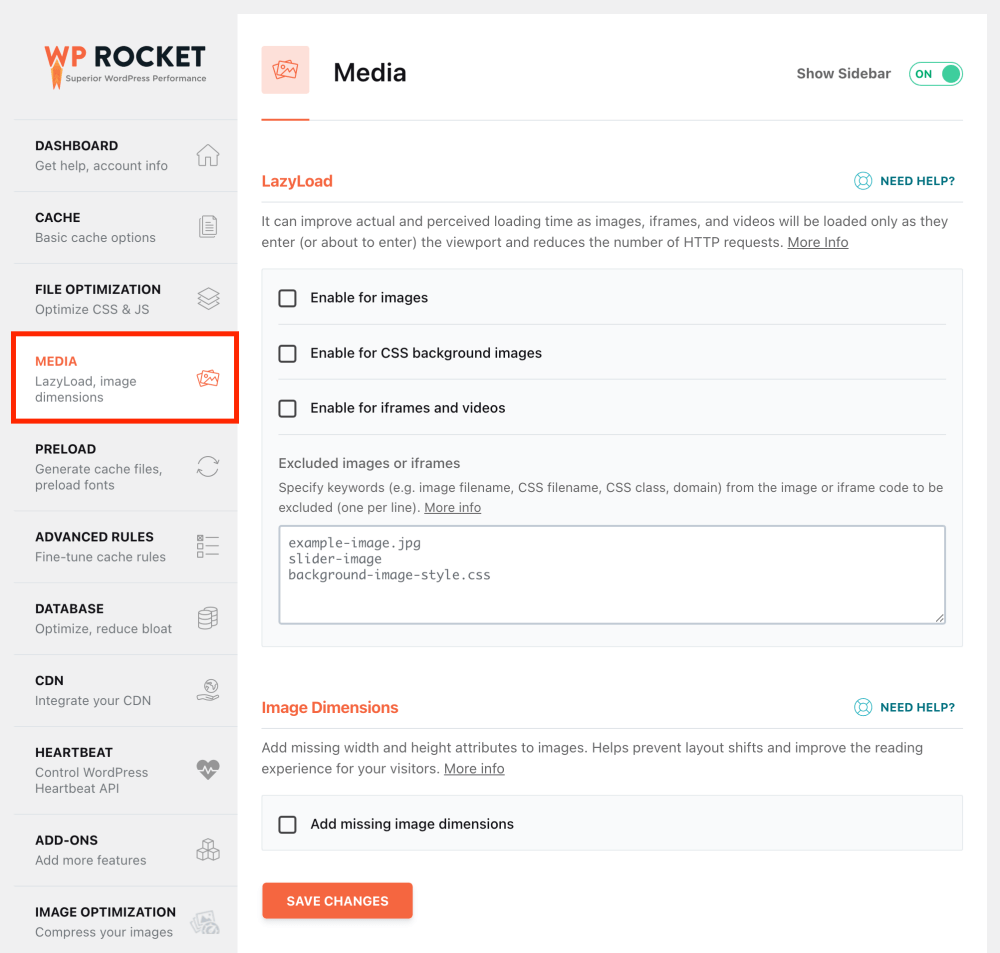
4: Media
Media files can slow down your website enormously if not optimized correctly for page speed.
Most importantly, high-quality photos and images will make your site sluggish if you don’t make sure they’re the right size. Hence, before uploading them to your WordPress Media Library, resize your images with ReduceImages and then compress them with TinyJPG, for example.
WP Rocket helps you speed up images, videos, and other media files on your website through a few different techniques, most notably lazy loading.
On the Media tab, you can activate these options for faster page speed:
- LazyLoad: Delay the loading of images, iframes, and video. LazyLoad means that any media below the fold will be downloaded and rendered only when it’s about to enter the viewport. In other words, images further down a page won’t be loaded as soon as a visitors opens a specific blog post. Once they start scrolling down, the images you’ve embedded into that blog post will be loaded one by one as they enter the screen. For YouTube videos, you can replace the video iframe with a preview image, which improves page speed even further.
- Image Dimensions: Add missing width and height attributes to your images. This improves the visitor experience by reducing layout shifts when your pages are loaded.
5: Preload
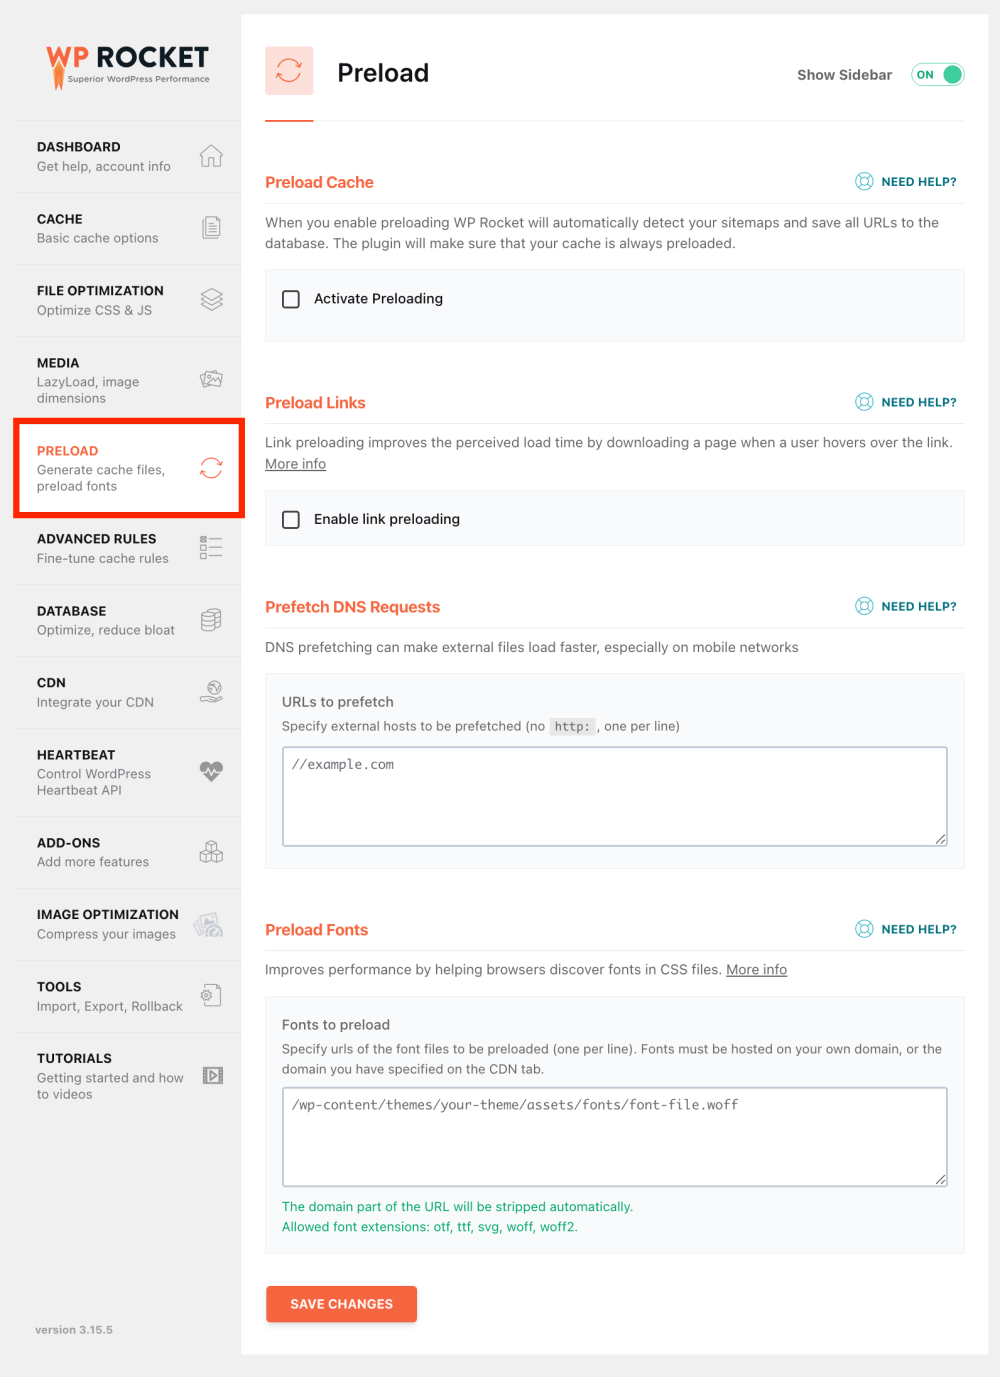
What is cache preloading?
Normally, when using caching, the cache is generated when someone visits a specific URL. Hence, the first visitor doesn’t get a cached version of that URL after you’ve purged your cache.
But with cache preloading, WP Rocket generates your cache automatically in the background. Hence, your pages will load at lightning speed even when nobody’s visited them yet.
On the Preload tab you can activate these settings:
- Preload Cache: Generate a full cache of your entire website automatically. WP Rocket will go through your sitemaps and save all URLs to the database, making sure your cache is always preloaded.
- Preload Links: Improve the perceived page load time by downloading a page when your visitors hover over a specific link.
- Prefetch DNS Requests: Speed up the loading of external files, such as Google fonts or YouTube videos.
- Preload Fonts: Improve the loading time of custom fonts hosted on your own domain (not on an external service like Google Fonts or Adobe Fonts). This addresses the PageSpeed Insights recommendation to preload key requests.
6: Advanced rules
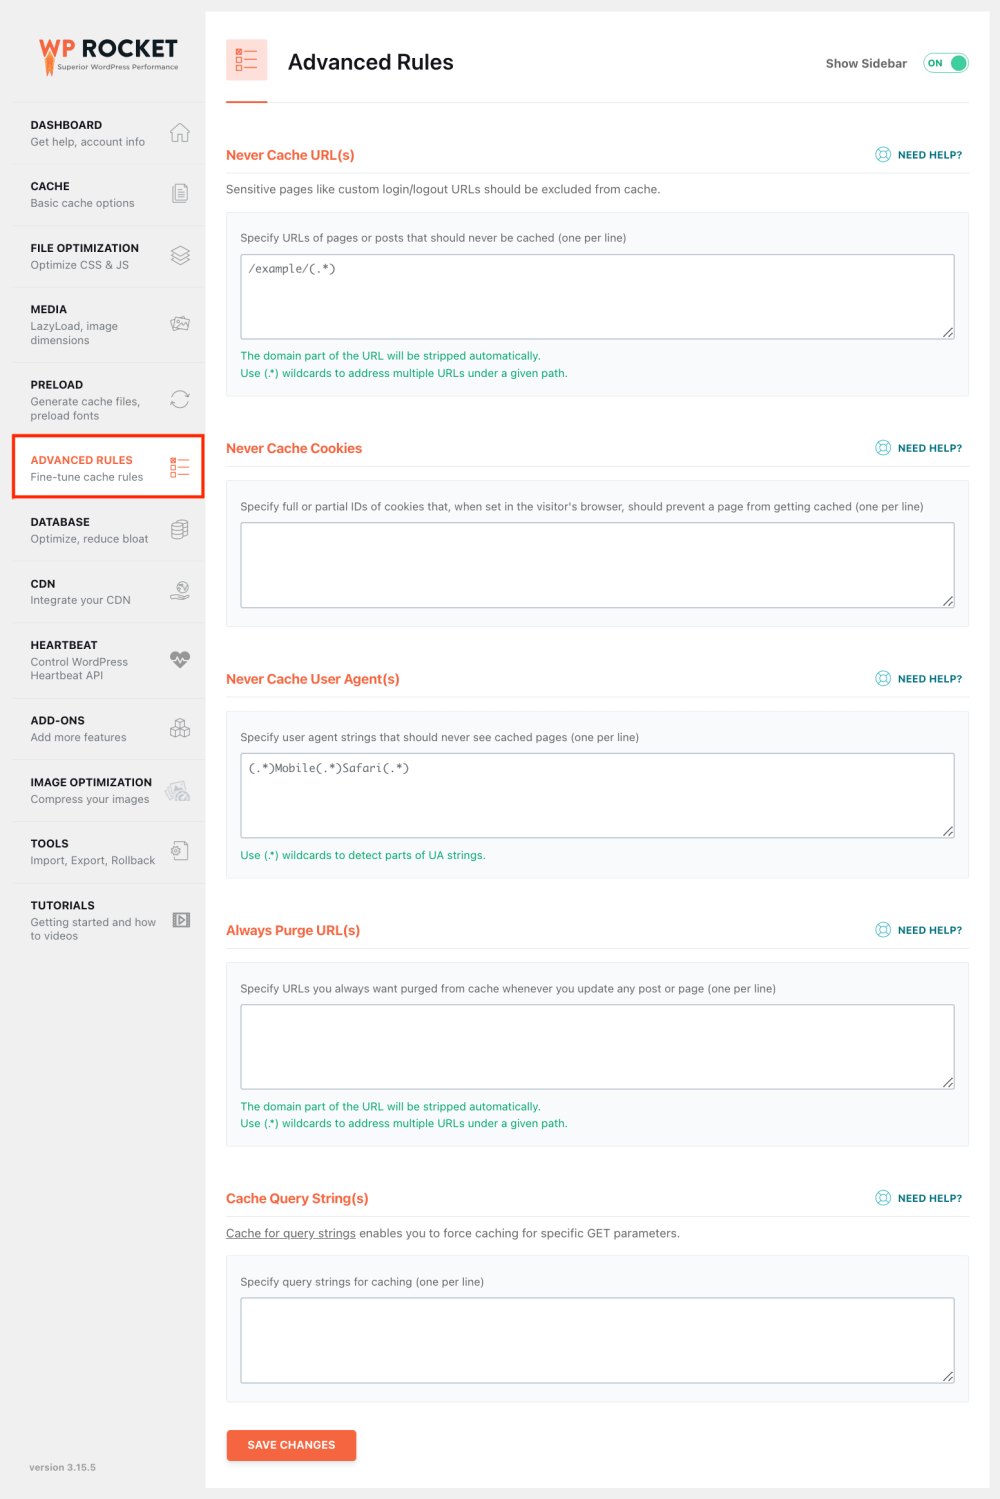
The Advanced rules tab allows you to set more granular and specific rules about what content you don’t want to cache.
That said, if you are new to caching and WP Rocket, you can ignore the Advanced rules tab. But if you have more experience and you know what you’re doing, these rules can further improve the user experience on your site and prevent a few common caching problems.
On the Advanced rules tab you can configure these settings:
- Never Cache URL(s): Exclude pages that shouldn’t be cached, such as the login page or customer-specific pages in e-commerce like cart and checkout pages.
- Never Cache Cookies: Choose which cookies in a user’s browser should prevent a page from getting cached.
- Never Cache User Agent(s): Specify certain user agents that should never get served cached content.
- Always Purge URL(s): Specify URLs to always purge whenever you update any page or post.
- Cache Query String(s): Force caching for specific GET parameters and strings.
7: Database
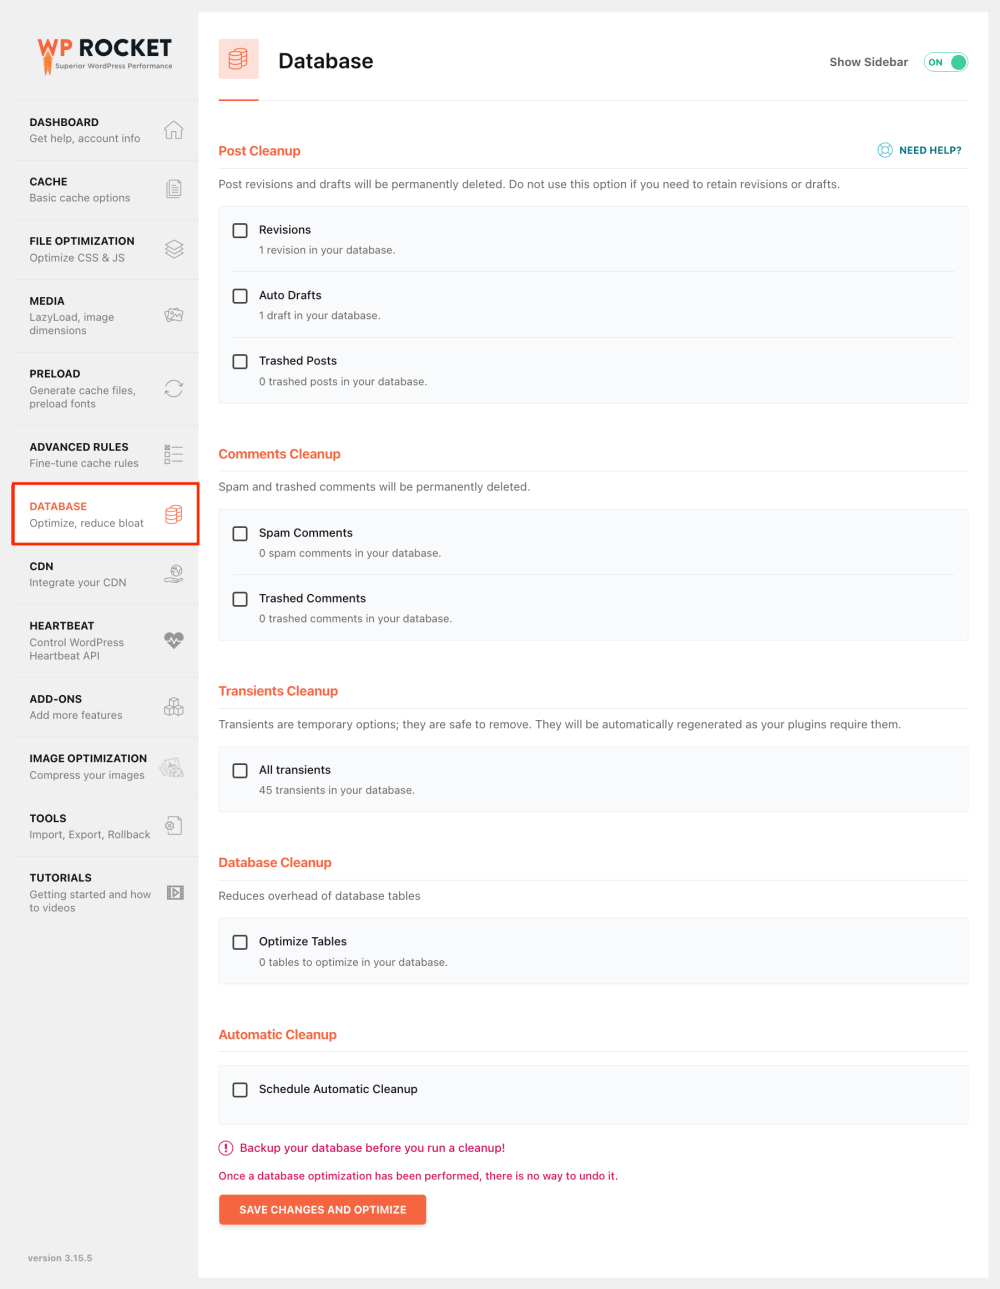
Over time, your database can get bloated with old, useless data that’s simply sitting there and slowing down database queries for your website.
As your site grows, you accumulate more pages, posts, drafts, revisions, comments, and whatnot. As a result, your database tables fill up and accumulate overhead.
Therefore, optimizing your database is an essential part of speeding up WordPress and keeping your website lean and clean.
Luckily, WP Rocket includes a quick way to clean up your database.
On the Database tab, you’ll find the following options:
- Post Cleanup for deleting revisions, auto drafts, and trashed posts
- Comments Cleanup for deleting spam and trashed comments
- Transients Cleanup for deleting transient options
- Database Cleanup for optimizing your database tables
- Automatic Cleanup for running a full cleanup daily, weekly, or monthly
Please note: Before touching any database optimization settings, make sure you have a full backup of your WordPress website. These optimizations are final, and there’s no way to undo them later on. If you accidentally delete stuff you still need from your database, restoring a backup is the only way to fix things.
You can optimize your database with a free plugin, too. WP Rocket simply makes it convenient to have everything under one roof and within a single dashboard.
What I love about WP Rocket’s database optimization is that you can schedule your database cleanup to run automatically.
8: CDN
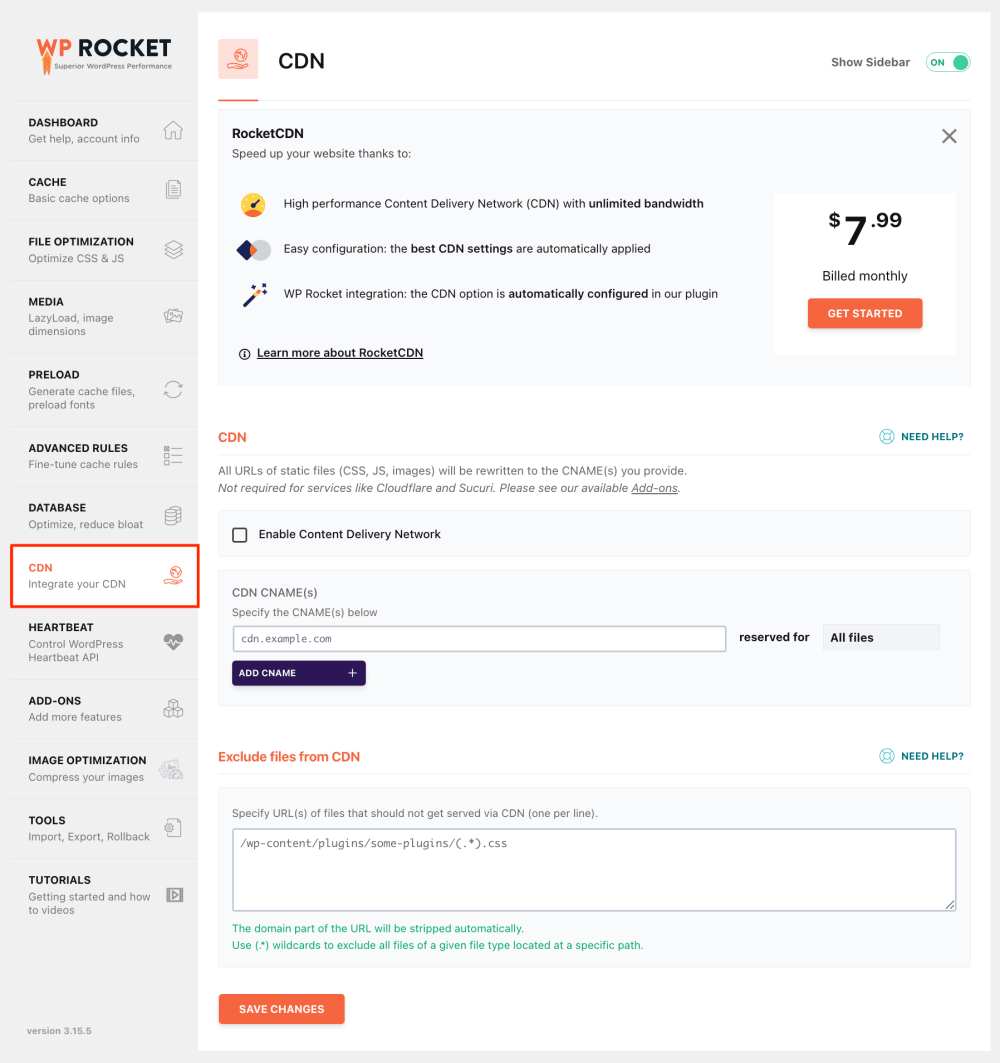
CDN stands for Content Delivery Network. Using a CDN means that your website files will be stored on multiple web servers around the world.
Without a CDN, your web host stores all your files and data on a single web server. When someone form the other side of the world visits your site, the data has to travel across the planet, which takes time and slows down the perceived page loading speed.
Using a CDN brings your website files and data closer to your visitor’s location, even if they live on the other side of the planet. Hence, your page will load faster for everyone across the world.
On the CDN tab, you can adjust these settings:
- RocketCDN: Easily integrate WP Rocket’s own RocketCDN service, which is powered by Bunny CDN’s global network.
- Third-party CDN: Enable a third-party CDN service such as MaxCDN or KeyCDN.
- Exclude files from CDN: Specify URLs of files that shouldn’t get served via CDN.
Moreover, you have the option to create separate CDN CNAME rules for:
- All files
- Images
- CSS & JavaScript
- JavaScript only
- CSS only
9: Heartbeat
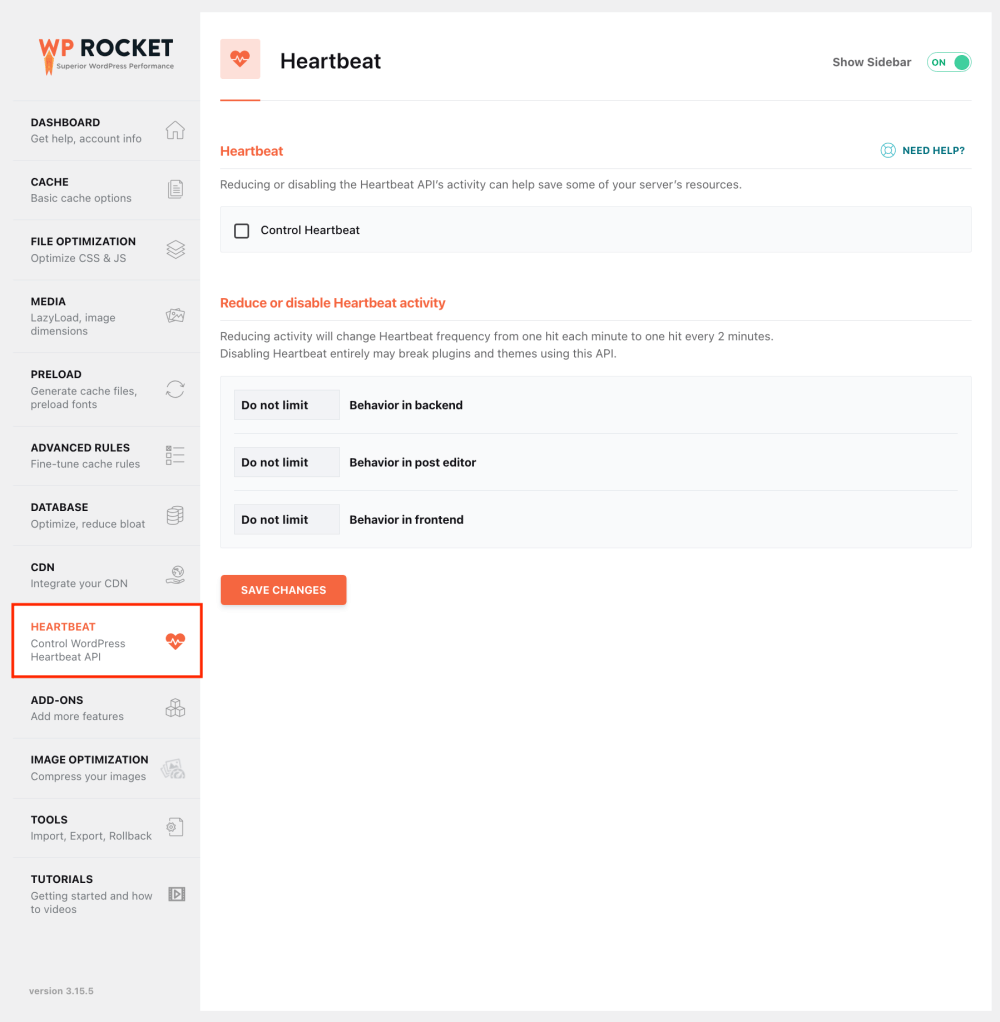
The WordPress Heartbeat API is a feature that helps WordPress manage and maintain some of its key functionalities. By default, Heartbeat is always active and running. For instance, it takes care of auto-saving your posts in the WordPress Gutenberg editor.
With that said, since Heartbeat is always active, it can eat up your web server’s resources.
On the Heartbeat tab, you can adjust these settings:
- Heartbeat: Let WP Rocket control the Heartbeat API’s activity to save server resources.
- Reduce or disable Heartbeat activity: Change the Heartbeat API’s frequency from one hit each minute to one hit every 2 minutes, or disable it altogether (not recommended).
10: Add-ons
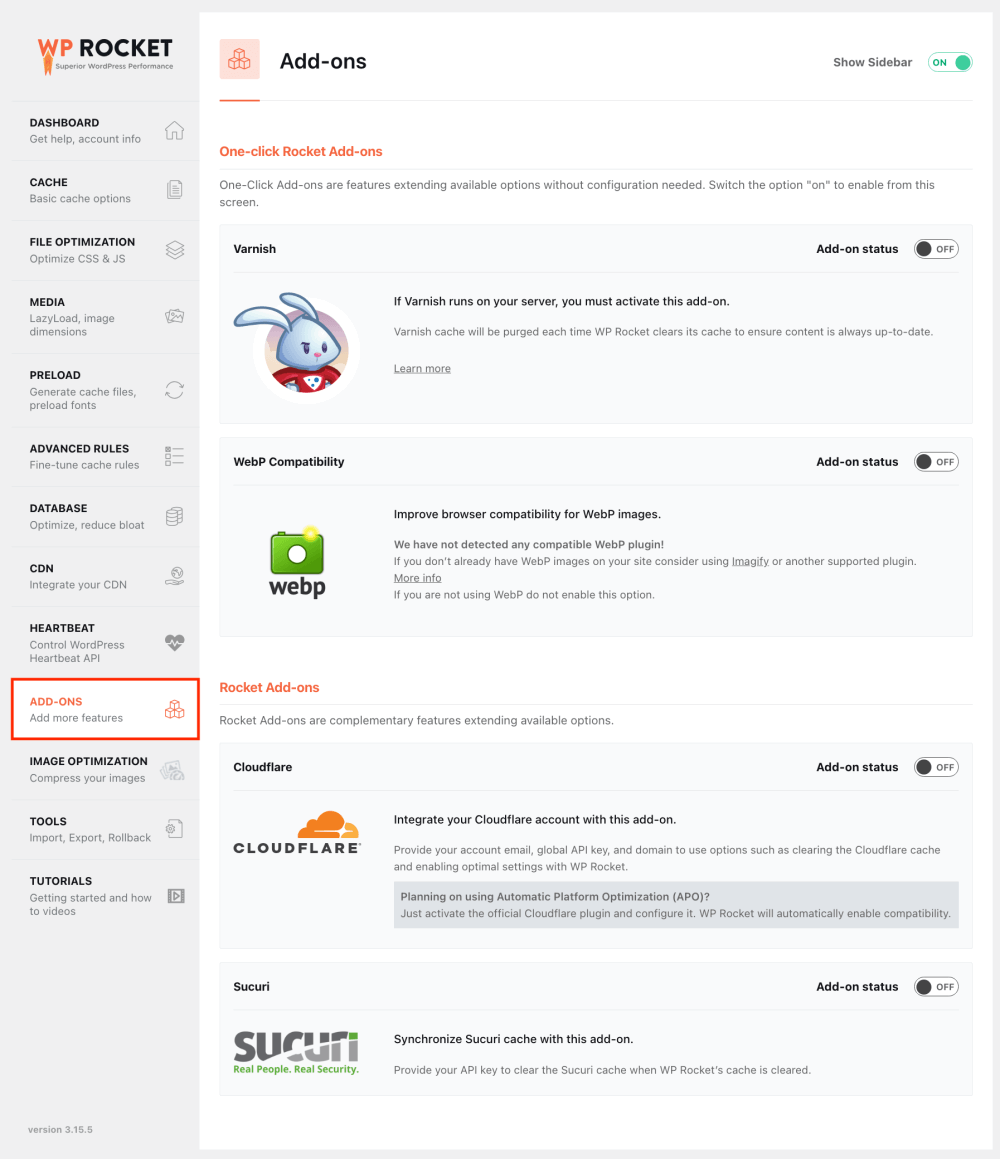
The Add-ons tab allows you to activate a few additional features:
- Varnish allows you to purge the Varnish cache every time you purge your WP Rocket cache.
- WebP Compatibility configures WP Rocket to support and work smoothly with WebP images.
- Cloudflare lets you integrate your Cloudflare account and control certain Cloudflare settings through your WordPress dashboard.
- Sucuri lets you purge your Sucuri cache whenever you clear WP Rocket’s cache.
If you enable the Cloudflare add-on, you will see a new settings panel for Cloudflare:
11: Image optimization
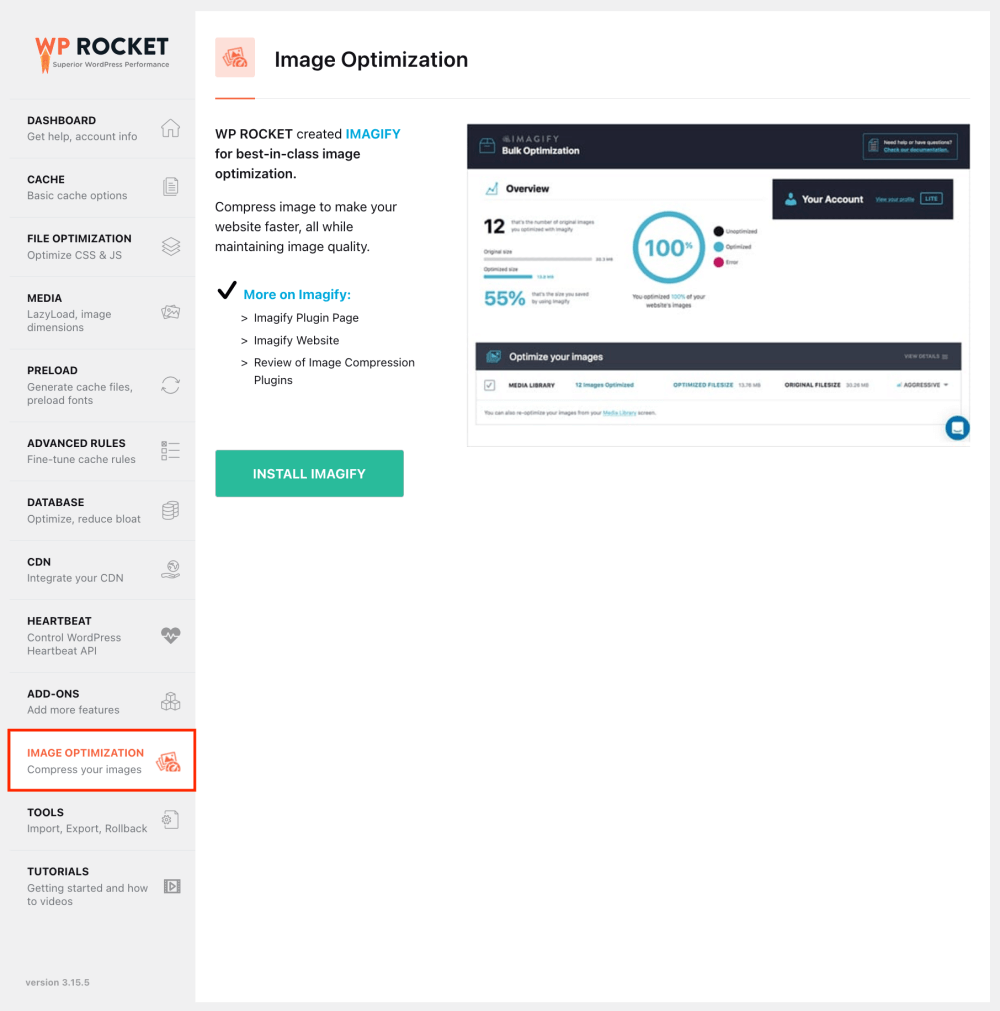
If you want to take care of image optimization through your WordPress dashboard, WP Rocket’s Imagify tool will take care of everything for you.
(Alternatively, you can resize and compress your image files manually before uploading them to WordPress.)
Imagify compresses your images to speed up your site – while maintaining image quality, of course.
On the Image optimization tab, you can install the Imagify plugin.
12: Tools

On the Tools tab, you can:
- Export settings to download a backup file of your WP Rocket configuration.
- Import settings to easily import and activate your preferred configuration.
- Rollback to a previous WP Rocket version – in case the current version causes issues on your site.
- Update Inclusion and Exclusion Lists to get advantage of new compatibility updates instantly. By default, these lists are downloaded to your site automatically every week.
13: Tutorials
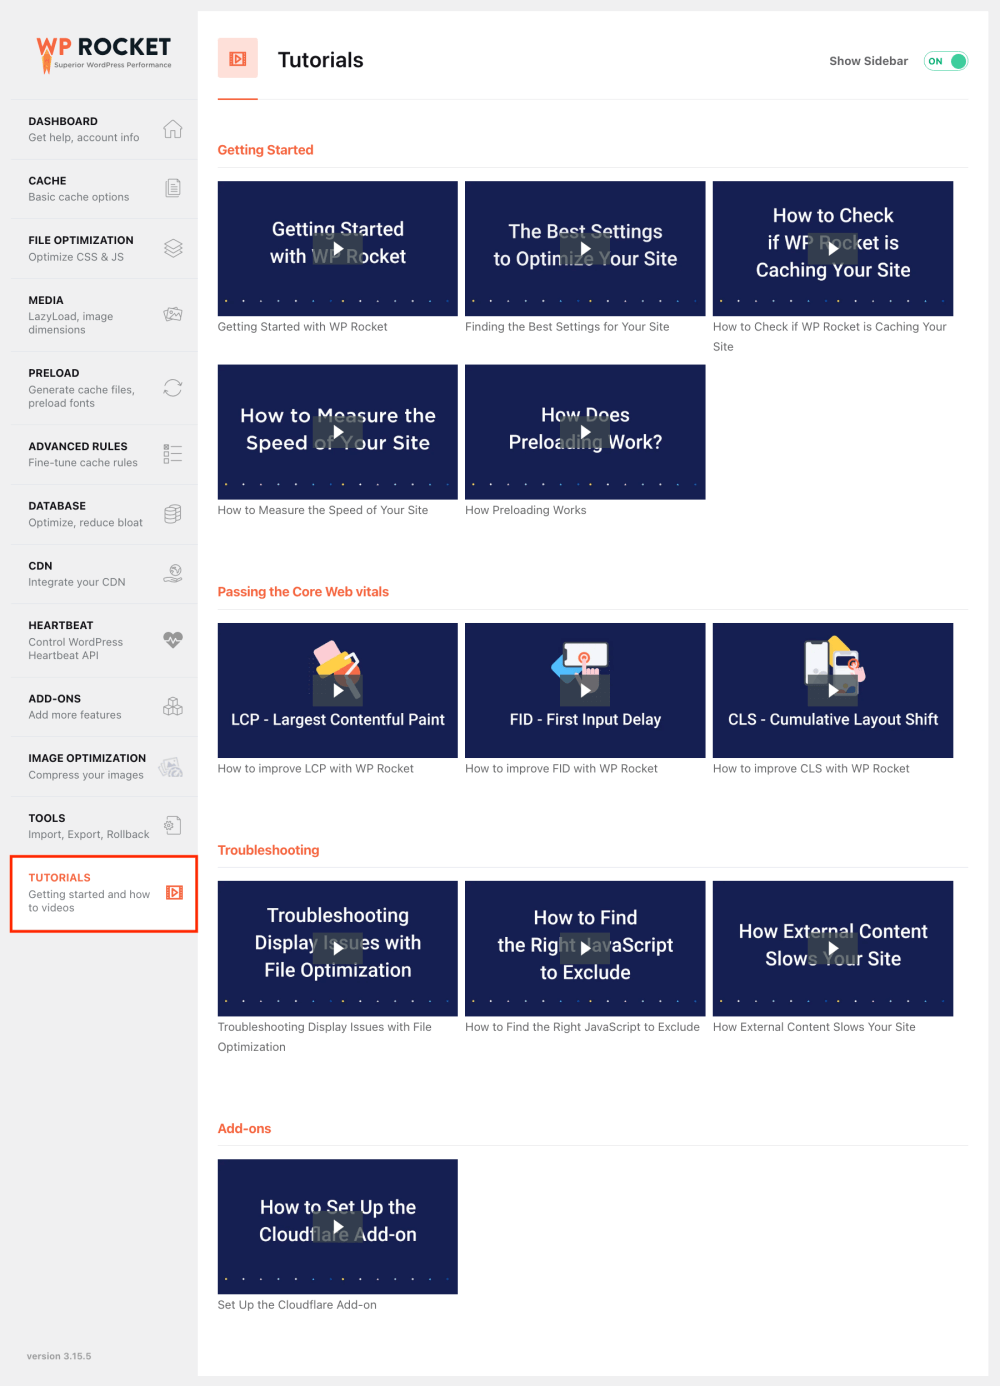
The Tutorials tab is packed with helpful resources and tutorials for learning how to get the best possible results from WP Rocket. (I love this area!)
On the Tutorials tab, you will find resources for:
- Getting Started: Learn the basics, find the best settings for your site, measure your site speed, and more.
- Passing the Core Web Vitals: Improve your LCP, FID, and CLS score with WP Rocket.
- Troubleshooting: Solve issues and problems you may notice when tweaking your WP Rocket settings.
- Add-ons: Find help with using add-ons such as Cloudflare.
Can WP Rocket break your website and cause problems?
If you’ve ever used a WordPress caching plugin, you may have seen problems with the look and functionalities of your site when certain settings are activated.
But the truth is:
All caching plugins can cause websites to break. Especially if you’re not familiar with the technical side of how caching plugins work, it’s difficult to troubleshoot issues that arise.
When I’m browsing WP Rocket’s Help Center, I always notice how prominently they feature the article “My Site Is Broken”:
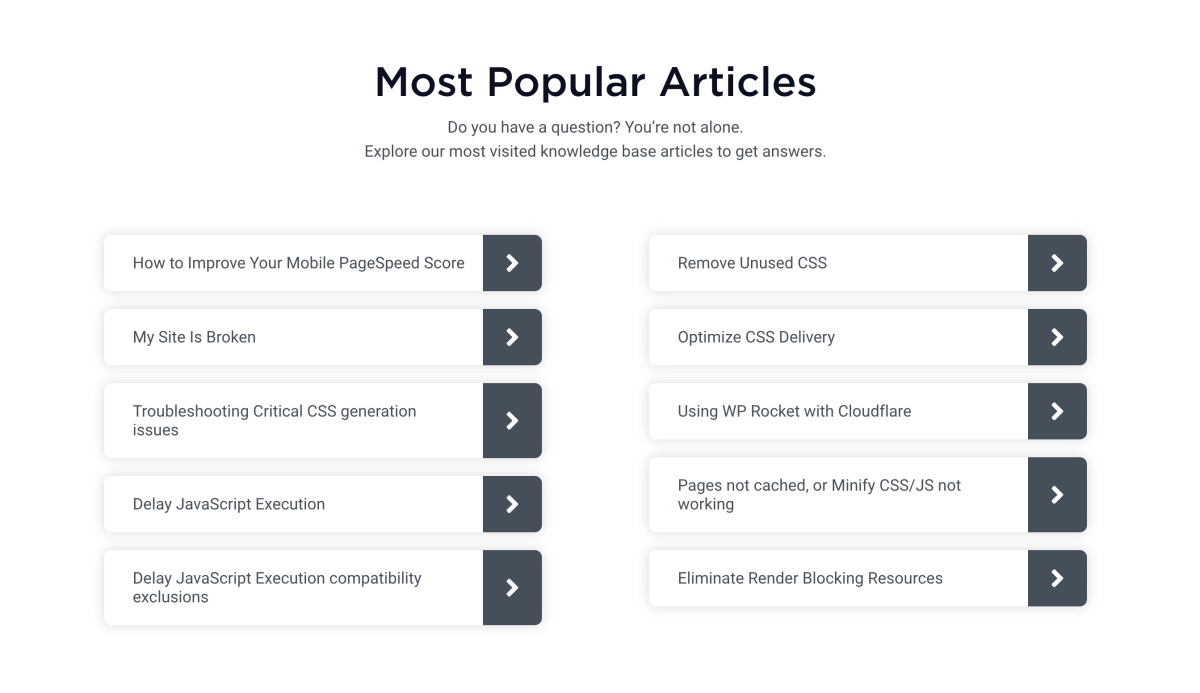
This tells us that this issue is very common and users want to troubleshoot their broken sites.
So what’s the best way to avoid problems with WP Rocket?
When adjusting the settings, take it slow. Only adjust one setting at a time if you can.
Then, test your website thoroughly with both a desktop and a mobile device.
If you notice anything strange, you can revert to your previous settings.
Hence, if your site breaks, the standard troubleshooting steps are to disable each option you’ve adjusted until you figure out what’s causing the problem.
You can find detailed tutorials and troubleshooting guides in the WP Rocket Help Center.
Is WP Rocket better than free caching plugins?
How does WP Rocket compare to free WordPress caching plugins then?
In other words: what are you paying for with WP Rocket exactly?
Let’s look at a few key areas where WP Rocket beats most of its free alternatives:
1: Convenience
Everything you need for improving your page speed is under one roof. This is by far the most time-saving feature of WP Rocket that sets it apart from its competitors.
If you use a free caching plugin, you’ll constantly be switching between different plugins and dashboards.
2: Support
The primary highlight, without a doubt, is the support you get with WP Rocket. Caching is a complex matter, and you’ll appreciate the opportunity to get in touch with an expert
Although they don’t offer a live chat feature or phone support, I’ve always received a quick response from their team to any questions I’ve had. Having used WP Rocket since 2021, my overall experience has been excellent – no complaints here.
In fact, more than 92% of their customers have given a 5-star rating to their support.
It’s worth pointing out that caching is a complex task overall. It usually requires a good amount of hands-on trial and error to get your WP Rocket configuration set up perfectly. Therefore, you want to take negative reviews regarding caching plugin support with a grain of salt.
3: Updates
Unlike some free caching plugins, WP Rocket receives regular updates, and the team is consistently working on enhancing the plugin and its features. They address bugs and issues faster compared to free caching plugins.
4: Compatibility
Since WP Rocket brings so many features into one plugin, you don’t have to worry about features interfering or clashing with each other. If you try to get everything done with multiple free plugins, troubleshooting compatibility issues will be cumbersome.
For me personally, the seamless compatibility of WP Rocket’s caching features with their own CDN service is priceless. Caching alone is a complex topic. So, trying to get a free caching plugin to work with a CDN service without breaking your site is a ton of work. Most likely, you’ll have to make compromises with your site performance along the way to get things up and running.
Luckily, WP Rocket is different. You’ll get better results with less work and everything just works.
5: Integrations
I love how WP Rocket makes it easy to seamlessly integrate your CDN, image optimization, and database cleanup into a single plugin. What’s even better: the dashboard is clear and easy to use, even for beginners.
All in all, WP Rocket is a fantastic plugin that delivers real results at a reasonable price point. The simplicity and ease of use make it my favorite caching plugin to speed up my WordPress sites right now. The quick initial setup is faster and easier than with any other plugin I’ve tried considering the instant improvement you’ll see in your page speed.
Final thoughts: Is WP Rocket worth it?
A big problem with most WordPress caching plugins is the complexity of configuring them to deliver optimal results. Even advanced users often struggle with this.
WP Rocket is different. You simply need to install and activate the plugin, and your website will load significantly faster right away.
Hence, WP Rocket is the best WordPress caching plugin if you want great results with minimal effort. If you’re not tech-savvy and don’t want to play around with the settings, this is the perfect plugin for you.
However, WP Rocket is a fantastic caching plugin for advanced users, too. If you want to squeeze out every drop of page speed juice out of your caching plugin, look no further.
But most importantly: Unlike a lot of the other caching plugins I’ve used, WP Rocket makes a significant difference in speeding up and improving your WordPress website performance.
Summing it up:
Yes, you can get a fast-loading site with free caching plugins. But if you want to save time by having all the tools you need under one roof, and a direct line to experts in their support team, investing $59 in a WP Rocket license makes sense. This caching plugin offers tons of features and options, but it’s still very easy to use – even if you are a total beginner.
Here’s how to get started with WP Rocket:
- Check with your web hosting provider whether WP Rocket is compatible with their server environment.
- Sign up with WP Rocket here to get a licence.
- Run a speed test with GTmetrix.
- Install and activate the plugin.
- Run another speed test with GTmetrix.
- Configure the settings to improve your WordPress performance even further.
Do you have a question about WP Rocket or this WP Rocket review? Let me know in the comments below!
Keep reading:
- The Ultimate Guide to Boost WordPress Performance and Speed
- 7 Best WordPress Caching Plugins to Speed Up Your Website