

So you want to grow your blog traffic with proven, powerful Pinterest marketing strategies?
Congrats! Pinterest is probably the easiest, quickest platform to share and promote your content and generate thousands of visitors to your website – for 100% free.
But before you start sharing your blog posts with Pinterest users, there’s something you MUST do:
Prepare your website or WordPress blog correctly, and make sure your readers engage with your content.
Because the truth is:
No matter how beautiful your Pinterest graphics are, and how often you pin new content to your boards – if your website isn’t properly set up for Pinterest traffic, you won’t see the results you expect.
Luckily, it’s super easy to make a quick website audit and make sure your blog website has all the elements and feature needed to grow your Pinterest traffic even faster.
Having said that, I created this step-by-step guide you can use before you start using Pinterest for blog traffic.
And hey, if you’ve started already, use this article to do a quick Pinterest audit for your website. Chances are you’re not using all the techniques I walk you through!
Let’s jump right in, fellow pinner!
Disclosure: This page contains affiliate links, meaning I receive a commission if you decide to purchase using my links, but at no additional cost to you. Please read my disclosure for more information.
What you need to make this guide work for your Pinterest marketing strategy
Now, let me walk you through a few essentials you need before you start using Pinterest to promote your content and to grow your traffic.
If you’ve already set up these three things, feel free to proceed to the first step of preparing your website below!
- Start a self-hosted blog website:
In order to create a solid Pinterest presence, you should have a self-hosted website that uses your own, unique domain name. If you’re using a free blogging platform, simply be mindful of its limitations. Most importantly, remember that you don’t own your content or the traffic you generate. If you haven’t started one yet, follow my step-by-step tutorial to start your WordPress blog website in just 30 minutes. - Identify your target audience:
Once you’ve set up the technical part of your blog website, it’s time to think about your blog niche and target audience. Who is your ideal reader? What are they struggling with? How can you make their lives easier and create helpful, valuable content? Check out my blog target audience guide to get started. - Create a Pinterest business account:
Last but not least, you want to use a Pinterest business account for driving traffic to your website. It’s 100% free to create and use, and you will unlock super helpful features such as Pinterest Analytics to track your performance. Create a business account here or convert a personal account to a business account here.
All set? Great!
Now let’s jump into preparing your website for massive Pinterest traffic.
Make sure you save this pin to Pinterest and share this post with others!
Step 1: Verify your website
When you’ve set up your Pinterest business account, the first thing you want to do is verify your website.
Verifying and claiming your website has a few big benefits you don’t want to miss:
- You get access to analytics for the pins you publish from your website
- You can see analytics for pins other people save from your site
- Pinners will see your profile photo next to pins from your website
- Pinners will see a “Follow” button for your Pinterest account next to your pins
In short: verifying your website tells Pinterest that you’re the website owner, and you will be rewarded with a few nice perks that help grow your reach on the platform.
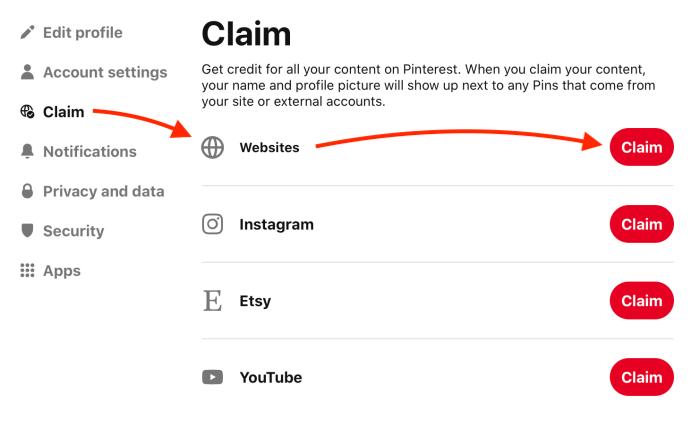
So how do you claim your website on Pinterest?
First, head over to your Pinterest account Settings > Claim, and click Claim next to Websites:
You will now see a pop-up window to choose how you want to claim your website:
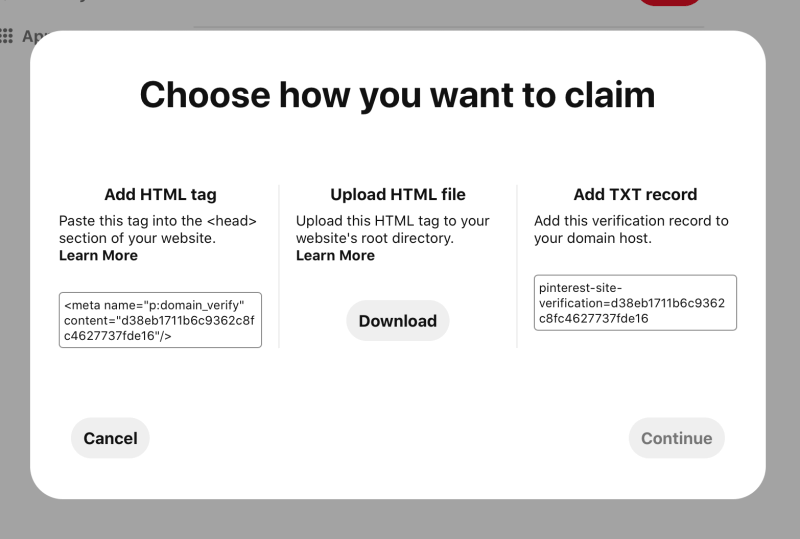
You have three options:
- Add an HTML tag to your website:
This means you will insert a short code tag to your website. - Upload an HTML file to your website’s root folder:
This means you will download a small file from Pinterest. Then, you log in to your web hosting account, and upload the file using your File Manager. - Add a TXT record to your domain DNS settings:
This means you need to add a new TXT type record to your domain’s Domain Nameserver Settings. If you registered your domain name with your web hosting provider, you can access your DNS settings in your hosting dashboard.
Now, this sounds a tad techy, eh?
If “HTML” alone sounds terrifying, jus take a deep breath and relax. Pinterest has created this helpful website verification guide that will help you get the job done quickly.
Step 2: Enable Rich Pins
Next, let’s activate Pinterest Rich Pins for your account.
If you’re not familiar, rich pins are a type of dynamic pin that shows extra information directly on your pin.
For example, rich pins from blog posts will automatically pull data from your website and show these details:
- Blog post title
- Blog post meta description
- Author of the article (that’s you!)
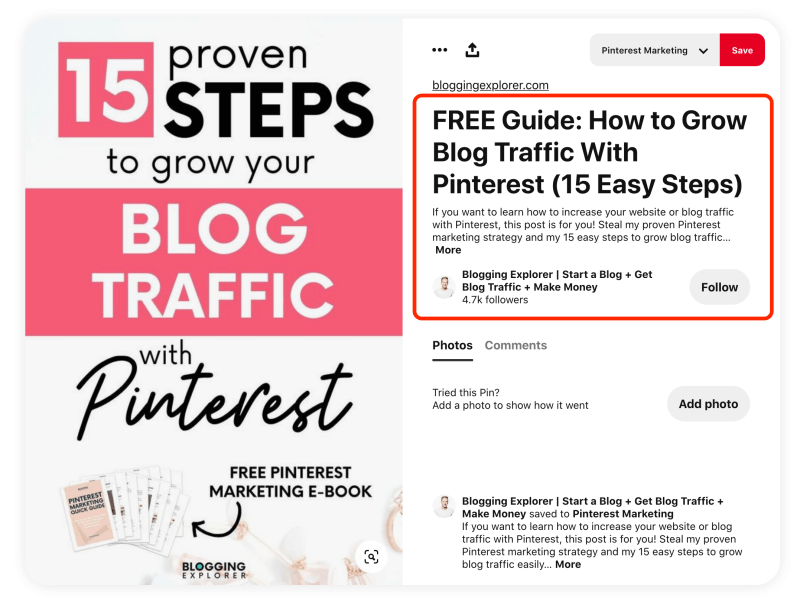
Here’s how one of my rich pins looks:
Also, when people scroll through their Pinterest feeds, your rich pins will show your profile photo and the pin title in bold:
Showing these additional details to Pinterest users helps you build brand awareness and gain more followers – for free!
What’s cool about rich pins is that the extra information will automatically sync with your website and blog post.
So if you decide to change your blog post title on your website, all rich pins pointing to that article will show your new title, too.
To get started, here’s a detailed guide on how to enable Pinterest rich pins in 5 minutes.
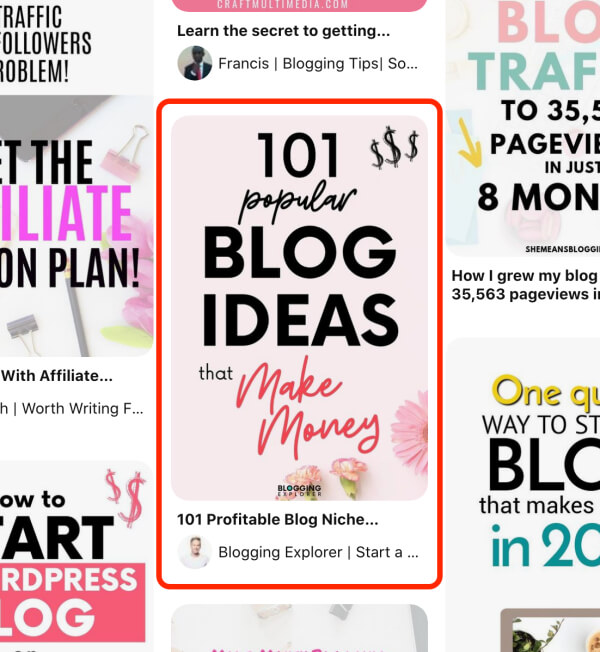
Step 3: Use the right Pinterest image size
Now that you’re all set with the technical stuff, let’s talk about creating stunning Pinterest graphics that people will love.
If you’re brand new to Pinterest, “Pinterest graphics” are the images you will share on Pinterest. Every graphic or photo you share on Pinterest can include a link to a blog post or website you want to drive traffic to.
Having said that, your Pinterest graphics need to be irresistible. They need to stand out and follow a few creative best practices so that people will notice them and click through to your website.
The most important thing is: you have to use the correct Pinterest graphic size.
Pinners love tall, vertical images. Scroll through your feed and you will see that most pins are taller than they are wide.
The best, recommended size is 1,000 by 1,500 pixels, width to height.
That means your Pinterest graphics should have an aspect ratio of 2:3.
So yes, you need to create separate graphics for your Pinterest marketing strategy. Pinning horizontal images, such as your blog post featured images, just won’t do it.
To start creating the perfect pins right away, check out my guide on how to design viral pins in 8 simple steps.
What is the best, fastest way to create irresistible and click-worthy Pinterest graphics?
You can use any graphics and photo editor you feel comfortable with. But if you ask me, use Canva.
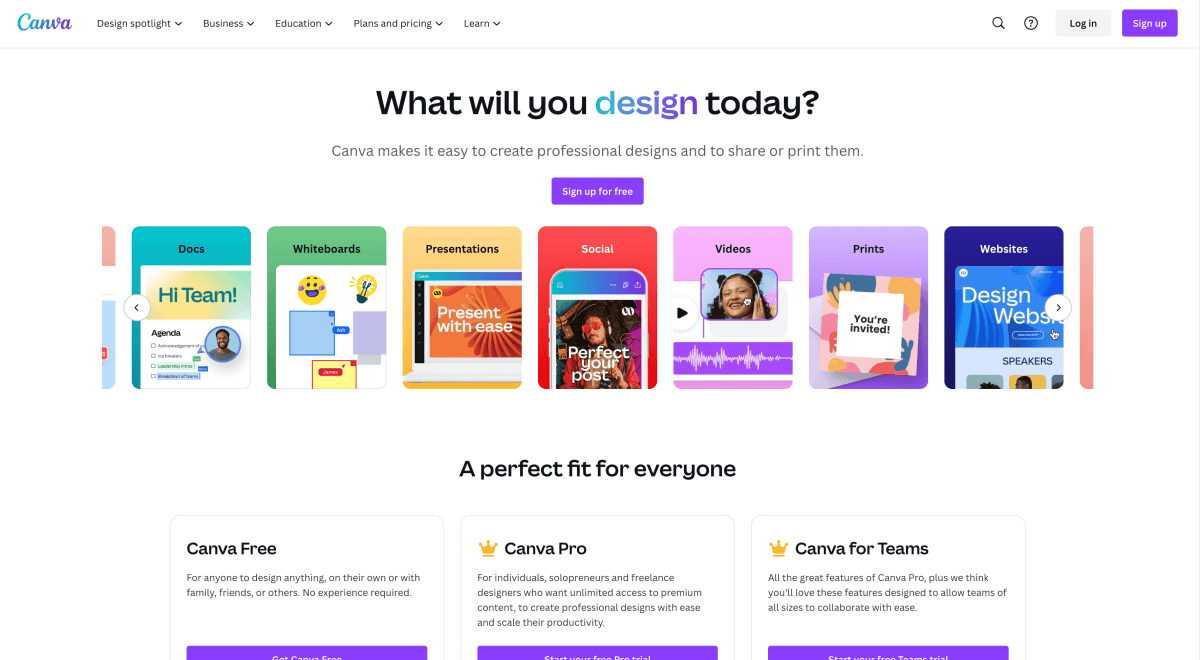
If you are not familiar, Canva is a free online tool you can use directly in your browser, so you don’t have to install any software on your computer.
You can create pretty much any type of graphics you can imagine with Canva.
They have a huge selection of pre-made templates you can use. Yes, including Pinterest graphics in the right size!
The best part?
You can create a free Canva account in 1 minute. Click here to get started now.
Now, if you are new to Pinterest and you don’t feel comfortable designing your own pins, don’t worry.
I’ve created a bundle of 20 premium Canva Pinterest templates you can use to create irresistible pin images within minutes.
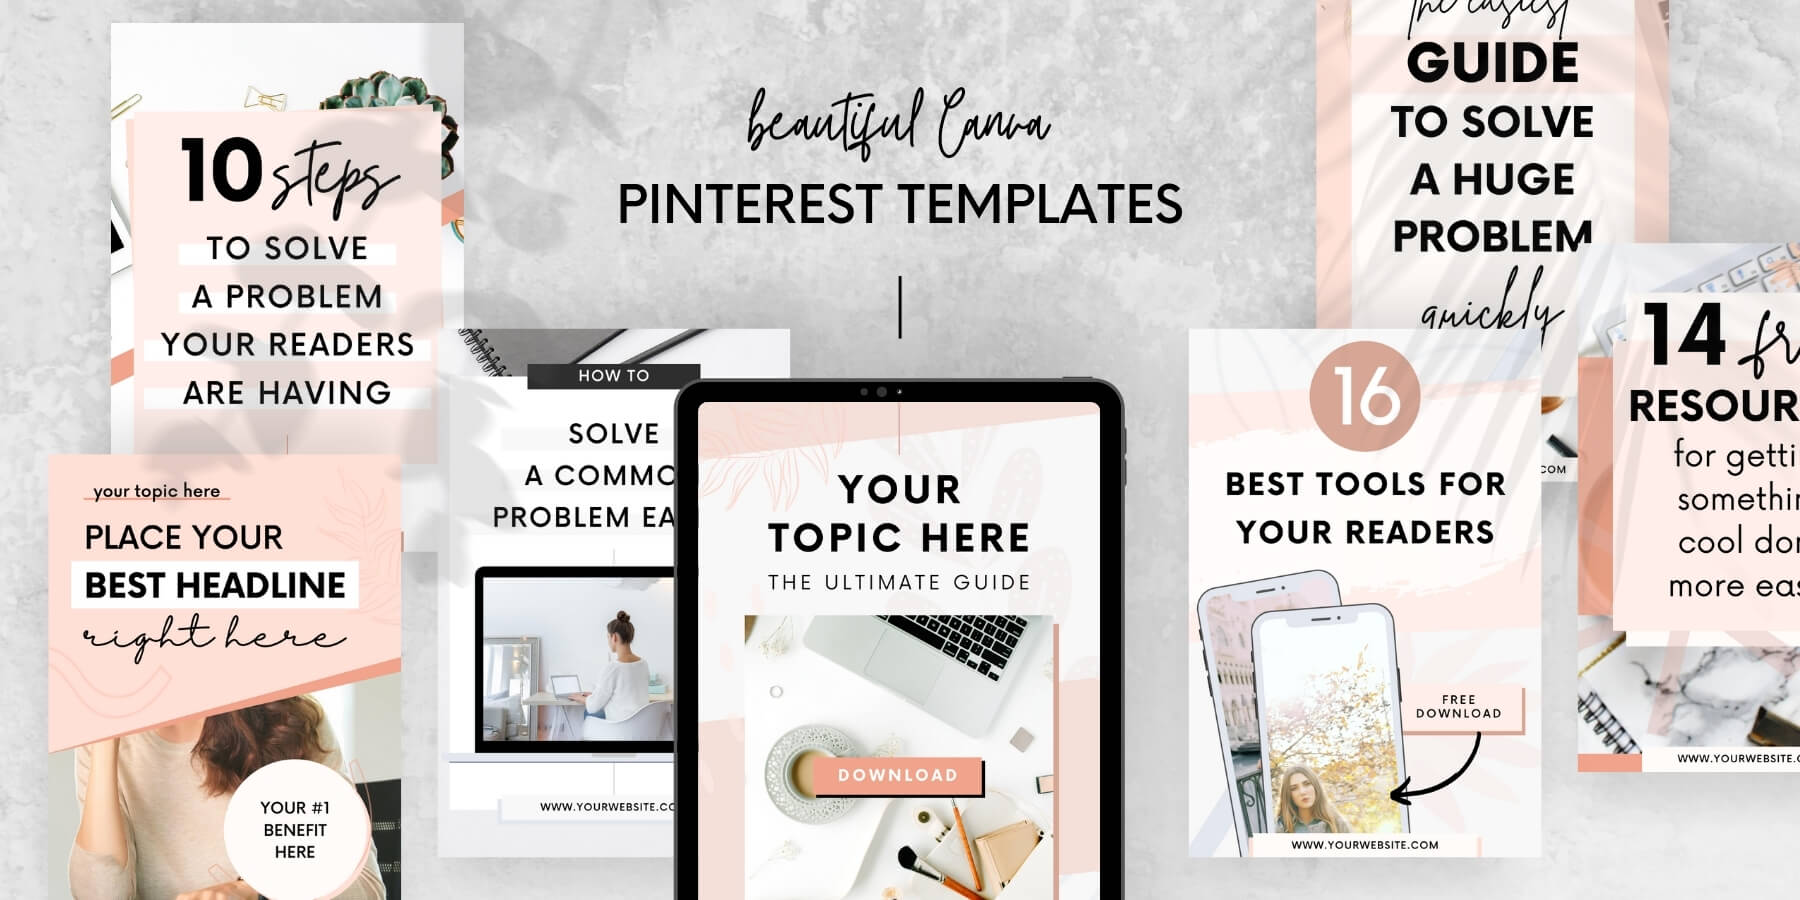
Each template was designed by a professional graphic designer – following all of my proven Pinterest secrets that help your pins generate hundreds and thousands of clicks to your website.
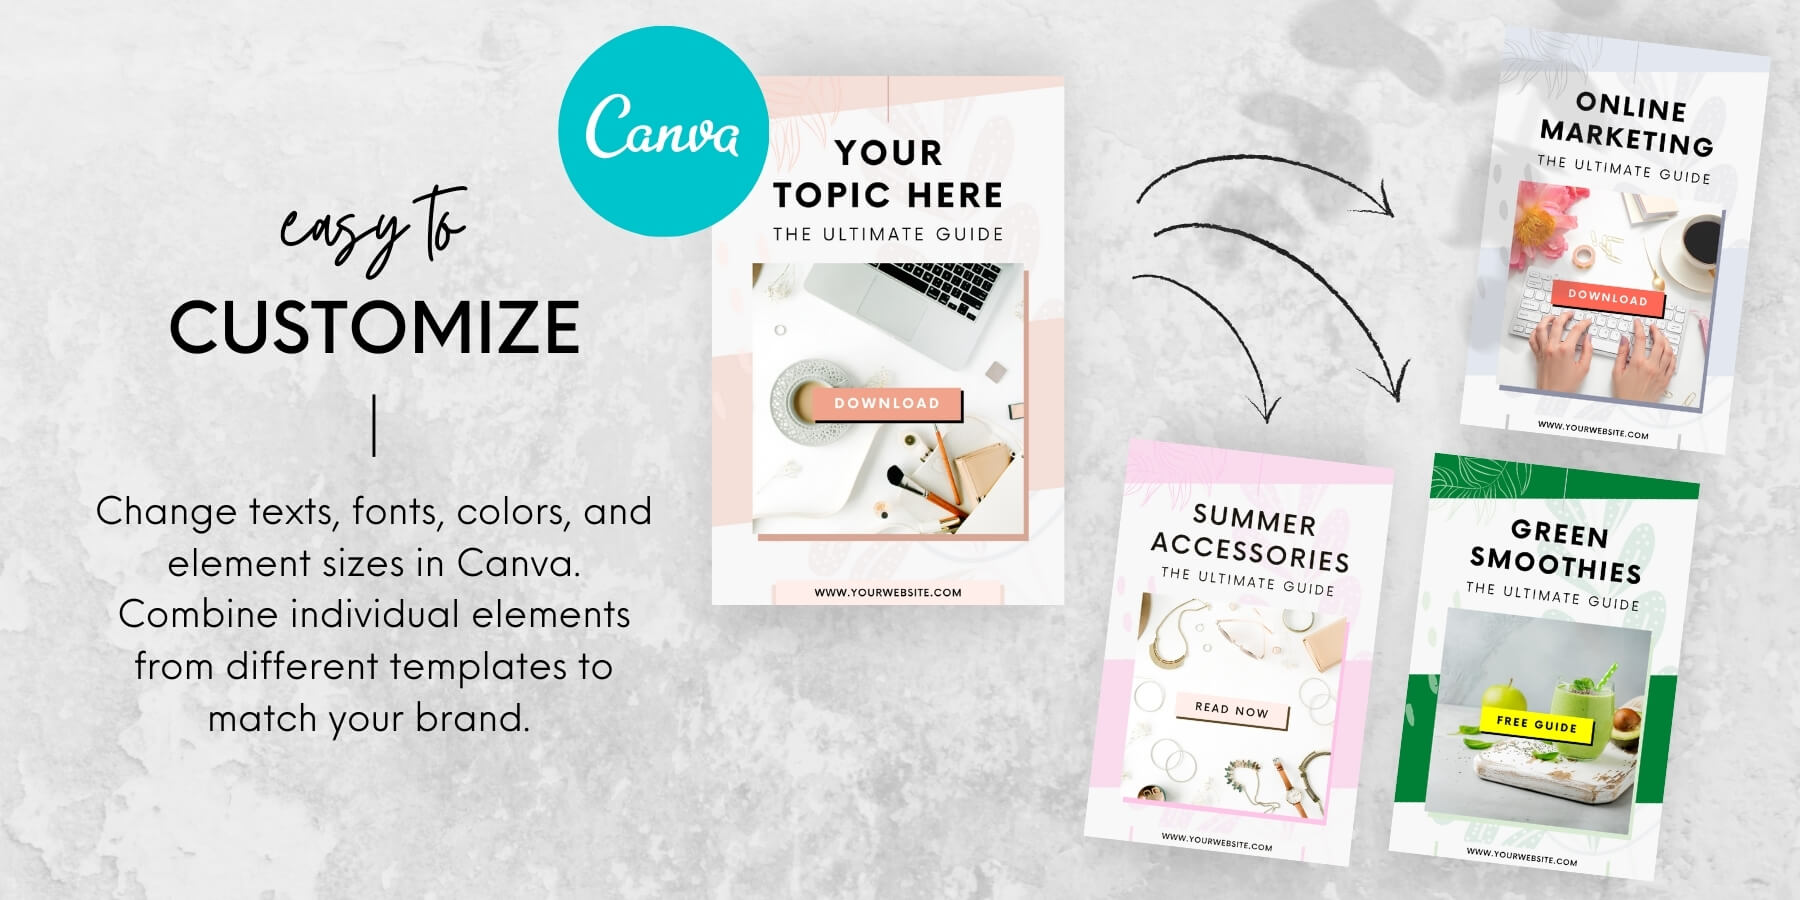
Plus, these templates are super easy to customize. Simply insert your blog post title in the text overlay, switch the colors to your brand palette, and you’re done!
Grab your Pinterest template bundle here.
Step 4: Compress your image file before uploading it to WordPress
Before you upload your pin image file to your WordPress media library, make sure you compress it first.
You want to make the file size smaller, so that it will load faster when people visit your website.
Compressing your image files means that the dimensions (1,000 by 1,500 pixels) will remain intact, while the file size (e.g. 500kB) will decrease.
I know this adds an extra step to your workflow, but trust me, it’s worth it.
Not only will your website data size remain sensible, but your readers will have a smoother experience browsing your site, too.
Plus, Google loves blazing-fast websites that load quickly. Hence, compressing your pin images is a super easy way to give your SEO rankings a quick boost.
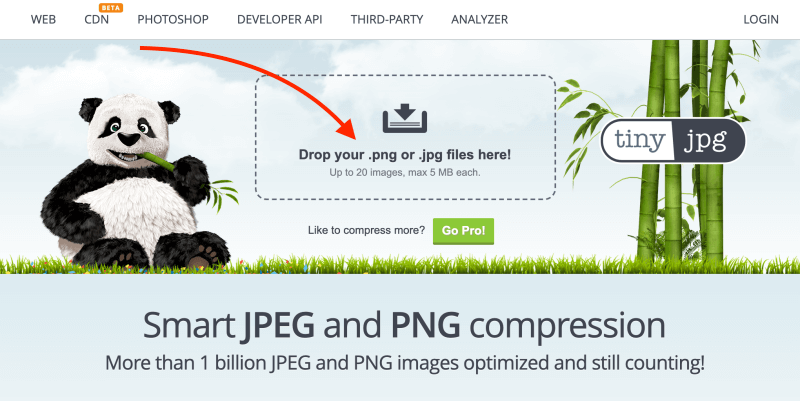
Again, you can use whichever tool you like. Based on my experience, I’d say the smartest way to compress your files is to use a browser-based tool.
My favorite is TinyJPG. Their compression only affects the quality and sharpness of the image very little, so that your pin graphics will remain crisp and beautiful.
Simply drag and drop your original image file to the page to start the compression automatically:
The cute panda will enjoy his bamboo for a few seconds, and he’ll cheer you on to download the compressed file when it’s ready:
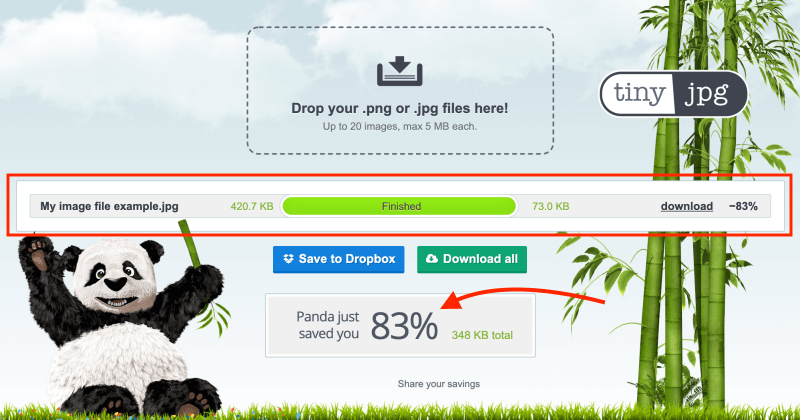
That new, compressed file will be considerably smaller than the original version.
For my Pinterest image, the file size decreased by 83%, from 420kB to 73kB. Pretty great!
If you want to learn a few more powerful SEO techniques, check out my beginner’s guide on what search engine optimization is all about.
Step 5: Name your Pinterest image correctly
There’s one more step to take before uploading your file to your website.
This is purely for Google SEO purposes. So if you’re in a hurry, this step isn’t 100% necessary. Nevertheless, it’s a simple trick to grow your blog traffic even quicker.
Before uploading your image, make sure you include keywords in the file name.
While this doesn’t necessarily help with Pinterest SEO, it certainly affects how Google treats your pages and posts in their search results.
Remember: Google can’t “see” what’s on your image.
Therefore, you should give it a bit more context, and the easiest way to do that is to name your image files correctly.
For example, let’s say you publish a blog post with “the best mac and cheese recipe”. Of course, you want to use a beautiful, appetizing photo of your mac and cheese as a pin image, right?
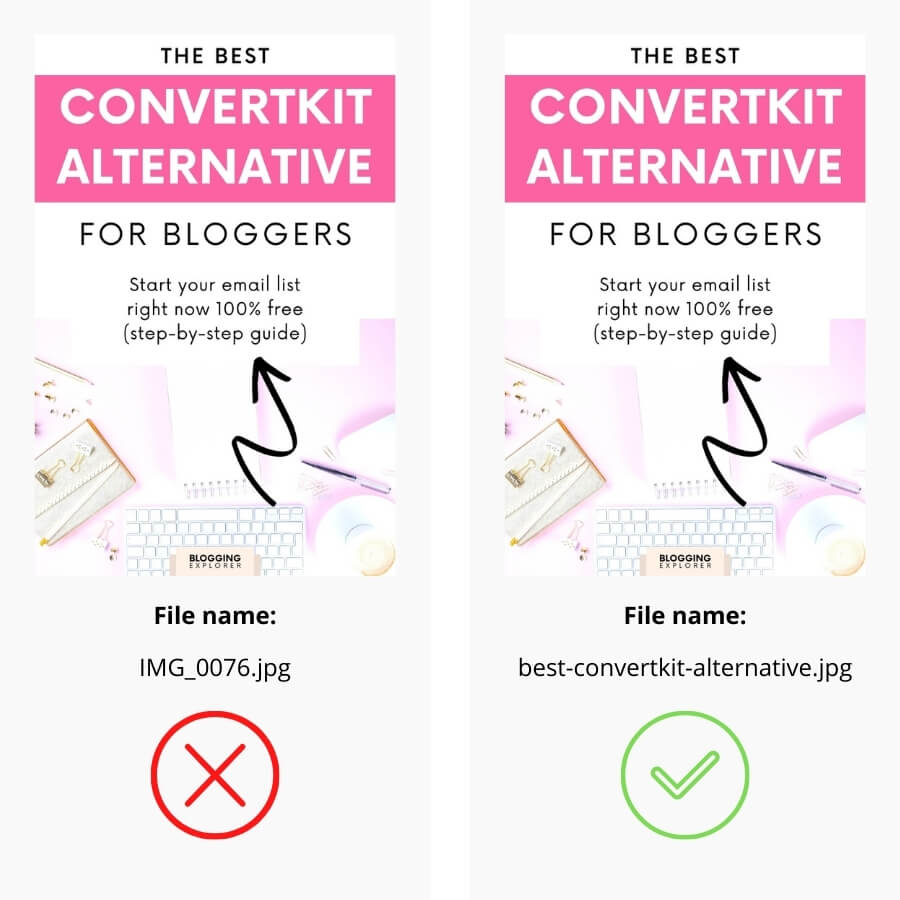
But if that image file is called “IMG_0049.jpg”, that doesn’t really give Google any clue about what’s on it.
Hence, naming your file “best-mac-and-cheese-recipe.jpg” would be much more helpful. It gives Google more information about your pin image and recipe blog post as a whole.
Here’s an example of a Pinterest graphic I created for my MailerLite review article. The text overlay says it’s “the best ConvertKit alternative for bloggers”, so I’ve used a couple of those keywords in my file name “best-convertkit-alternative.jpg”:
Step 6: Embed your Pinterest image to your blog posts
Now that you’ve created a beautiful Pinterest image and it has a smart name, let’s embed it to your blog post next.
This step is essential for making it as easy as possible for your readers to save your pin to their Pinterest boards.
When people save pins from your website, this sends the Pinterest algorithm a positive signal.
Remember: Pinterest is a search engine.
The algorithm wants to find the best possible pins to show users for any given search query.
When someone searches for “easy chocolate brownie recipes”, the search engine wants to show the most relevant recipes to that user.
The more people engage with your content and save stuff from your website to their boards, the higher you will rank in search results.
So how can you embed your Pinterest graphic to your blog post?
The easiest way is to use the standard WordPress blog post editor and insert an image block within your text:
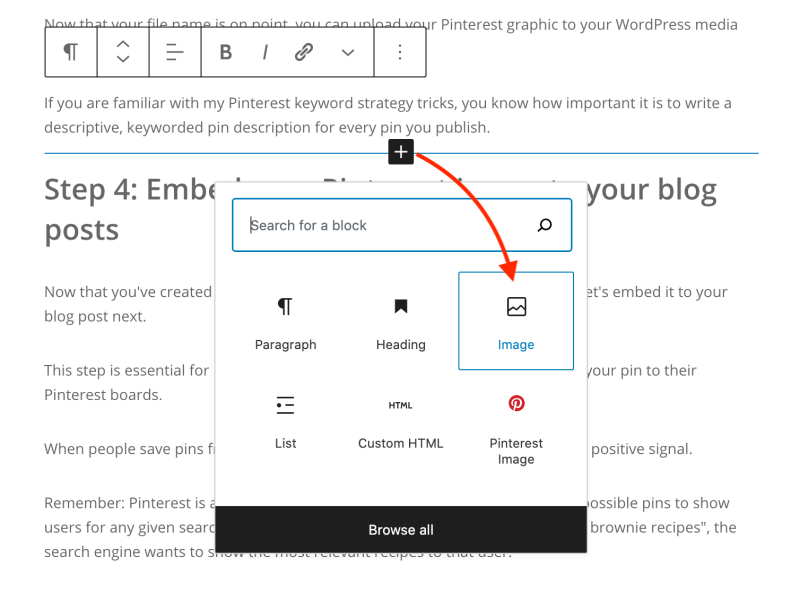
If you haven’t already, upload your Pinterest graphic to your media library and select the right file to insert.
Step 7: Add social sharing buttons to your website
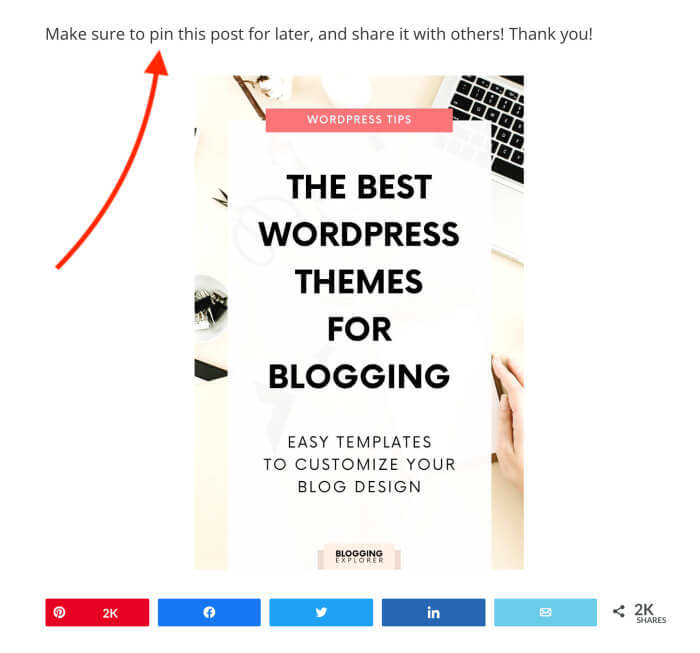
OK, now your readers can see your beautiful Pinterest graphic in your blog post. Wonderful!
Next, you want to make it as easy as possible for them to save that image to their Pinterest boards.
The smartest solution is to use a so-called social sharing plugin that adds sharing buttons for various social networks and Pinterest directly into your blog post.
Here’s how my buttons look – please feel free to share this post with others 😉
How can you add these buttons to your WordPress blog?
The plugin I use and love is called Social Warfare. It’s super easy to use, and you can add sharing buttons to your blog posts within minutes.
Click here to head over to Social Warfare, and download the free plugin now.
In the top navigation bar, click on Products. Now you will see the free plugin on the far left:
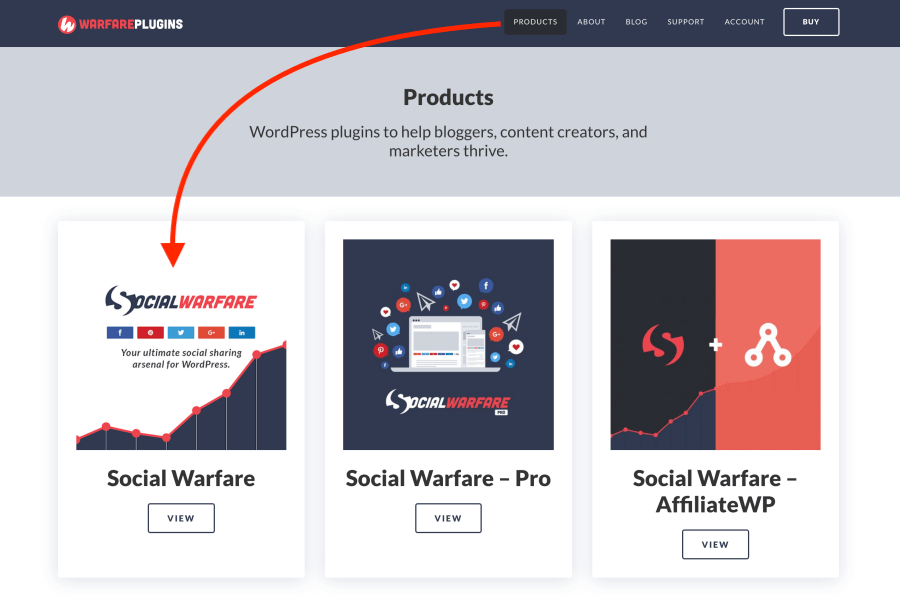
Click on the button that says View, and download the plugin as a ZIP file on the next page.
You can now upload your ZIP file directly to your WordPress dashboard under Plugins > Add New > Upload Plugin. Remember to activate it, too.
Read next: 10+ Essential WordPress Plugins You NEED to Grow Your Blog Faster
You will now see a new navigation menu point on the far left of your WordPress dashboard called Social Warfare. Click on it to open the setting for the Social Warfare plugin:
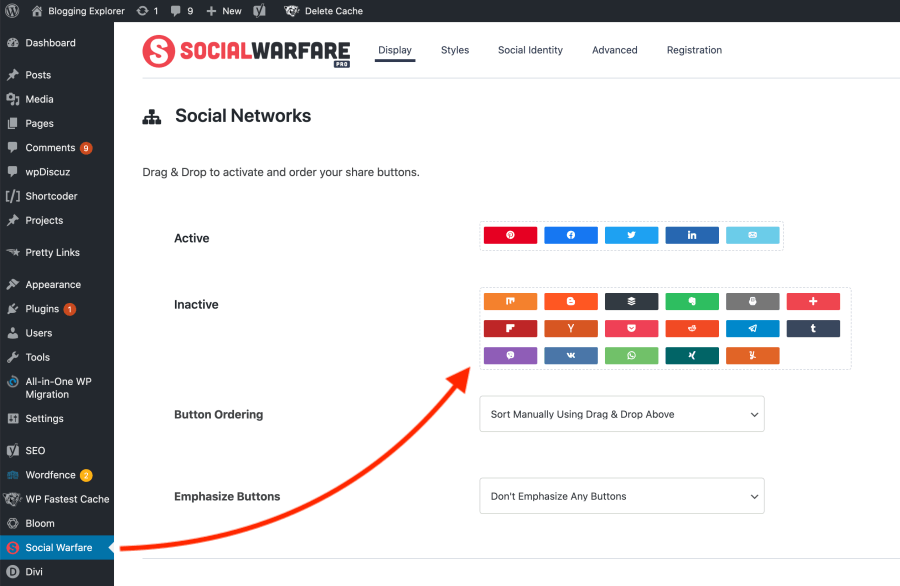
Here you can choose which social networks you want to add to your sharing buttons.
In the screenshot above, you can see that I use the following buttons on Blogging Explorer:
You simply need to figure out where your target audience hangs out, and add the most relevant networks and channels to your sharing buttons.
Hence, if your target audience doesn’t spend time on LinkedIn, there’s no need to add it to your buttons. If you’re not sure, check out my ultimate guide on how to find your blog target audience.
Step 8: Encourage your readers to save your content to Pinterest
Last but not least, you want to make sure you encourage your readers to take action and share your content on Pinterest.
Because although your pin image is stunning and you have added social sharing buttons to your blog post, sometimes readers still need a little nudge.
So how do you make your readers save your pin to Pinterest?
You simply ask them to do so!
The easiest way to increase your readers’ engagement with your freshly created Pinterest graphics is to include a short call-to-action either above or below your pin image.
For instance, here’s what I’ve written in one blog post of mine:
Final thoughts: Is your blog website ready for Pinterest marketing?
If you are planning to drive massive traffic to your blog for free using Pinterest marketing, you want to start by preparing your website first.
I hope you found a few helpful tips here to get started. I know it’s a lot to take in, and you probably just want to start sharing your pin images on Pinterest asap.
But trust me, it’s worth your time to make sure your website is all set up for it first.
The quick tricks we covered in this guide will help your Pinterest marketing strategy yield even better results than you may expect.
They are easy but powerful techniques you want to use before you start sharing your content on Pinterest.
And hey, if you’ve already started pinning your blog posts to your boards, NOW is the perfect time to double check that your WordPress blog website has everything you need to grow your traffic faster.
But now I want to hear from you!
How have you prepared your website for Pinterest traffic? Anything I’ve missed on this list?
Please drop me a line in the comments below! I’d love to hear your thoughts, ideas, and questions!
Here are a few more Pinterest marketing guides I think you will find helpful:
- 15 Quick Pinterest Marketing Tasks You Can Finish In 5 Minutes
- 10 Simple Pinterest Marketing Do’s and Don’ts (Fix These Mistakes Right Now!)
- Is Pinterest Social Media? (And Why You MUST Know This)