So you may be thinking: What the heck are Pinterest rich pins anyway?
Well today is your lucky day because I am going to walk you through everything you need to know about this simple but powerful Pinterest marketing technique. Glad you’re here!
Spoiler alert:
Pinterest rich pins are one of the easiest ways to drive more traffic to your website from Pinterest — for 100% free.
And before you think this is some technical hocus-pocus and you can’t be bothered with, hear this:
Rich pins are really easy to set up. I’ll show you how to do it in just a minute.
Before we start, make sure you grab your FREE Pinterest marketing quick guide below to steal my proven Pinterest traffic strategies:
- What are rich pins on Pinterest?
- What do Pinterest rich pins look like?
- Why you should enable rich pins: 4 essential benefits
- How to activate rich pins in WordPress
- What you should do next: Optimize your pin titles and descriptions
- General FAQ: Pinterest rich pins
- Final thoughts: How to enable Pinterest rich pins in 5 minutes
Disclosure: This page contains affiliate links, meaning I receive a commission if you decide to purchase using my links, but at no additional cost to you. Please read my disclosure for more information.
What are rich pins on Pinterest?

Pinterest rich pins are dynamic pins that automatically pull data from your website.
Here’s the official definition from Pinterest:
Rich Pins are a type of organic Pin that automatically sync information from your website to your Pins. You can identify Rich Pins by the extra information above and below the image on closeup and the bold title in your feed. If something changes on the original website, the Rich Pin updates to reflect that change.
Sounds a tad technical, I know. But we can instantly see two fantastic benefits:
- First, rich pins automatically pull data from your website. This gives each pin more context and your target audience will see more details about your content right away.
- Second, rich pins sync information from your website or WordPress blog whenever you make changes to your blog posts.
For example, let’s say you have a blog post about “The Best Romantic Comedies on Netflix in 2026”.
Chances are that those movies are just as funny and interesting in 2027 with a few new additions.
So towards the end of 2026, you update your blog post and change the title to “…2027”.
With rich pins activated, all your existing pins for that blog post will automatically pull the new title from your website.
Now all your pins still link to the same blog post but users will see the current year in your pin title. Neat!
What do Pinterest rich pins look like?
So, what do Pinterest rich pins look like?
You can find three different types of rich pins on Pinterest. Let’s take a quick look:
1: Article rich pins
Article rich pins show the title, the meta description, and the author of the article or blog post.
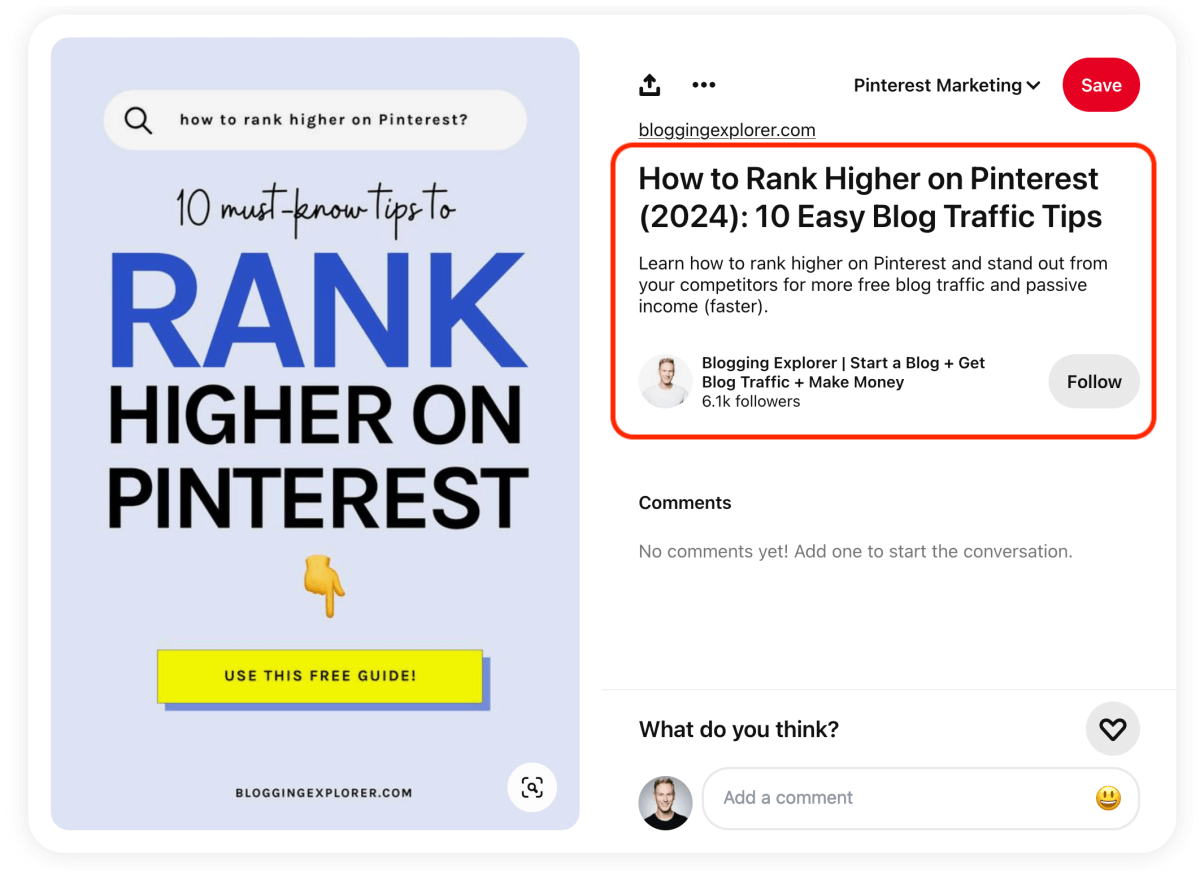
Showing these details to pinners helps you build brand awareness on the platform – for 100% free.
For example, when I’m scrolling through my Home Feed, I love seeing new, fresh pins from familiar faces. I’m much more likely to click on a pin if I see it’s from a creator I’m already following.
2: Recipe rich pins
Recipe rich pins show:
- Title
- Ratings
- Cooking time
- Diet category (e.g. vegetarian or vegan)
- Number of servings
- List of ingredients
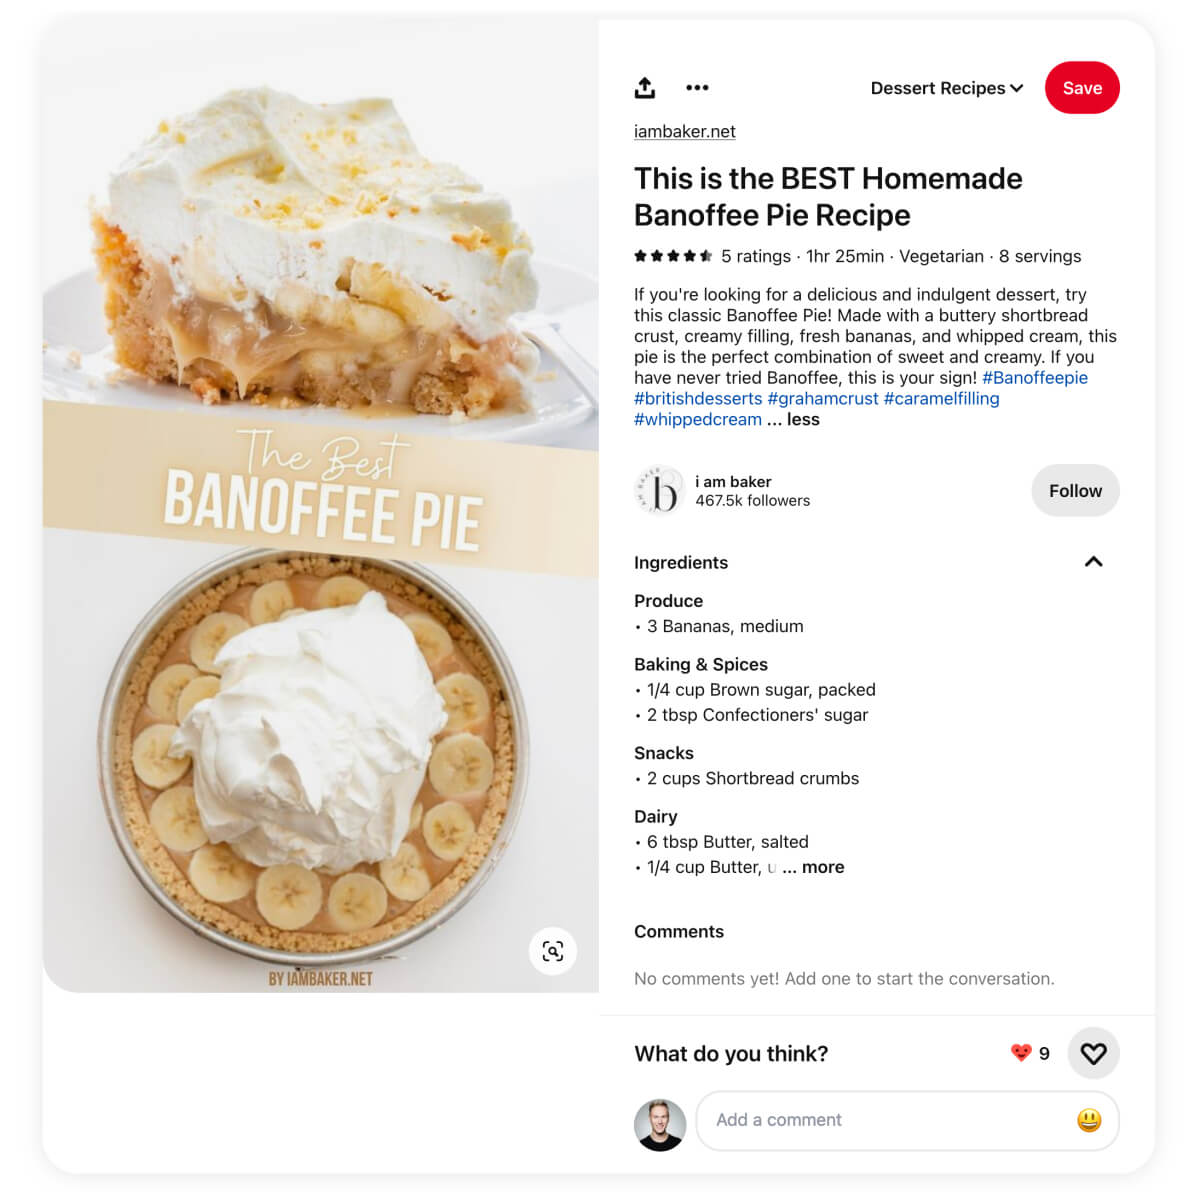
(Yum, I love banoffee pie!)
Depending on the recipe plugin you use in WordPress, the details shown in your recipe rich pins may vary. I’ve had the best experience with WP Tasty Recipes for creating recipe blogs for my website clients.
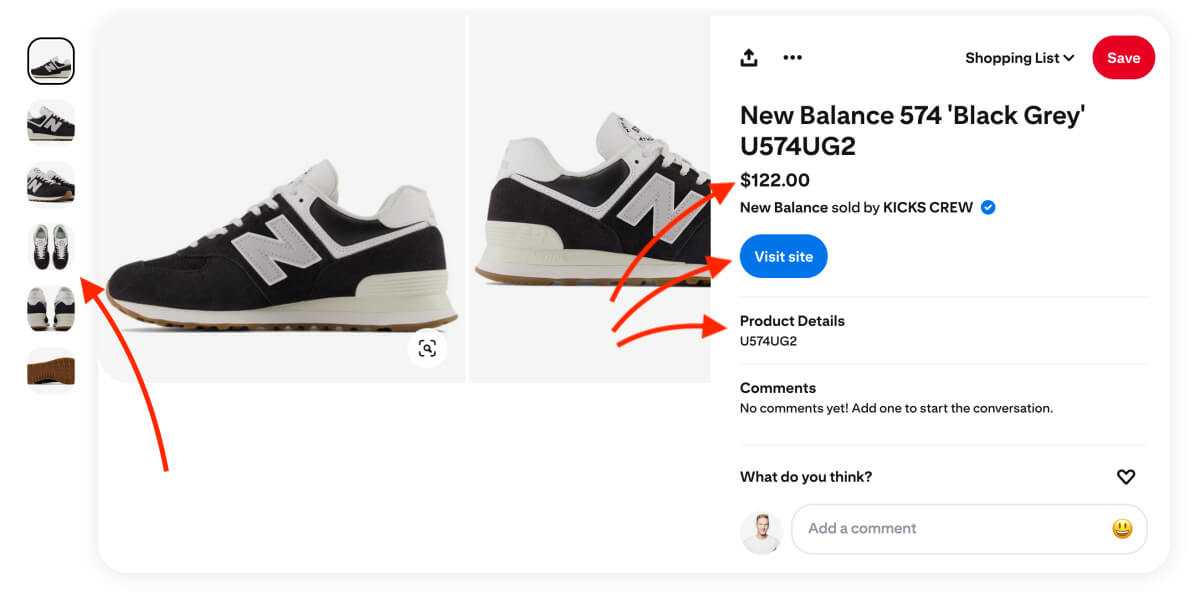
3: Product rich pins
Product rich pins linking to product pages will display:
- Product image gallery
- Price
- Direkt link to the shop
- Additional product details (or product description)
- Availability details
Why you should enable rich pins: 4 essential benefits
So what’s all the fuss about Pinterest rich pins anyway? Why should you set up rich pins for your website?
Here’s why:
Rich pins help you grow your reach on Pinterest faster because they tell users what your article, product, or recipe is about.
Here are four essential benefits you get from activating rich pins for your website:
Benefit #1: Users see more information about your content
The additional information on rich pins encourages users to engage with your content.
For example, let’s say you publish cooking recipes.
When users see the list of ingredients, the cooking time, and step-by-step instructions for your recipe, they are much more likely to save your pin to their boards right away.
Rich pins help users find the content they are looking for faster.
Bear in mind that displaying your full recipe in rich pins may decrease the clicks to your blog — but that’s a short-term effect.
In the long run, your pin will generate more engagement and rank better on Pinterest. Hence, even more people will see your pin, and over time you will see more traffic to your website, too.
The best part? The visitors your rich pins send to your website usually have a lower bounce rate. Those visitors are more likely to spend more time there, peruse your content, and perhaps sign up for your email list.
If you haven’t started one yet, head over to my step-by-step tutorial to start your email list for free now.
All in all, rich pins mean your visitors are more engaged, and genuinely interested in your recipes overall.
Benefit #2: Rich pins update automatically when you update your blog post
This is by far the #1 benefit from activating Pinterest rich pins for your blog.
Let me explain:
Sometimes you may want to update an old blog post to give it a boost and generate more traffic. I know this all too well — I’m doing my best to keep all my blog posts up-to-date, improving them continuously.
You may even update the blog post title to increase clicks to your website, right?
When you enable rich pins on Pinterest, the titles on all your existing pins to that blog post will automatically update, too.
This is great for blog posts that have a year in their title.
For example, one of my most popular articles is titled “How to Start a WordPress Blog on Bluehost in 2026“.
But that article will be just as current in 2027 — with additional bits of helpful information my readers need.
So when I update my blog post title to “…2027”, all my pins pointing to that article will pull the new title and display it to my target audience on Pinterest.
Hence, rich pins save you time by keeping your content fresh and up-to-date on Pinterest.
Benefit #3: Rich pins stand out in the Pinterest feed
Most pinners find your content in these three feeds:
- The Smart Feed or Home Feed
- Search results
- Similar content (display below a pin in the close-up view)
When you enable rich pins, your pins will be branded with your Pinterest profile photo or logo.
Users will also see your blog post title in bold below your pin image:
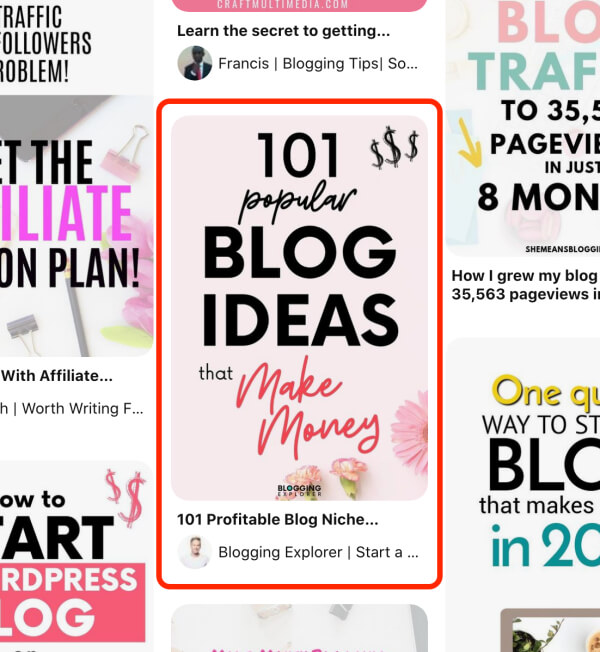
This is huge advantage against normal pins that don’t display any additional information about your content in the feed.
Firstly, your photo or logo will help you build brand awareness on the platform.
Secondly, users will instantly see your blog post title below your pin image. Use titles that make people curious to click!
Benefit #4: Rich pins have a built-in Follow button
Pinterest rich pins display a Follow button in the close-up view:
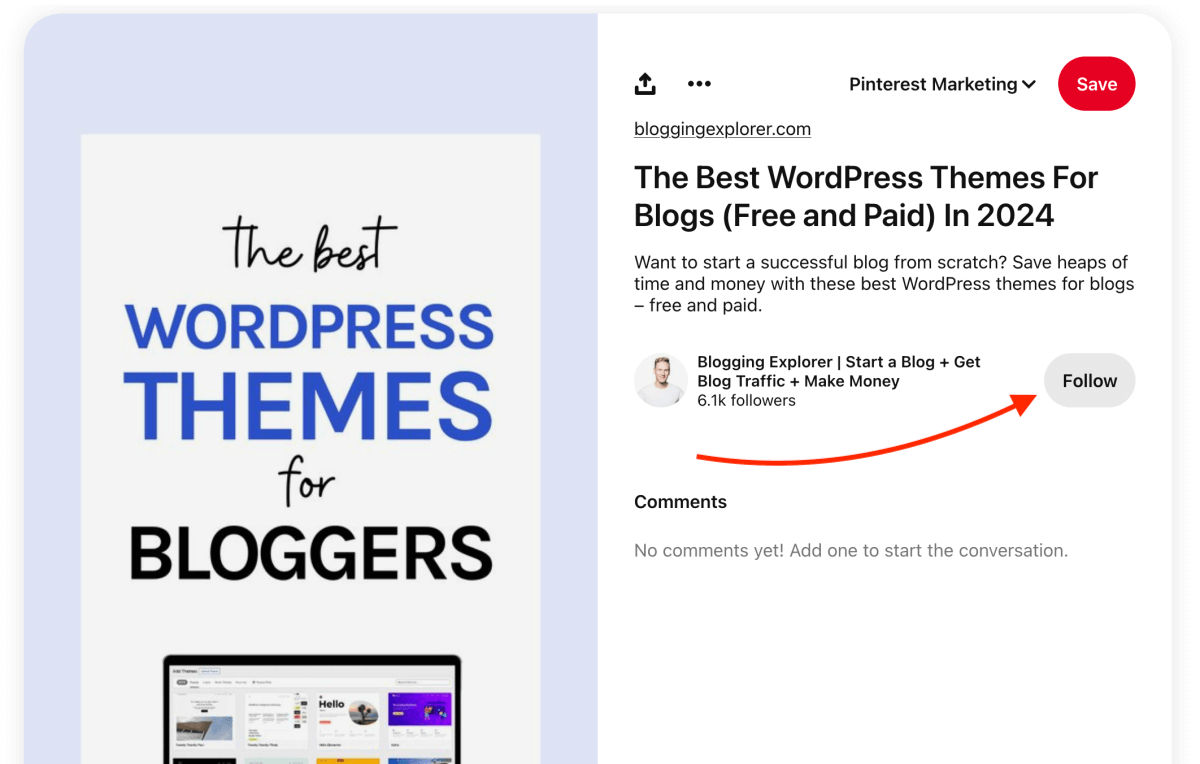
This allows users to discover your account more easily and encourages them to follow you without having to navigate to your Pinterest profile page. Neat!
The meta data pulled from your website and the automatic Follow button are massive advantages you want to use!
The best part?
Enabling rich pins is super easy. Let’s activate them for your WordPress website right now!
How to activate rich pins in WordPress
If you’ve been postponing Pinterest rich pins because they sound technical, you are in the right place.
Because the truth is:
Activating them is much easier than you may think. You’ll be done in 5 to 10 minutes.
But before you start, make sure that you:
- Use a Pinterest business account:
Create a free business account here or convert your personal account here. - Claim your website on Pinterest:
Follow my step-by-step tutorial here.
Before you start, please share this post with others! Thanks!
Step 1: Add meta data to your website
Meta data sounds scary. But it’s not.
It’s simply a fancy name for information that we will add to your website. This will take 2 minutes.
The easiest way to add the right type of metadata to your website is to use the free Yoast SEO plugin for WordPress.
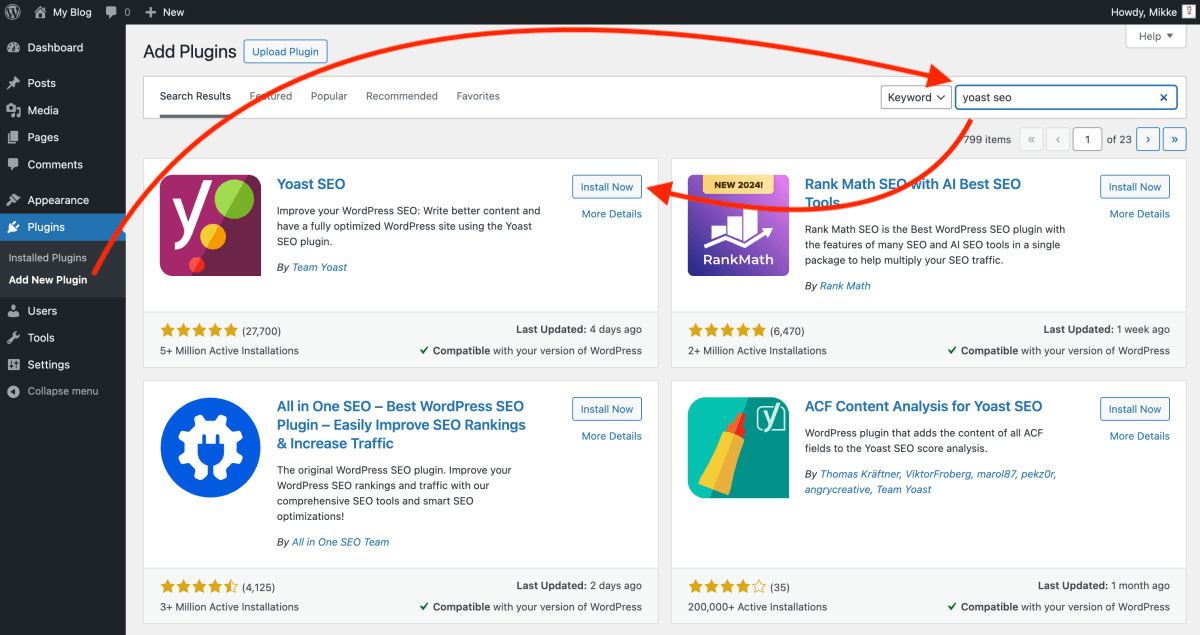
In your WordPress dashboard, navigate to Plugins > Add New Plugin.
Now search for “Yoast SEO” and click on Install Now:
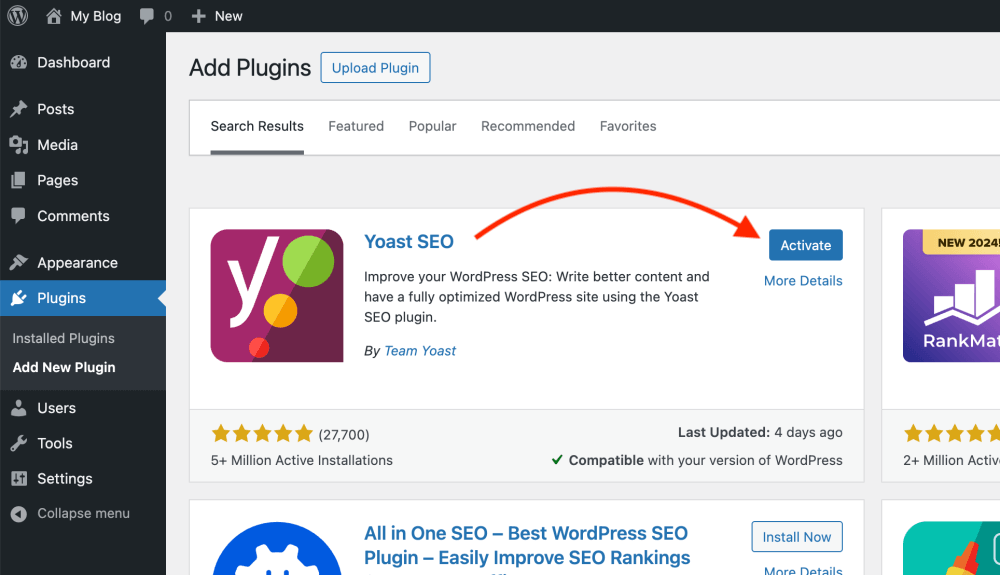
Once the installation is complete, click on the Activate button:
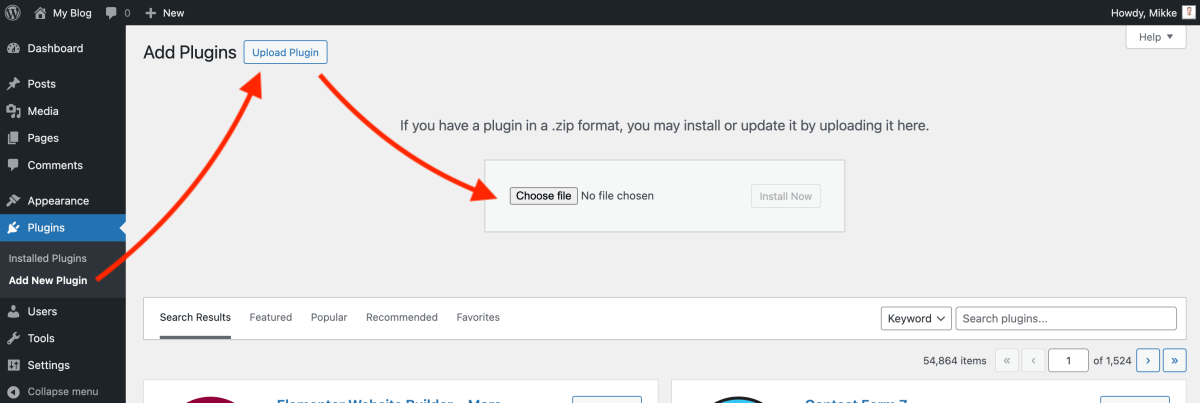
Alternatively, you can download the plugin as a ZIP file here and upload the ZIP file to your WordPress website in Plugins > Add New Plugin > Upload Plugin:
Again, once the installation is complete, remember to activate the plugin.
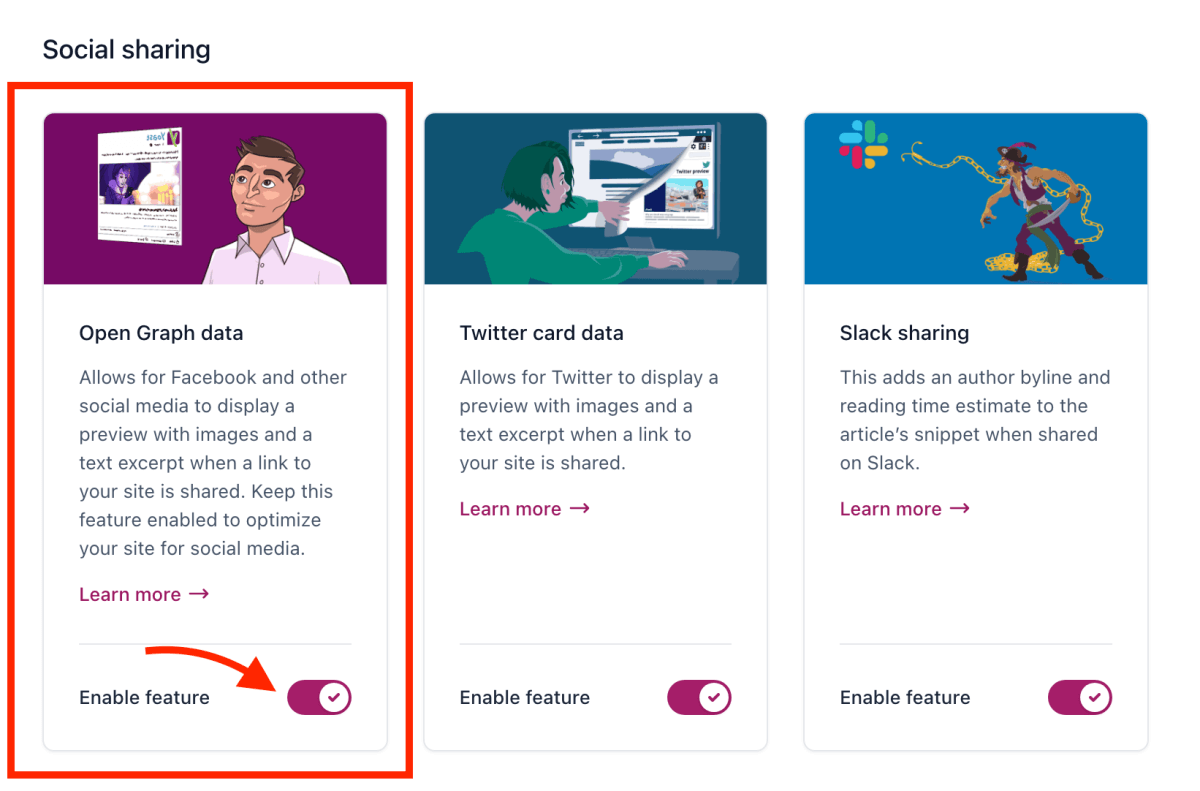
Next, head over to Yoast SEO > Settings > General > Site features in your WordPress dashboard menu.
In the Social sharing section, enable the Open Graph data feature:
Congrats! We are now done with the technical part of activating your Pinterest rich pins, yay!
Step 2: Create your first rich pin
Update 2024:
Until a while ago, at this stage you would have needed to validate your rich pins manually. This process is now fully automatic, and you can start saving rich pins from your website to your Pinterest boards immediately.
Make sure to clear any WordPress caching plugins if you use one. That way, Pinterest can access the metadata you just added to your website.
In the future, when you create a new pin with a link to your website, it will automatically appear as a rich pin. Existing pins that link back to your website will also appear as rich pins.
If you don’t see your rich pins syncing with your website, it means that Pinterest can’t find the required meta data on the page URL you entered.
Here’s what you can do:
- Wait — It may take up to 24 hours for Pinterest to find the meta data from the Yoast SEO plugin on your website.
- Clear your website cache — If you are using a caching plugin, Pinterest may not see the latest version of the URL that your pin links to. Clear your cache and try again.
For all the details and more help, check out the rich pins documentation.
You know what? You’re done!
Now, give yourself a pat on the back and sit back.
Pinterest will now start to pull the data for your rich pins, and your existing pins will convert into rich pins automatically.
Depending on how much content you have, this may take a few days. Just have patience here.
What you should do next: Optimize your pin titles and descriptions
Now that you’ve unlocked the power of Pinterest rich pins, what’s next?
Remember how rich pins pull data directly from your blog posts?
You want to make sure that data is available for Pinterest to see and display to users.
Also, you want to utilize that extra real estate to make people curious to click on your pins and visit your website.
Here are a few quick tips to make the most of your rich pins:
1: Write click-worthy blog post titles and meta descriptions
First, make sure you add a compelling blog post title and meta description to each blog post. This encourages people to actually visit your website.
If you followed my guide above, you already installed and activated the Yoast SEO plugin.
This plugin makes it super easy to add and edit your blog post title and meta description.
When editing your blog post in the standard WordPress editor, scroll down to the Yoast SEO section:

There, fill in your SEO title and meta description.
It’s perfectly OK to use the default SEO title based on the blog post title you entered into your WordPress blog post editor. But sometimes you may want to write a more click-worthy title for search engines.
If you leave the meta description blank, your rich pins will display the first few lines of your blog post.
2: Use a recipe plugin for your recipe blog
If you are a food blogger and some of your blog posts are recipes, you want to display your ingredients list, cooking time, and other information on your rich pins.
The easiest way to do this is to use a WordPress recipe plugin that allows you to enter all these details more easily in your blog post editor.
Otherwise, you will waste your time making sure your recipe details are tagged with the right meta data selectors and identificators. (I’m a web developer and even I think that sounds too cumbersome and tedious.)
Here’s a shortcut I recommend:
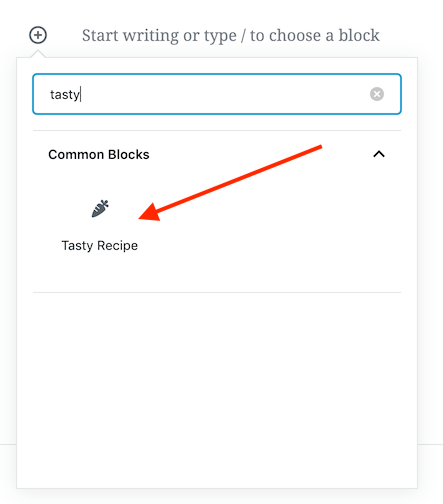
WP Tasty Recipes is an easy-to-use, robust recipe plugin that makes it easy to write and publish beautiful recipe posts on your blog.

It takes care of all the heavy lifting for you. You can simply add a “Tasty Recipe” block to your blog post and enter your recipe details:
Now all your recipe information is nice and structured for both your readers and search engines like Pinterest and Google. Pretty great, huh?
If you are not familiar, check out the full documentation and beginner’s guide for WP Tasty Recipes here.
Also, check out their testimonials here to see what other food bloggers are saying about the plugin.
General FAQ: Pinterest rich pins
Rich pins are organic pins that automatically pull live information from your website to your pins. Hence, the details for your article, recipe, or product will sync directly from your website and give users additional, relevant information about your content. Also, rich pins display your pin title in bold in search results and the Smart Feed.
To get rich pins on Pinterest, you need to enable Open Graph meta data for your website. The free Yoast SEO plugin allows you to activate the right type of meta data quickly. Once done, your pins linking to your website will appear as rich pins on Pinterest. You don’t need to use the Rich Pin Validator tool anymore since Pinterest has automated this process.
Rich pins give Pinterest users additional, relevant information about your articles, recipes, and products. This helps your content stand out on the platform, growing your reach and increasing engagement. Also, this information will automatically sync from your website. If you decide to change the details of your content on your website, you don’t have to update your pins manually.
There are three types of rich pins: Article, recipe, and product rich pins. Article rich pins display your post title, meta description, and the author. Recipe rich pins show the ingredients, cooking time, diet preference, serving size, and ratings. Product pins include the product title, pricing, and availability.
You don’t need to validate your rich pins any longer. This process is now fully automated, and the Rich Pin Validator tool is no longer in use. Once you’ve enabled Open Graph meta data for your website, Pinterest will pull data for rich pins from your website automatically.
If your rich pins aren’t working, there is a problem with your Open Graph data on your website. If you use a caching plugin or a content delivery network (CDN), clear your website cache fully. This ensures that Pinterest can fetch the most up-to-date version of the URL that your pin links to.
Final thoughts: How to enable Pinterest rich pins in 5 minutes
Even if you are completely new to Pinterest marketing…
Even if you thought enabling Pinterest rich pins is difficult and technical…
Even if you only have 5 minutes to spare…
You want to activate rich pins for your blog right now!
I really hope you found this guide helpful. I know there are tons of things to think about when you start building a presence on Pinterest.
If you run into any problems when activating Pinterest rich pins for your site, drop me a line in the comments below — I’m happy to help.
Once you’ve set up your Pinterest rich pins, follow my complete Pinterest marketing strategy guide to supercharge your growth asap.