It can feel exhausting to find the right email marketing tool for your blog.
But it’s an essential task if you want to make money blogging.
Email marketing isn’t just about sending emails and sharing exciting stuff with your subscribers.
It’s more like a foundation for your entire blogging business.
Using emails is your #1 tool to connect with your readers and build a relationship with them. Whether you are just about to start your email list or want to sell your own products, emails are THE tool to achieve your goals faster.
To make things easier for yourself, you want to find an email marketing tool that allows you to:
- Create beautiful sign-up forms for your blog quickly
- Manage your subscribers and emails with ease
- Build automated email sequences to warm up your new subscribers
- Get started for free
The best email marketing software for you is hassle-free, easy to use, and quick to learn. You are wearing a dozen hats as a blogger, so you don’t want a tool that makes your life harder.
You can’t spend 1 hour on trying to create a signup form and embedding it to your blog post. You need a tool that works for you, not against you.
I started my first blog in 2016 and I always felt email marketing was tedious and cumbersome.
I tried a handful of different tools until I switched to MailerLite. And oh boy, how things have changed for me since!
In this Mailerlite review for bloggers, I will tell you why I switched providers and why I’m not considering any other email marketing tool ever again.
If you are a blogger and looking for an intuitive, powerful email marketing tool to turn your blog into a profitable business, you are in the right place!
- Why you need an email list (asap)
- What makes some email marketing services better than others
- Why I use MailerLite for my blog email marketing
- 1: MailerLite is incredibly EASY TO USE
- 2: You can get started for FREE (with ALL the features you need)
- 3: Their free plan is the best out there
- 4: Their pricing is fair
- 5: Migrating your current subscribers to MailerLite is easy
- 6: They have beautiful forms you can use in WordPress
- 7: Tagging and segmenting your subscribers is easy
- How you can get started with MailerLite today
- Final thoughts: MailerLite review for bloggers – Is it worth it?
Disclosure: This page contains affiliate links, meaning I receive a commission if you decide to purchase using my links, but at no additional cost to you. Please read my disclosure for more information.
Why you need an email list (asap)
When it comes to making money blogging, email marketing is the best way to turn your blog into a profitable business.
Email is the only way to drive high-converting traffic to your blog posts, product pages, and campaigns. It’s the most powerful tool you can use to boost your sales and grow your income.
And it doesn’t have to be difficult.
I send a ton of emails to my email list every day without lifting a finger because most of them are automated.
These automated email sequences are a crucial part of my daily blogging business. They allow me to:
- Connect with my audience directly
- Offer tons of valuable content to them
- Gather questions and feedback from my readers
That feedback helps me create the perfect blog posts that my audience is genuinely interested in.
And more importantly: it helps me brainstorm ideas for digital products to create and sell. When I know what problems my subscribers are struggling with, I can craft products I know will sell.
So whether you are just getting started with blogging or you have a good amount of traffic already, you want to start building your email list as soon as possible.
Email is the best way to connect with your audience on a more personal level, build TRUST, and find out what your readers really need from you.
You simply can’t build a deep connection with your audience in the 5–10 minutes they spend on your blog post. Even if your product is the best in the world, they won’t be ready to purchase from you.
And it doesn’t matter whether you have 100 or 10,000 subscribers – you need an email marketing software that makes your life easier. That’s what MailerLite has done for me, and I’m really excited to share my experience with you!
Save this pin to Pinterest and share this article with others!
What makes some email marketing services better than others
Throughout my blogging journey, I’ve tried and tested a bunch of popular email marketing software before switching to MailerLite:
- Mailchimp
- ConvertKit
- Constant Contact
- AWeber
- GetResponse
Whenever I’ve switched to a new service, it was always for the same reasons:
- Too difficult to use – Most tools are too complex with too many bells and whistles. For example, I used Mailchimp for 3 years and I still don’t understand their dashboard.
- Poor help and support – If I’m paying good money, I expect someone to answer my questions and help me out. Most providers are difficult to reach, and their idea of “helping” is to send me a link to their documentation.
- Overpriced – The pricing structure needs to be fair. Most providers have outdated dashboards and features that nobody needs, yet they still overcharge you.
It feels like the more established a provider is, the worse their features and customer service are – and their product is more expensive.
But can you use a free email marketing software?
Absolutely.
I know tons of bloggers have jumped on the no-free-lunches bandwagon, but that’s not how things work.
You can definitely get a great tool for $0.
MailerLite has an unbeatable free plan you can use, and it has all the features you need – unlike the limited free plans of ConvertKit and Mailchimp, for instance.
Don’t get me wrong – ConvertKit has some amazing features. But their product is overpriced and the free version is missing a few essential tools you need from the get-go. I’ll come back to this in a minute.
The simple truth is: MailerLite has it all.
Their tools are designed to help you grow. Even with the free plan, you get amazing support for the first 30 days. Their helpful team takes the time to listen to your feedback and find the best solution for you.
They want you to succeed, so it only makes sense that they give you full access to their features for free in the beginning.
Later on, if you feel like upgrading to a paid plan, their pricing is very affordable. Hence, the step from free to paid isn’t such a big leap.
Why I use MailerLite for my blog email marketing
I’ve tried my fair share of different email marketing providers for my blogs. That is, until I tried MailerLite.
I first tried them in early 2020. At the time, I used Mailchimp for both my blogs.
Mailchimp was doing an OK job, but the dashboard was too difficult to navigate for me. I never felt 100% comfortable with it simply because it’s so difficult to find what you’re looking for.
And as my list was approaching the 25K mark, paying $230 monthly just felt like a lot of money.
So I signed up with MailerLite – and I’ve never looked back.
From day 1, they were by my side to help me set up everything properly.
Regardless of how big or small my questions were, they were quick to respond with clear, step-by-step instructions. And that’s how it’s been ever since.
They are genuinely interested in helping me succeed. After all, I want to use their product because it makes my life as a blogger so much easier.
It feels more like a partnership, really. So yes, I’m absolutely in love with MailerLite.
Let me walk you through a few reasons why I know you will love them too:
1: MailerLite is incredibly EASY TO USE
If your email software is difficult to use, you are not going to use it regularly.
This happened to me with Mailchimp. The reason I started my email list with Mailchimp is simple: everyone recommended it and it was free to use.
But if I had known how complex their dashboard is (and how much they overcharge) I would have chosen another provider.
Mailchimp changed their dashboard all the time, so it was difficult to find the tools I needed. Also, their updates were only making things worse.
So when I saw MailerLite’s dashboard…
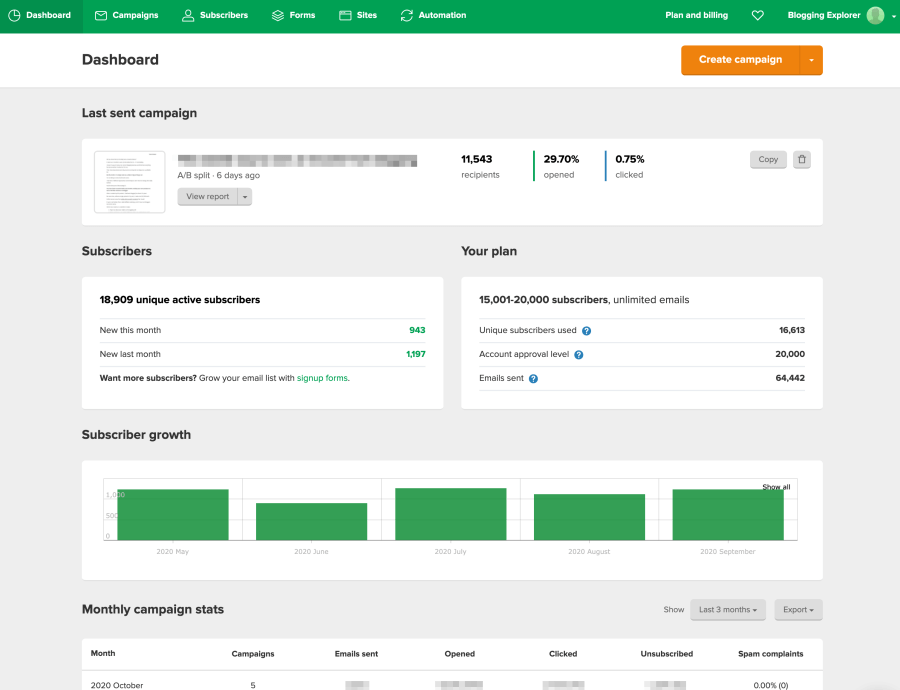
How can this be so simple?! I must be missing something, right?
I can instantly see all the stats I need. Hooray!
And when I started creating my first email signup form…
Why is this so easy to use?
None of the email marketing software I had used before felt so quick and easy. I would always have to click through 3–5 pages to find what I was looking for.
And editing my signup forms was so complex that I hadn’t created new forms with Mailchimp in 2 years.
With MailerLite, you can navigate easily between your campaigns, subscribers, automations, and more.
You can create new signup forms with just a few clicks and assign new subscribers to the right groups in seconds.
When you see the big picture at once, you can find what you are looking for instantly. This helps you create better forms, campaigns, and automation flows.
The magic word is simplicity.
When you are a busy blogger, you want to avoid complex tools that are difficult to manage and tedious to use. You need that time for content creation and marketing!
Ease of use is something MailerLite NAILS it. (To the wall!)
Everything from setting up your account to growing your list and managing your campaigns is super simple and quick.
2: You can get started for FREE (with ALL the features you need)
Yes, MailerLite offers a 100% free plan that includes ALL the tools you need to grow and monetize your email list.
It takes 1 minute to create your MailerLite account and 5 minutes to create your first signup form.
You won’t have to pay a dime until your list exceeds 1,000 subscribers (or 12,000 monthly emails).
That gives you enough time to grow your list and start making money from your email campaigns.
Whether you are new to email marketing or have some experience already, there really is no risk with trying MailerLite.
But with email marketing providers, there are “free” plans, and then there are FREE plans. Let me explain…
3: Their free plan is the best out there
If you are just getting started with blogging, I know you don’t want to spend money on tools that aren’t 100% necessary.
Most email marketing providers offer a free version to help you get started without any initial investment.
However, most free versions are very limited and only offer a small range of tools you can try out. They are usually just the most essential features. Once you start to get the hang of it, things will quickly feel restricted.
Compared to every other email marketing provider I’ve tried, MailerLite offers by far the best free plan with everything you need.
Here are a few powerful advanced features included in the free MailerLite plan:
Automated email sequences:
These are email series you send to your new subscribers automatically at regular intervals. For example, your welcome email sequence could have 5 consecutive emails sending once a day.
Automations are the lifeline of your email marketing strategy. They save you enormous amounts of time and build trust with your new subscribers from day 1.
(Automations are not included in the free ConvertKit plan, for example.)
Visual automation funnels:
You can build your automated email sequences with a super intuitive visual interface.
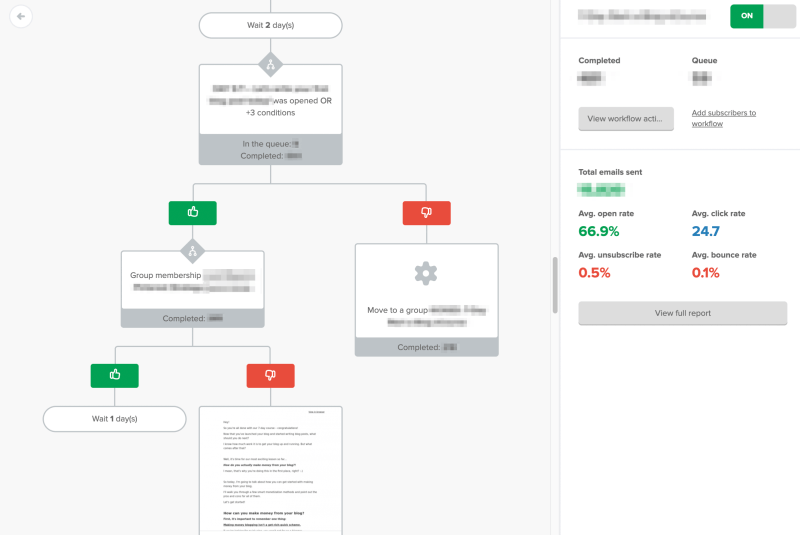
This tool is by far my favorite feature with MailerLite! I use automated email sequences a lot, and this visual funnel tool makes it easy to:
- Add new conditions within my existing sequences
- Adjust any existing steps in my sequence
- Add new emails between existing ones
- Move subscribers between steps and sequences when certain conditions are met
Integration tools for WordPress etc.
The free plan allows you to connect MailerLite with your WordPress website and other 3rd party tools you use.
The official, free MailerLite WordPress plugin is the quickest way to add your email signup forms to your blog posts, pages, and widgets. You’re going to love it!

In short: MailerLite offers by far the best free plan for bloggers. It has all the tools you need to start monetizing your list faster than any other provider out there.
But once your list starts to grow, you don’t want to wake up to a nasty surprise and pay $100/month for a few thousand subscribers.
Speaking of nasty surprises with pricing…
4: Their pricing is fair
Regardless of which email marketing software you choose, it isn’t worth its price if you don’t use it regularly.
But even if you are making $10,000 from your emails monthly, it doesn’t mean you should choose a tool that’s overpriced.
I know from experience that most email marketing providers are ridiculously expensive once your list exceeds 5,000 to 10,000 subscribers.
Some providers overcharge you for features you don’t even need. Their systems are built to maximize their own revenue – not to help you succeed.
For example, if you have the same subscriber on multiple lists in MailChimp, you will pay multiple times for that same person on your list.
Luckily, MailerLite is different.
Their pricing is subscriber-based. Each subscriber only counts once, even if they are on 10 different lists and groups.
And once your email list starts to grow, you don’t want to overpay just for the fun of it.
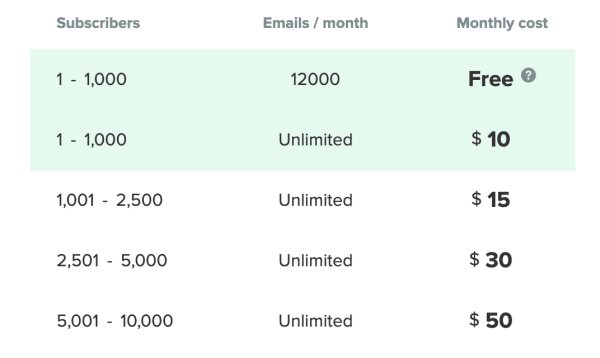
A good rule of thumb with email marketing is:
If you’re paying more than $10 monthly per 1,000 subscribers, you’re being overcharged.
If that’s the case, you are going to love MailerLite. Their plans offer a lot more value for your money even when your list grows to 5,000 subscribers and more.
For example, here’s how the MailerLite paid plans compare to ConvertKit:
| Monthly plans | MailerLite | ConvertKit |
|---|---|---|
| Up to 1,000 subscribers | $10 | $29 |
| Up to 2,500 subscribers | $15 | $49 |
| Up to 5,000 subscribers | $30 | $79 |
| Up to 10,000 subscribers | $50 | $119 |
Even with the free plan, you have access to ALL the tools you need with MailerLite.
And when it’s time to upgrade to a paid plan, MailerLite is up to 70% cheaper than ConvertKit – with identical or even better features.
5: Migrating your current subscribers to MailerLite is easy
So you are thinking about how to migrate your existing email subscribers to MailerLite?
Don’t worry about that. MailerLite has an intuitive tool for importing your subscribers.
All you have to do is export your subscribers from your current email software in a CSV file.
If you are not familiar, the CSV file type is simply a way of saving and migrating data that you would normally store in a spreadsheet.
All major email marketing providers have a thorough walkthrough for exporting your subscriber data into a CSV file.
For example, here are step-by-step instructions for exporting from ConvertKit, GetResponse, Constant Contact, and AWeber.
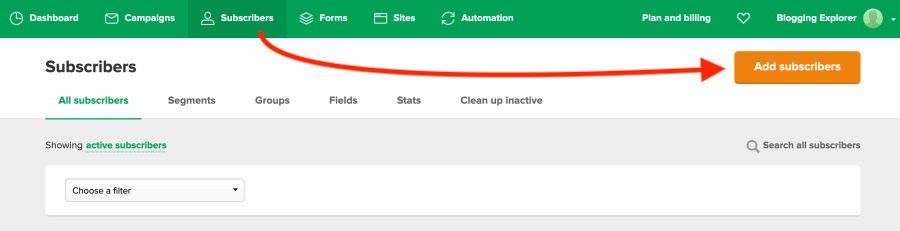
Once you have your CSV file, head over to Subscribers > Add Subscribers in your MailerLite dashboard:
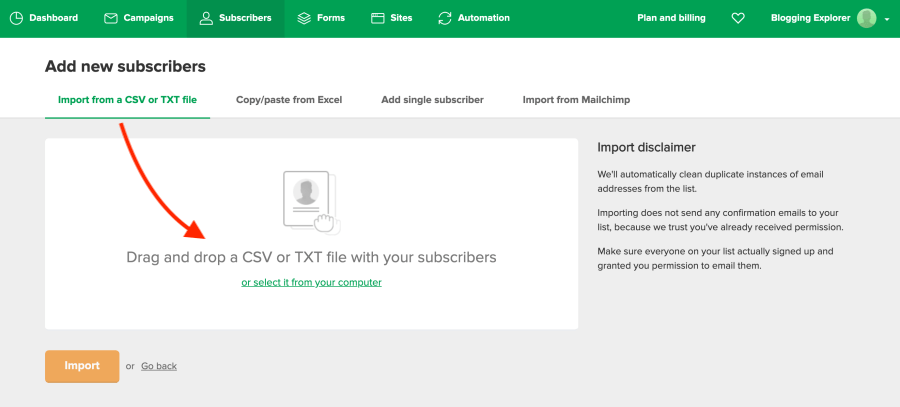
Simply drag and drop your CSV file or select it from your computer:
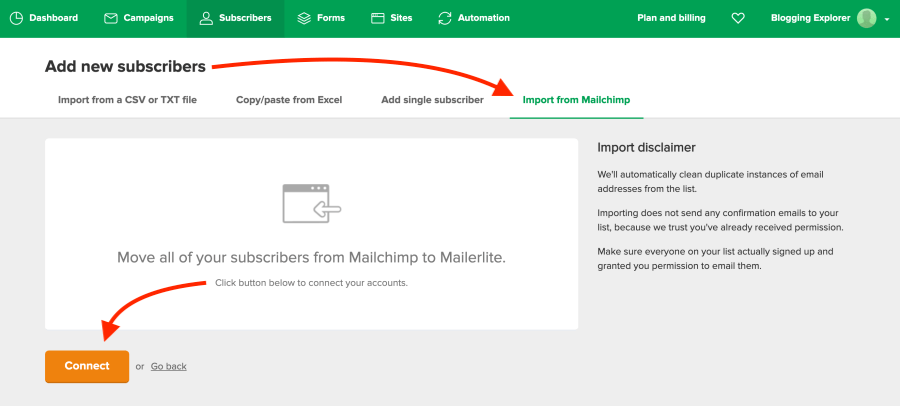
If you are using Mailchimp, MailerLite has a built-in tool for importing your subscribers in just a few clicks.
In your Add Subscribers screen, select Import from Mailchimp, and click Connect to establish a direct connection to your Mailchimp account:
Next, you need to log in to your Mailchimp account and follow the instructions MailerLite gives you.
Here’s a helpful video tutorial to guide you through the importing workflow:
6: They have beautiful forms you can use in WordPress
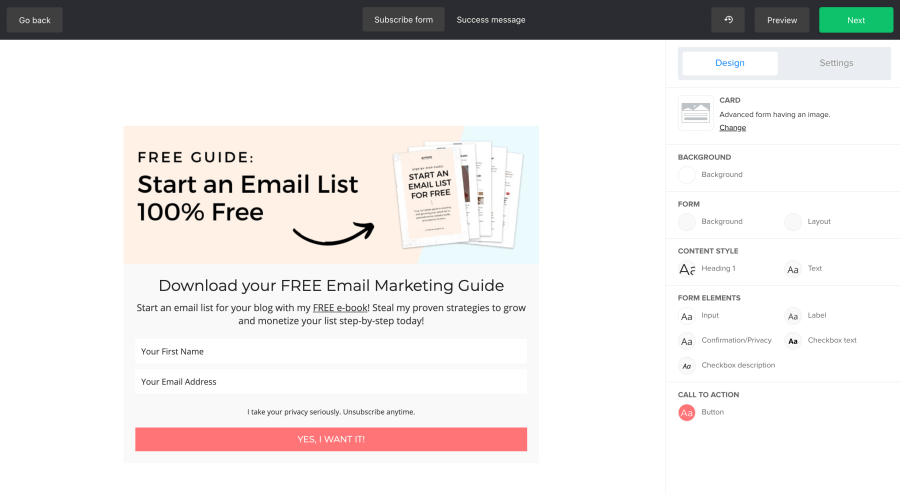
If you have ever felt frustrated or overwhelmed trying to create gorgeous signup forms, you’re going to love MailerLite.
You don’t need any experience or tech skills to build stunning forms because MailerLite does all the heavy lifting for you.
Start by choosing from these two options:
- Pop-up forms appear based on timing and scrolling. For example, a form could pop up when your visitor scrolls halfway through your page, or 20 seconds after the page is loaded.
- Embedded forms allow you to add signup forms to your blog posts, pages, and widgets. For example, you could add one at the end of each blog post to encourage visitors to subscribe and receive a free downloadable from you.
There are a few different plug-and-play form templates you can use to set up your first form within minutes.
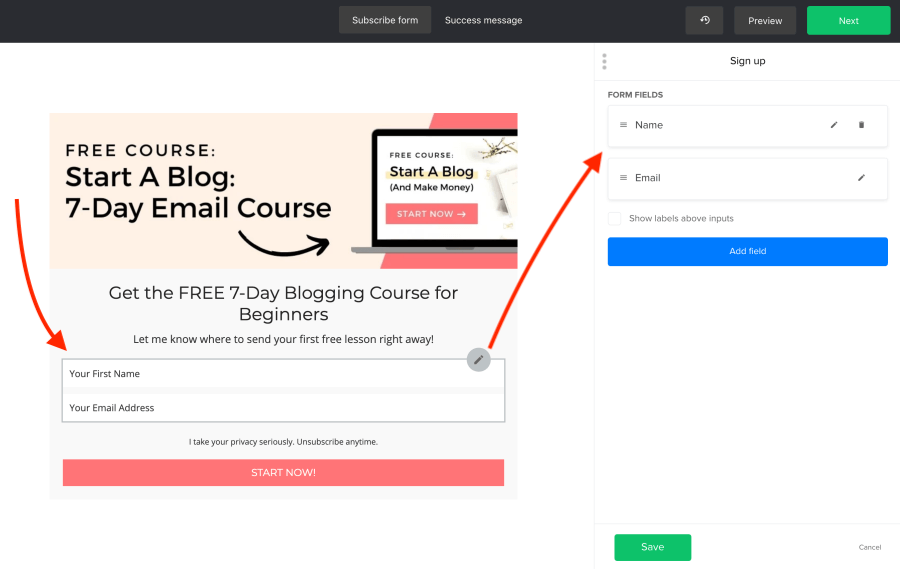
The intuitive editor makes customizing your forms super easy. Click on any element you want to adjust, and you will see all your options on the right:
Make sure you have the MailerLite WordPress plugin installed and activated.
Your pop-up forms will display automatically on your WordPress website.
To add an embedded form to your blog post, start by assigning it a name in your WordPress plugin.
Next, open your blog post editor and add new MailerLite signup form block where you want it to appear:
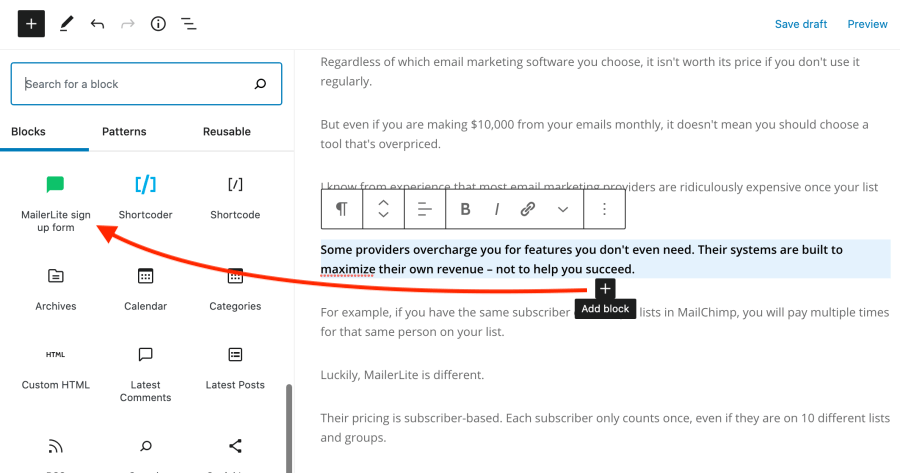
Select the right form from your list and save your blog post. Voilà!
7: Tagging and segmenting your subscribers is easy
If you want to sell your own products or promote affiliate links, MailerLite makes it easy to set up trigger links for people who still want to be on your list but aren’t interested in a specific product or campaign.
For example, let’s say you want to launch a new product. You will set up a launch email sequence with 5 emails that are sent automatically on consecutive days.
Not all subscribers will be interested in hearing about your product for 5 days straight.
But it would be a pity if they unsubscribed just because this one product isn’t their thing, right?
After all, they may go bananas for your next product that you will launch next month!
To keep those people on your list, you can add a trigger link in your selling emails. When a person clicks on that link, they are removed from the sales sequence, but they still remain on your list.
This is such a valuable feature because it decreases your unsubscribe rate and gives subscibers more control over what type of content they want to receive from you.
Here’s an example I used in a recent product launch:
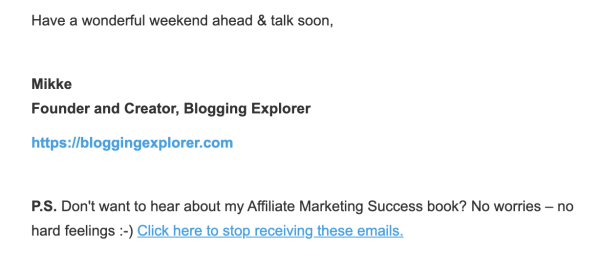
This feature alone can make a huge difference in your blogging income. It simply allows you to keep potential buyers on your list until the perfect product comes along.
And yes, this feature is included in the free plan, too.
How you can get started with MailerLite today
Are you ready to switch to MailerLite already?
If you’re still on the fence for some reason, here are a few more perks you will love:
- Quick-to-create signup forms to embed in your blog posts
- Easy setup for autoresponders
- Powerful automation sequence tools (included in the free plan)
- Clutter-free, easy-to-navigate dashboard
- Easy access to all your analytics and reports
- GDPR compliant signup forms
- Easy targeting and segmenting tools to keep your subscribers happy
- Intuitive customization tools for your forms and emails
But why am I even listing everything here? Click here to sign up in 1 minute for free and give them a try yourself.
Here’s how you can start using MailerLite right now:
Step 1: Create your free MailerLite account
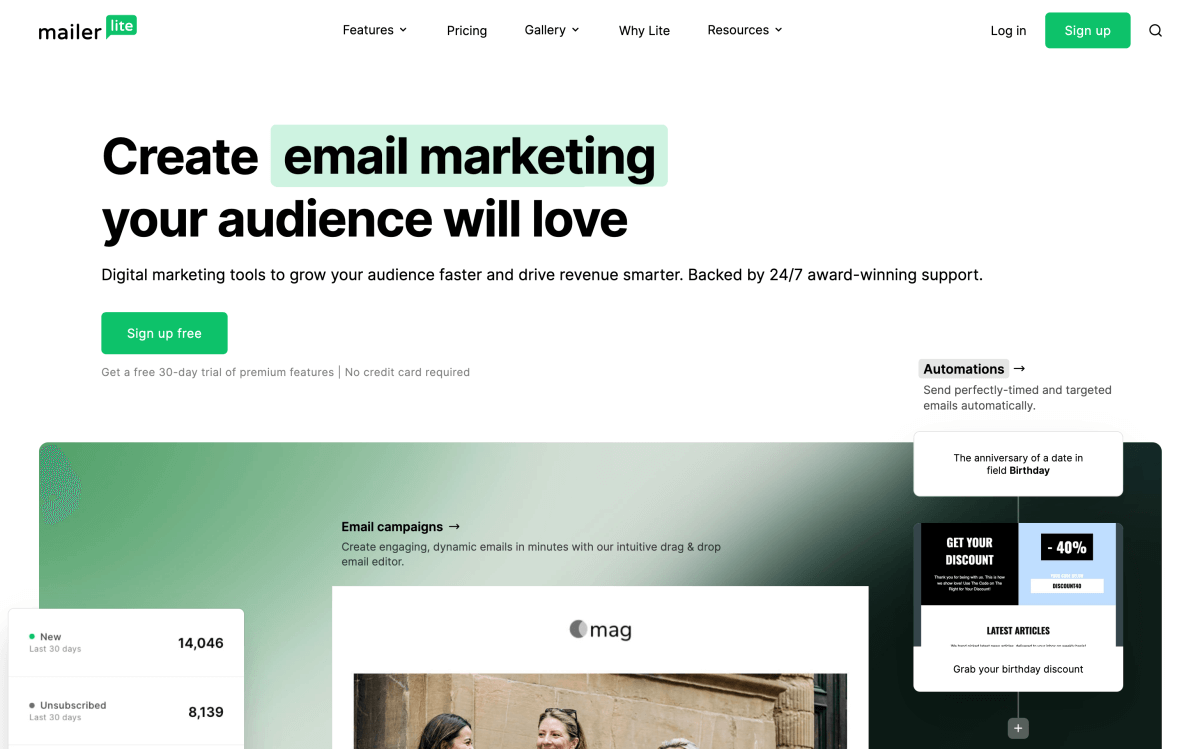
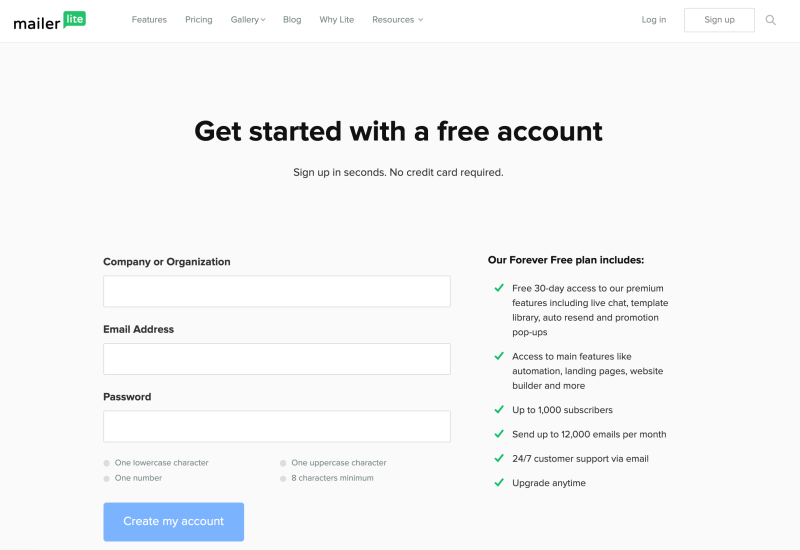
Head over to www.mailerlite.com and click on the button that says Sign up free:
Enter your blog or business name and email address, and set your password. When ready, click Create my account:
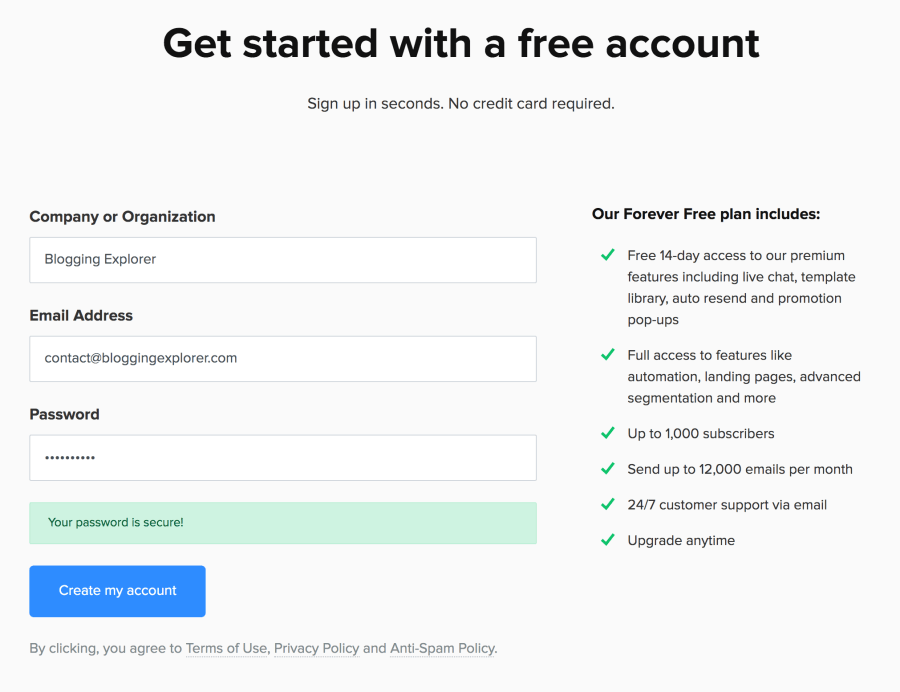
Congrats! You have a MailerLite account now!
Step 2: Navigate your MailerLite dashboard
When you create your account, you will be taken directly to your MailerLite dashboard:
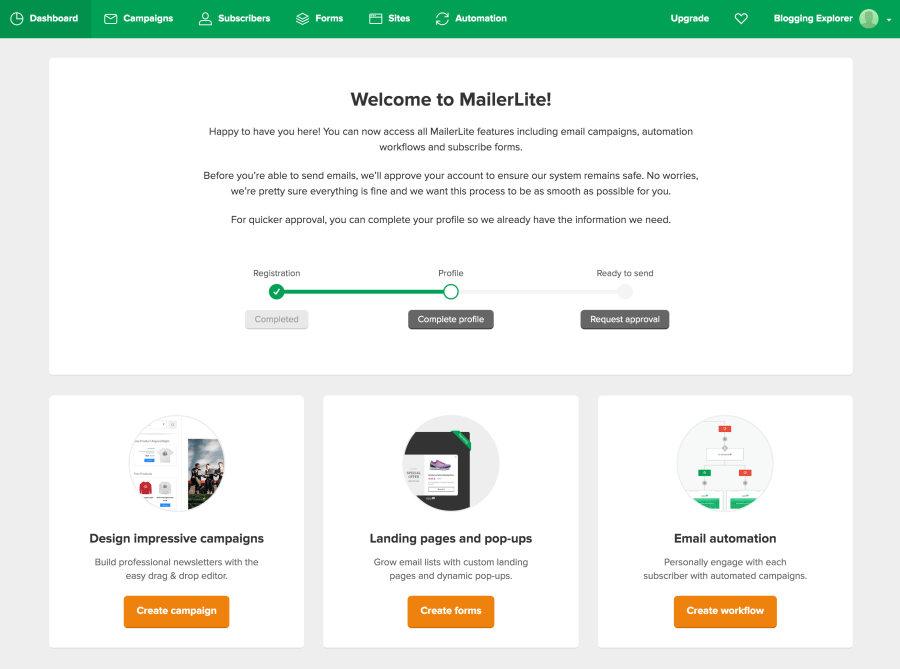
Here you can:
- Create and track your email campaigns
- Manage your subscribers, groups, and segments
- Create signup forms for your blog
- Set up automated email sequences
- Edit your account settings
But before you create your first signup form, let’s take a moment to complete your profile.
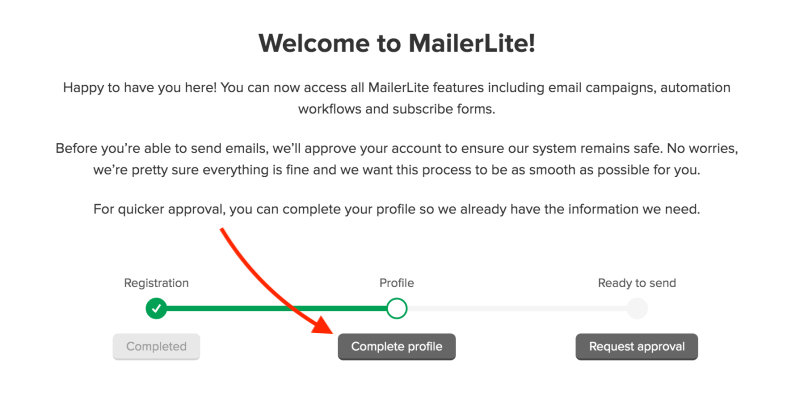
Step 3: Complete your profile
This step is necessary so that MailerLite can review and approve your account. They simply need a few more details to ensure their systems stay safe.
Click on the grey button that says Complete profile:
You will be taken to your profile page where you can fill in these details:
- First and last name
- Organization information: Address, city, and country
- Time zone
- Industry, employees, organization age, and number of subscribers
- Additional questions about how you collect subscribers and what you plan to send out
Also, make sure you read their Anti-Spam Policy. You want to understand what type of marketing is okay and what you shouldn’t be doing.
Feel free to sign up for the MailerLite newsletter and finish by clicking Save at the bottom of the page.
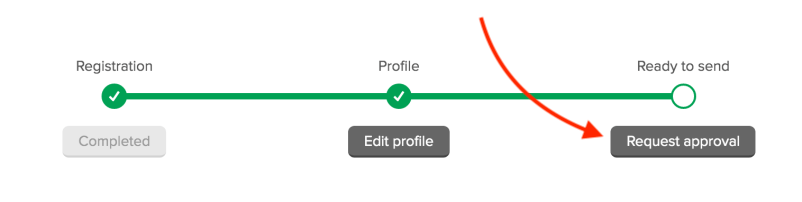
Step 4: Request account approval
Now you will see your dashboard once again. You can now click on Request approval:
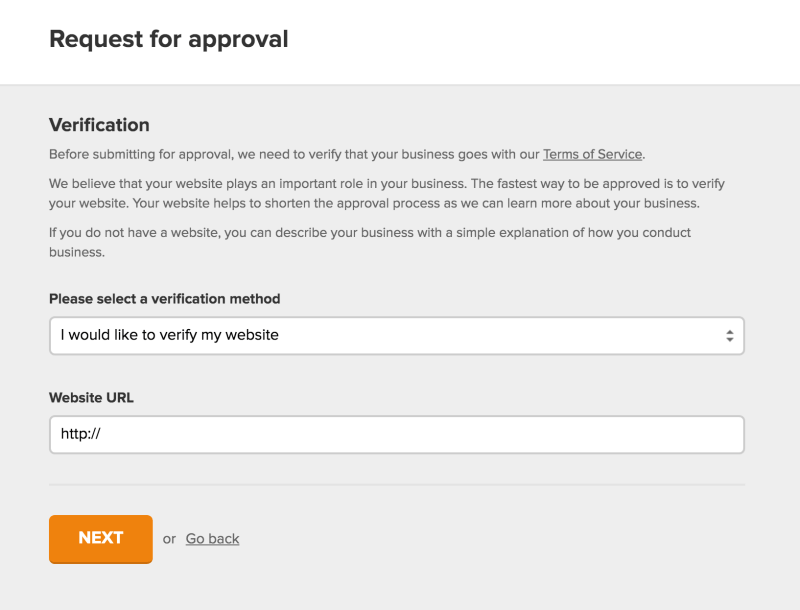
On the next page you can verify your website or blog. Simply enter your website URL in the designated field and click Next:
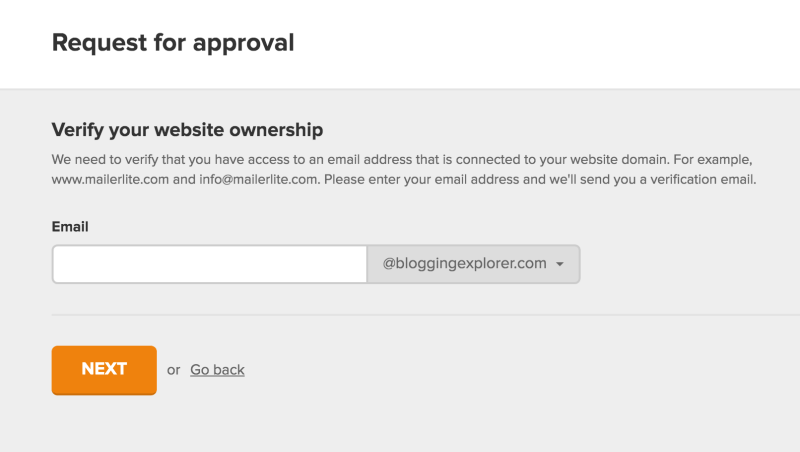
In the next step, you need to enter your email address that is connected to your domain name:
Again, you will be taken to your MailerLite dashboard where you can double-check the email address you just entered.
If you don’t receive a confirmation email in the next few minutes, make sure the email address is correct. If you need to, you can resend the confirmation email.
Check your inbox to find the email from Mailerlite and simply click the beautiful green button Confirm my email address:
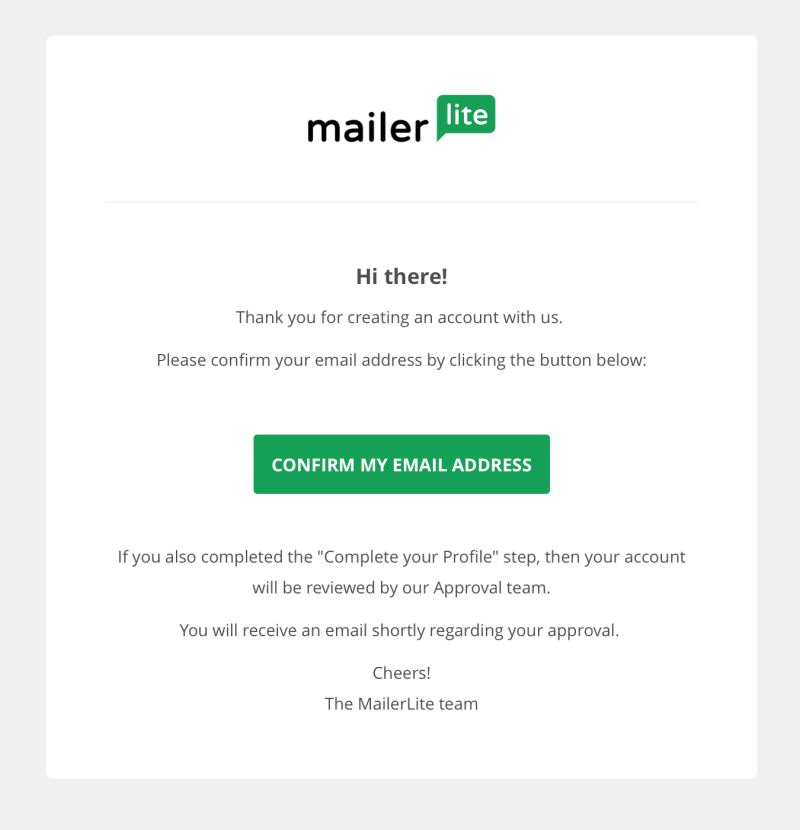
This will take you back to your dashboard. Your account will now be reviewed and an account manager will contact you within 24 hours:
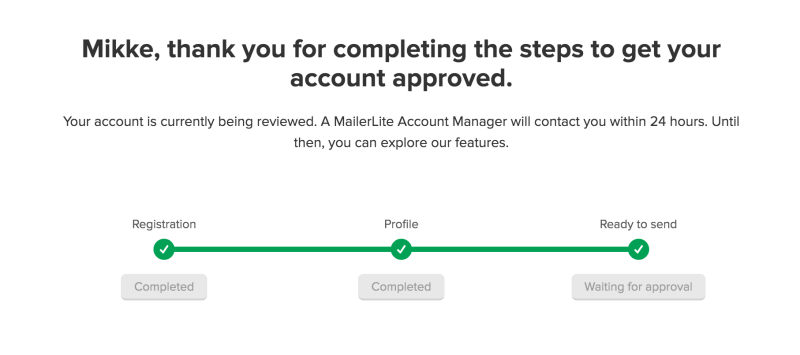
All you can do now is wait. But feel free to explore the different features in your dashboard now that you have a few moments!
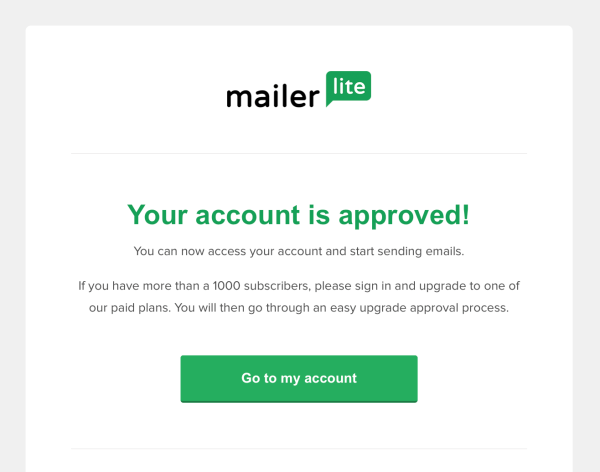
Now don’t go anywhere! Your account can be approved in less than 10 minutes. I waited for 7 whole minutes to get an email saying my account was approved:
Step 5: Explore your MailerLite dashboard
Now that your account has been approved, your dashboard looks different:
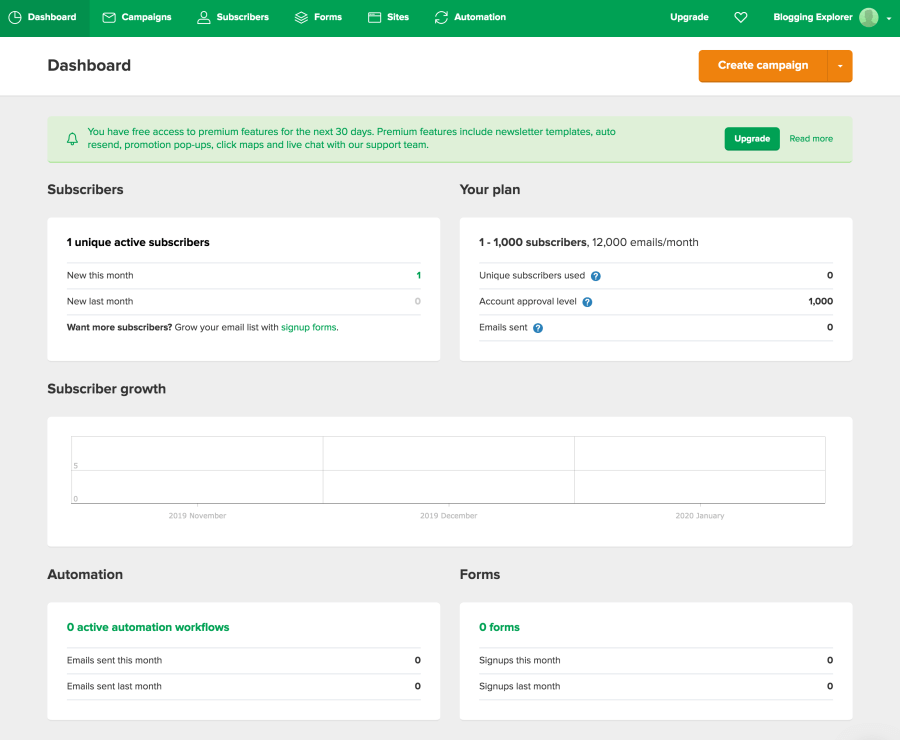
When you start getting subscribers, you can easily track the growth here.
Also, you have a clear overview of your plan, your automated campaigns, and your signup forms.
As a cool bonus, you will also get access to all their premium features for 14 days.
So, if you plan to grow fast, you might as well get familiar with the premium features now, too. You can decide whether you want to upgrade any time.
Step 6: Create your first signup form
Time for the fun part: let’s create your first MailerLite signup form!
The easiest way to collect subscribers is to use either embedded forms within your content or pop-up forms.
Here is a helpful step-by-step tutorial to create your first embedded form to start growing your email list right away:
Final thoughts: MailerLite review for bloggers – Is it worth it?
Phew, this MailerLite review was a lot to take in. I hope you’re still with me!
I know it’s a lot to think about, and getting started with a new email marketing tool can feel like a huge leap.
But trust me, MailerLite makes things super easy for you. I really encourage you to peruse their features and create your account today.
You can create a signup form within minutes and start collecting email addresses from your readers right away.
I totally understand if a paid email tool isn’t within your budget right now. In that case, MailerLite is the perfect option for you because you get full access to their most powerful features even with the free plan.
Their free plan is the best one out there. No other free email marketing software comes close to the features included.
And if you want to make the best investment into the growth and success of your blog, their paid plans are the way to go. They are the most affordable plans you can find – with the most powerful features out of all the providers I’ve tried.
Plus, with this link, you get a $20 credit when you sign up. You know, just in case you wish to upgrade in the future.
But the choice is yours, and you should think about your long-term blogging goals when setting up your email marketing system.
I know choosing the best email marketing software for bloggers can feel daunting. That’s why I wanted to give you a few insights in this article to help you find the best too for your needs.
What email marketing software are you using right now? How does it compare to MailerLite? Drop me a line in the comments below, I’d love to hear your thoughts!
P.S. If you found this MailerLite review helpful, please share this post with others and pin it to Pinterest! Thank you!